


If you are familiar with After Effects, you’ve probably come across the dreaded disk cache error message. If you’re not sure what it means, it is quite easy to click past and carry on with your work, but previewing it will be challenging. Fortunately, we have 10 quick fixes for the After Effects preview error to get you back to animating.
Summary
Part 1: 10 Smart Fixes for the Cached Preview Error in After Effects
When you preview your work in After Effects, the software creates render files, which are saved to your hard drive and RAM. The After Effect preview error lets you know that it doesn’t have enough space to render your project thoroughly and won’t preview your work. The lack of space can result in a low-quality playback, and in some cases, no preview at all.
If you are using 3D cameras in your project or a third-party plugin such as Element 3D, the solutions might be a little more in-depth. But first, go through our list of 10 quick fixes until the error is resolved.
1. Purge RAM Cache
Your RAM cache is where After Effects saves all the rendered preview files associated with your projects. While these files are not massive on their own, they can quickly build up to cause issues with your storage. To purge the cache, go to Edit > Purge > All Memory. This will clear all of the cache files saved to your machine’s RAM.

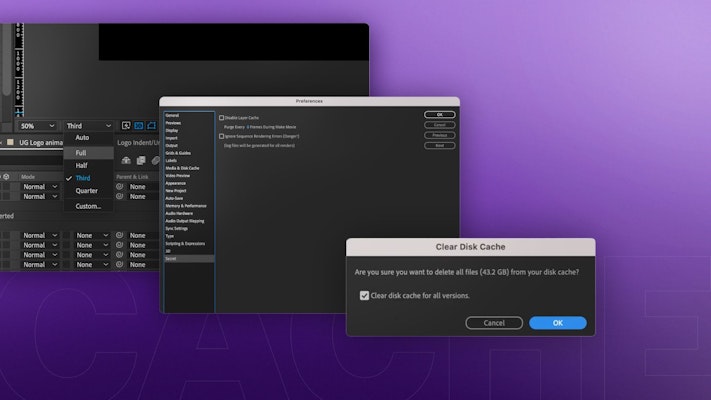
2. Empty Disk Cache
After Effects saves cache files to both your RAM and your hard drive, if you have cleared your RAM and still get the error message, it is worth trying to empty your disk cache as well. This handy function is located just above the RAM option – Edit > Purge > All Memory & Disk Cache.
3. Close Out Unused Programs
To prevent programs from competing over your system memory, make sure you close all other applications. This can be annoying when working between After Effects, Adobe Premiere Pro, or Adobe Illustrator, but working your system too hard can cause ongoing issues.
4. Increase the RAM
If you do need to have multiple programs open simultaneously, Adobe will let you set how much RAM is allocated to those other programs. Go to Preferences > Memory to view the RAM allocated to Adobe and drag the RAM number as high as it will go. You can always change this later if you need more RAM for other programs.
5. Change Disk Cache Location
A typical problem animators don’t know about is that Adobe After Effects will struggle to read and write files to the same location. You should have a separate storage solution for your project files and your cache files for the best workflow. Most AE users will create their project on an external drive, while the cache files are saved to the local drive.
To change the disk cache locations, go to After Effects > Preferences > Media and Disk Cache > select ‘Choose Folder‘ under Disk Cache.
6. Clean Database & Cache
Another way to clean the media database and cache can also be found in the Preferences menu. However, this method will only delete files associated with footage where the source file is no longer available. Nevertheless, this is an excellent option for using AE consolidation methods when you want to archive a project with the render files.
Go to After Effects > Preferences > Media and Disk Cache and choose Clean Database & Cache.
7. Organize & Simplify Your Project
There are several ways you can organize and simplify your projects to give After Effects a more accessible time rendering your work. AE struggles in having too many pre-comps within pre-comps, so check how your project is structured and see if you can simplify it. If it is an extensive project, try dividing it into smaller ones to work on in sections.
You should also check your pre-comp sizing. When importing graphics, you can quickly end up with huge composition sizes. These large comps will then be scaled down as a whole, but AE still needs to read the pre-comp file.
You can also simplify your project by removing any unused footage or imported files. This is usually done once a project is finished and you want to archive it, but it can help speed up your system. Go to File > Dependencies > Remove Unused Footage.
A final option to consider for simplifying your project is to optimize your effects. Some of the After Effect effects can be pretty difficult to render. Try turning your effects off to see if the playback is improved. If you can, move your effects to adjustment layers that can be switched on and off easily.
8. Set Your Region of Interest and Work Area
Minimizing your region of interest and work area can help AE create smaller, quicker render files because it looks at a smaller or shorter portion of your composition.
To change your work area, drag the in and out points of your timeline to view only the portion you want to preview. You can also place your playhead on the timeline and use the B and N keys to create in and out points.
To set your region of interest, choose the Region icon from the bottom of the viewer and draw a box on our screen covering the area you wish to view. Once you’ve watched your preview, uncheck the Region icon to go back to the full view.
9. Re-Import Your Rendered Clips
Re-importing your rendered clips should be used as the very last choice, as it can create an incredibly challenging workflow. Essentially, you would render out portions of your video and re-import them as video files.
Exporting and importing sections of your project can be incredibly helpful when you have a clear workflow, for example, rendering out video footage with heavy effects and re-importing them as clips for a motion graphics frame. However, if you might need to go back and change elements in your exported comps, it can create an incredibly convoluted workflow.
10. Optimize Your Machine
If you’ve given these methods a go and are still getting the preview error message, it might be time to look at your overall device. If you have recently updated your software or operating system, there may be some conflicts causing the issue. Adobe has all the system spec information available on its website.
Part 2: 3 Additional Tips to Avoid Slow Preview in After Effects
If you are not getting the After Effects preview error but your playback is still struggling, there are a few things you can try to preview your work better.
1. Skip Frames
After Effects lets you choose the frame rate you preview your composition without changing the project frame rate. You can also choose to skip frames, which can help After Effects smooth the look of your preview.
- To open the Preview settings, go to Window > Preview.
- In the Preview panel, choose your preferred Preview Frame Rate.
- Choose to skip every 2 frames.

2. Change Preview Quality
If you want to preview the speed and flow of your animation but are not too worried about seeing it in HD, you can change the preview quality. For example, changing your playback to just Half the quality will result in smaller and quicker to create render files.

3. Speed Up Rendering
There are also a couple of boxes you can check to help After Effect speed up the rendering process.
- Go to After Effects > Preferences > hold Shift and click on General.
- In the left-hand column, select Secret.
- Select Disable Layer Cache and Ignore Sequence Rendering Errors.
- Under Purge Every, adjust the number of frames to 2.
As you can see, preview errors are a common occurrence in animation work. Ensuring your machine is kept organized and well maintained will go a long way to preventing an error in the first place. Hopefully, you have reached the bottom of this tutorial, and your After Effects preview error has been fixed. If you’re having problems rendering your projects, check out these 5 troubleshooting tips.


