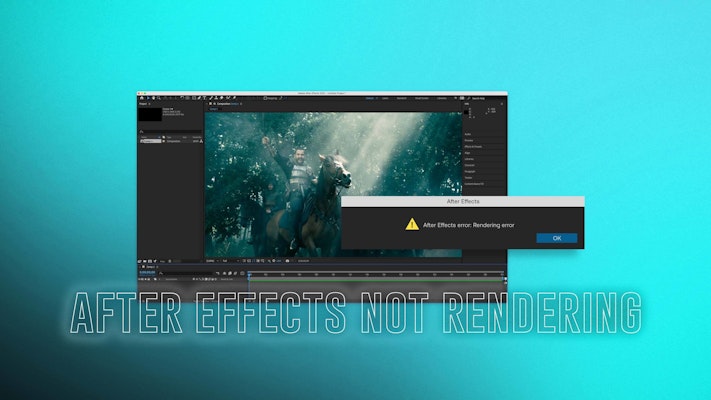
If you’re having trouble with After Effects not rendering after you’ve completed your composition, don’t despair, this tutorial will walk you through five easy steps you can take to troubleshoot rendering issues. Below you will learn about the Rendering Queue, Media Encoder, using CPU rendering, flushing the cache, and using the “secret” preferences panel.
Whenever you add effects, images, or video clips, After Effects must render the results for you to preview or export. This process is largely done in the background, without your knowledge. But sometimes during the final export, rendering problems can pop up unexpectedly.

Summary
What to Do if After Effects is Not Rendering
Running into a rendering error after you’ve completed your composition can be extremely frustrating. On top of that, diagnosing the cause of an error can be quite difficult. That’s why we’ve outlined five steps for you to overcome the problem. If your issue is that After Effects is shutting down, check out this troubleshooting resource instead.
1. Use the Render Queue Panel
This is the most common way to render and export your After Effects projects. If you’re new to After Effects, this procedure may be new to you and worth reviewing to make sure you’re doing it correctly. If you’re an AE veteran, you may want to skip ahead.
- When you’ve completed your composition in After Effects, add it to the Render Queue by selecting Composition > Add to Render Queue from the top menu bar (shortcut Control + Command + M).
- The Render Queue panel should appear at the bottom of your After Effects window. Click the blue Best Settings to open the Render Settings window where you can choose your export options such as Frame Rate and Motion Blur. Close this window when you’re done.
- Below Render Settings is the Output Module. Lossless is a good preset for short compositions that you want to import and edit in an NLE like Premiere Pro. If your composition is longer, however, the Lossless preset may produce gigantic files that quickly fill up your hard drive. You can produce smaller video files using Media Encoder, which is covered in the next section.
- To the right, you should see Output To. By clicking the blue text here, you should open a pop-up window where you can choose the destination of your exported video file.
- Once you’ve set a destination for your render, a button should appear at the top right of the Render Queue panel that says Render. Click here to begin rendering your file.
- You can watch the progress of the render as the blue status bar fills up at the top of the Render Queue panel. When it’s finished, your file should appear at the destination you’ve set.
The built-in Render Queue is the most common export method for After Effects projects, and if you follow the above steps, you should be able to output your video compositions without a hitch. Unfortunately, errors do occur from time to time. Below we’ve outlined a few additional methods you can employ to make sure your composition renders correctly.
2. Render Using Media Encoder
Adobe Media Encoder is the creative cloud suite’s catch-all media export program, which can output your files from After Effects, Premiere Pro, Photoshop, etc. It includes a handy selection of useful presets for common platforms like YouTube and Vimeo.
If you’re having trouble rendering your final composition using After Effects’ built-in Render Queue, then you might have more luck with Media Encoder. Although it’s a separate application, it comes bundled with the Adobe CC suite. It’s pretty easy to use too, even if you’ve never opened the program before.
- Open After Effects and Media Encoder on your computer.
- In After Effects, once you’re ready to export your project, choose File > Export > Add to Media Encoder Queue.
- Switch over to Media Encoder. You should see your After Effects project appear in the Queue panel on the right side of the screen.
- To the left of your After Effects Project in the Queue panel, you should see the word Format with a small beneath it. Click this arrow to drop-down a list of all the formats you can output to. Choose your preference. In this example, we’ll be choosing H.264 because this is a very common format for online video sharing.
- To the right of Format, you should see a similar drop-down option for Preset. Click here and choose the best preset for your output. For this tutorial, we’ll choose Youtube 1080 Full HD.
- To the right of Preset, there’s a field to choose your Output File. Click here and set the destination where you’d like to save your final output file.
- When everything is set correctly, press the green arrow at the top right to Start Queue (keyboard shortcut Return).
- You can watch the progress of your export in the Encoding panel at the bottom of the screen.
Under most circumstances, your After Effects project should render in Media Encoder without a hiccup. If you’re still encountering difficulty, such as an error message, you may want to continue with the following troubleshooting steps below.
3. Switch to CPU Rendering Instead of GPU
After Effects can take advantage of several GPU technologies, like OpenGL and Metal, these allow you to render your compositions using high-performance graphics cards quickly.
While convenient, this feature has been known to cause render problems from time to time. If your render keeps failing, you may want to try switching this option off for the time being and render with just your CPU, also known as Software Rendering.
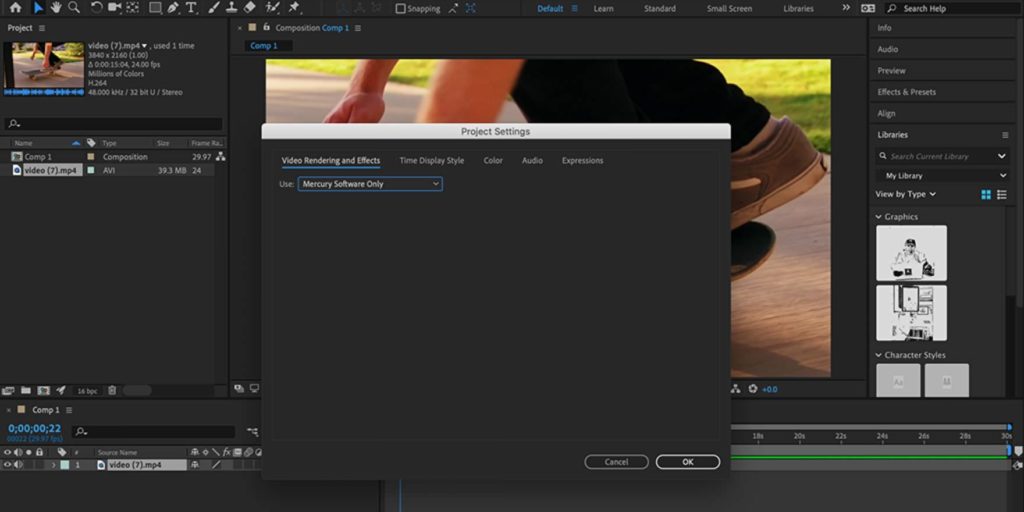
- Navigate to File > Project Settings on the top menu bar.
- Under Video Rendering and Effects, change the drop-down option to Software Only.
- Render your project using the Render Queue or Media Encoder as outlined above.
CPU rendering can be much slower than GPU rendering, so you may need to wait sometime to see the results. And don’t forget to change back to GPU rendering when you’re done!
4. Flush the Cache
Behind the scenes, After Effects is storing renderings of your work as you go. This allows you to quickly preview your composition without having to wait on render times as you work. Generally, this is a helpful feature, but sometimes cache files can become large or contain errors that disrupt your rendering performance. When this happens, it’s helpful to clear the cache.
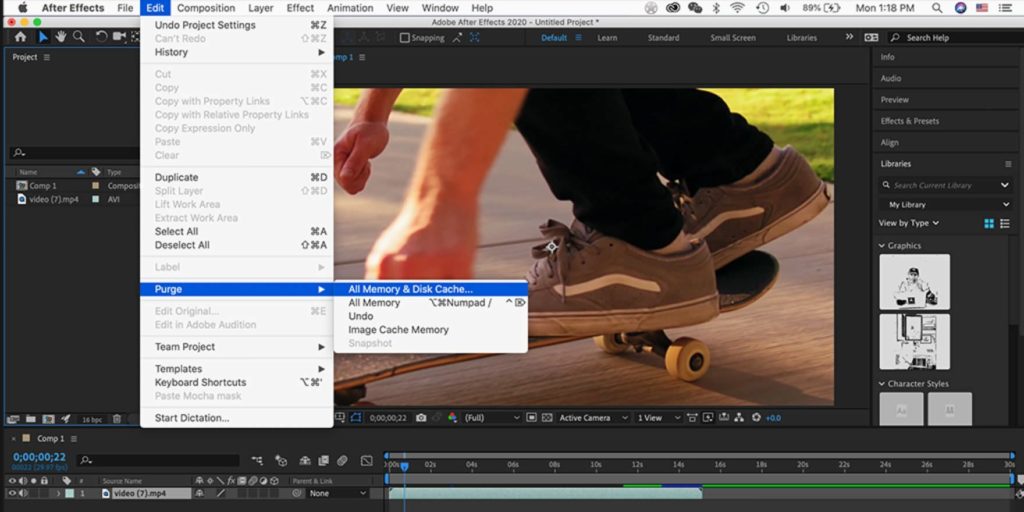
- Navigate to Edit > Purge > All Memory and Disk Cache.
- A pop-up should appear asking for confirmation. Click OK.
- A blue progress bar will appear. When it has filled up, your cache has been cleared.
- Try rendering again using the Render Queue or Media Encoder.
5. Use the Secret Preference Settings
If you’ve gone through the troubleshooting steps above to no avail, there is one last trick to be tried. Adobe has hidden a covert settings menu for last resort bug-fixing. Adjusting the preferences in this panel should only be used if you’ve tried everything else: it’s time for the secret Preference panel.
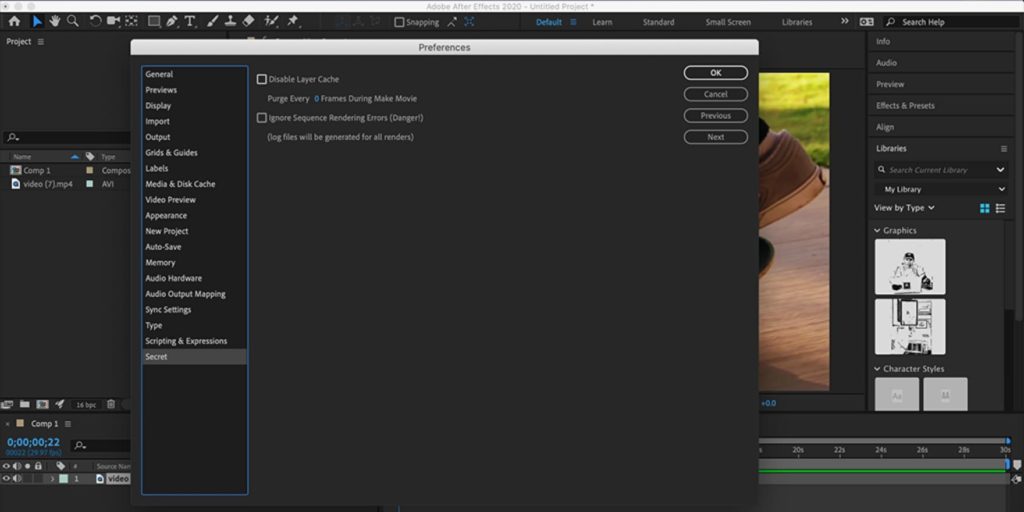
- If you’re a Windows user, select Edit. If you’re a Mac user, select After Effects.
- Hold down Shift and select Preferences.
- Choose General, and don’t let go of that Shift key!
- When the Preferences window pops up, you will notice a Secret category available at the bottom. Open it.
- Try adjusting these options. You can Disable Layer Cache and Ignore Sequence Rendering Errors.
- Select OK then try to render again using the Render Queue or Media Encoder.
The section is hidden for a reason—these are not settings you should normally adjust. So make sure when you’re done, you go back and disable anything you changed!
That covers our 5 basic steps for overcoming render errors. By using the Render Queue, Media Encoder, CPU rendering, flushing the cache, and the elusive “secret” settings menu, hopefully, your rendering issues are far behind you.
Now that you’ve solved your rendering problems, there’s a lot more to do in After Effects. If you’d like to upgrade your AE toolkit, Motion Array has thousands of curated After Effects templates and presets available for download so you can produce stunning projects in minutes!