


Spray Paint effects are super cool and can be used across various project types, from music and events videos to slideshow text and transitions. There are many Spray Paint effect templates and plugins, but it is straightforward to create this effect from scratch. So let’s jump straight into creating an After Effects Spray Paint look.
Summary
Part 1: Create a Wavy Spray Paint Animation in After Effects
Step 1: Create the Spray Paint Wave
The first step is to create our basic spray paint shape. You may want to try some excellent effects, such as spray painting text or a logo, and this method can be used for just that. If this is your first time creating a spray paint effect, it might be best to stick to a simple shape to follow along.
- Create a Shape layer and name it Paint 1.
- Select the Pen Tool and create your Spray Paint wave on the screen, paying close attention to the curves in your lines.
- Increase the Stroke until you are happy with the basic width of your line.
- Change the ends of your line to Round Cap in the layer Effects dropdown.
- Go to the Effects Arrow in the layer panel and select Trim Paths.
- In the Trim Paths properties, create a keyframe for the End setting at 0.
- Move the playhead to where you want the animation to finish and create a 2nd keyframe for the Trim Paths End setting of 100.
- Select both keyframes and add an Ease Ease by pressing F9 on your keyboard (Tip: hold fn and press F9 if you’re using a MacBook).
Step 2: Create the Spray Paint Look
You should now have a moving line that animates the way you want but doesn’t look a great deal like Spray Paint; this next step will add the texture you expect with this look.
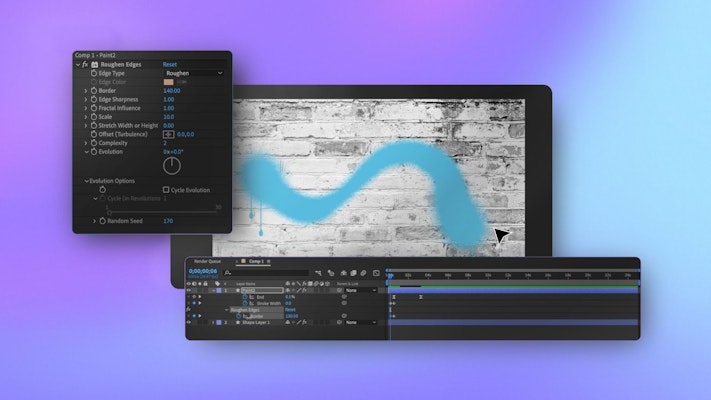
- In the Effects Control panel, search for Roughen Edges and drag it to your shape.
- Again in the Effects Control panel, change the Scale to 10 and the Border to 75.
- Adjust the Stroke Width if you want to make your paint spray thinner or thicker.
- Select the Shape layer in the timeline and press Cmd/Ctrl + D to duplicate it; rename this second layer Paint 2.
- Select the Paint 2 layer and increase the Stroke to at least double your Paint 1 layer.
- In the Effects Controls panel, change the Border for Paint 2 to 140 to create a lighter paint spray.
- In the Evolution options, change the Random Speed setting to create a slightly different effect around your stroke’s edging.
- Select the Pen tool, ensuring the Pen Creates Mask box is checked.
- Draw a mask around the start of the stoke in Paint 2, tapering off to create a bulge shape at the beginning of the line.
- You may notice a harsh straight line through your Roughened Edges effect; to correct this, draw a 2nd mask on the same layer slightly off-screen.
Step 3: Animating the Start and End Paint Blob
A vital part of a realistic-looking spray paint effect is the slightly thicker bulge at the start and end of each line. Now we have created that look, we need to ensure the animation of our bulges matches the animation of our line.
- Select the Paint 2 layer and go to the 1st Trim Paths keyframe. Change the setting to 0.1.
- At the same point in the timeline, add keyframes for Stroke Width and Roughen Edges Border.
- Move the playhead back 6-8 frames and create new keyframes, changing the Stroke Width and Border settings to 0.
- Adjust your keyframe timing to suit your animation and add an Easy Ease for a more subtle start to the animation.
- Duplicate Paint 2 and adjust the mask for Paint 3 to cover the end of the line.
Optional: You can also add some tapering to the middle of the line. Select your first Paint layer, grab the Pen tool, ensuring the Pen Creates Mask box is checked, and create some subtle masks at the edge of your line. In the Layer Control, find the Mask and select Subtract from the dropdown menu.
Step 4: Create the Drips
Finally, we need some drips to run down at the Start and End of our line to give that excellent graffiti effect.
- Create a new composition, 200 by 1080 pixels.
- Use the Pen tool to create a drip shape and the Rectangle tool to represent the drip line.
- Create a keyframe under the Position settings for your shape at the start of your timeline. Move your drip to the top half of the screen.
- Move the playhead about a 2nd into the timeline, and create a 2nd Position keyframe, moving the drip downwards. Make sure your keyframes have an Ease at the start and end for a more realistic drip effect.
- Go back to your main comp and drag your Drip comp to the timeline.
- Position the drip to come from the budges at either end of your line, and adjust the timing as needed.
- Use the Mask tool to crop out any dripline bits that can be seen above your main spray paint line.
- You can duplicate your drip as many times as you need for your graphic.
Step 5: Apply the Spray Paint to a Background
Your spray paint effect can look pretty cool on its own, but adding a background will give it depth and realism. Pay close attention to your color choices, as some will look better than others on your chosen backdrop.
- Select all the layers and hit Cmd/Ctrl +Shift + C to Precompose your layers.
- Search for the Fill effect in the Effects Control panel and add it to your layer. Adjust your color until you are happy with the look.
- Import your background layer and drag it to the timeline below your spray paint animation.
- Go to the Layer Control panel, and for your graffiti, change the Blending Mode.
Note: It will depend on your background and graffiti color choice, but Multiply, Screen, and Color Burn are great blends to try.
- Adjust the Opacity of your spray paint layer so you can see the background behind it a little.
- Finally, from the Effect Control panel search for and add the Liquify Effect to your spray paint layer.
- Again, in the Effects Control panel, choose the Wave option and decrease your Brush tool size.
- Go through your composition, creating minor adjustments to the spray paint drips where they interact with a part of the wall, such as making little dips where the paint runs between bricks.
Optional Step: Adding Graffiti to a Wall with Perspective
We have shown you so far that it is an excellent way of adding a Spray Paint Effect to a flat wall, ideal for titles, logos, and other messaging. However, if you want to use the effect within a film, you will likely need to add some perspective to your Spray Paint to make it fit.
- Add your background, and resize your graffiti, so you know it will fit.
- Go to the Effects Control panel and search for the Power Pin effect.
- Drag the effect to your spray paint Comp. A box will appear on the screen around your spray paint.
- Drag the corners of the box around your screen; you can see how easily you can change your graffiti’s perspective.
- Use the natural lines in your background to line up the box’s corners until the spray paint lays flat on the wall.
- It can help to go back to the Liquify effect at this point and make any adjustments based on the spray paint position on your wall.
Part 2: Top 3 After Effects Spray Paint Templates
1. Spray Paint Promo Opener
The Spray Paint Promo Opener contains ten text and four media placeholders, ideal for presentation openers and title sequences. The bright spray paint effect highlights the images and text in a modern and minimalist way.
Download Spray Paint Promo Opener Now
2. Graffiti Logo
The Graffiti Logo project is a fun, cartoon-style logo indent, ideal for content creators logo openers. The fun Spray Paint can swiftly fill in the stencil to reveal your painted logo. With an intelligent color controller and customizable Background, you can have a lot of fun with this template.
3. Spray Paint Lower Thirds Titles
The Spray Paint, Lower Third Titles project, contains five beautifully designed and dynamically animated titles, ready to drag and drop to your AE project. Customizable text and colors make this template ideal for adding an artistic flourish to your slideshows and presentation.
Download Spray Paint Lower Thirds Titles Now
Creating a graffiti look is straightforward and easy in After Effects, and once you’ve mastered the basics, your creativity is your only limit. Now that you know how to create After Effects spray paint animation, why not check out some other cool effects you can make from scratch, like this fantastic realistic flame effect.


