Bring your videos to life with animated titles. Whether you’re creating lower thirds, chapter markers, or highlighting important information from the video, animated titles can be a slick and fun way to create on-screen text. There are plenty of different creative styles of animated text, and the one you choose depends on the kind of video you are creating. Here are a couple of After Effects title tutorials to help you decide what works best for you.
Summary
Part 1: How to Create and Animate Titles in After Effects
There are two options we’ll cover in this After Effects title tutorial: the first is a simple line title animation.
1. Simple Line Title Animation Tutorial
It has a simple, clean design that is useful for projects if you don’t want the title to distract from the image or the story. This works well for professional, corporate videos, if you want to convey information like titles, names, and key points of the video. Firstly, open up your project in Adobe After Effects.
To Create the Title Text:
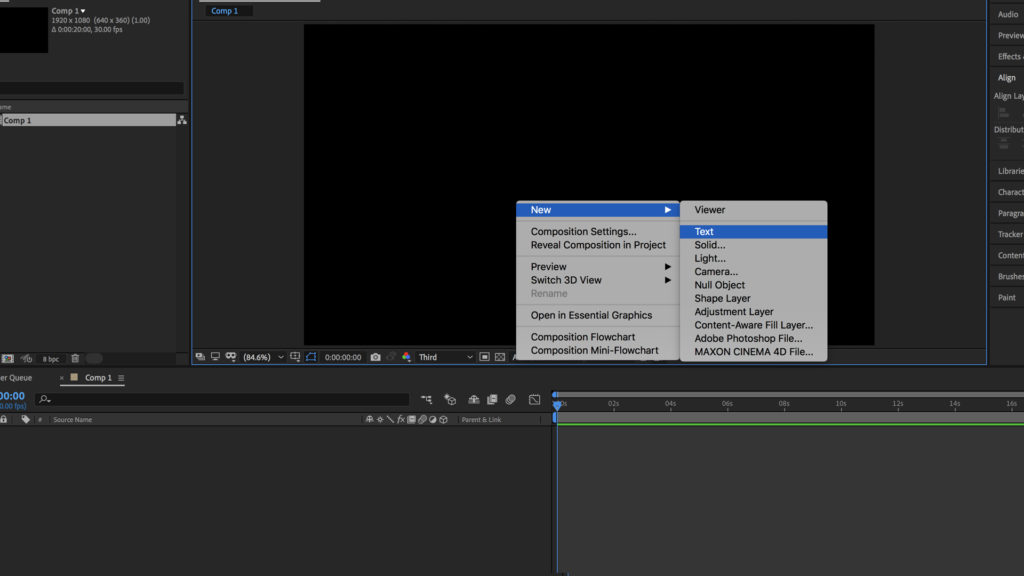
Step 1: Create a new composition.
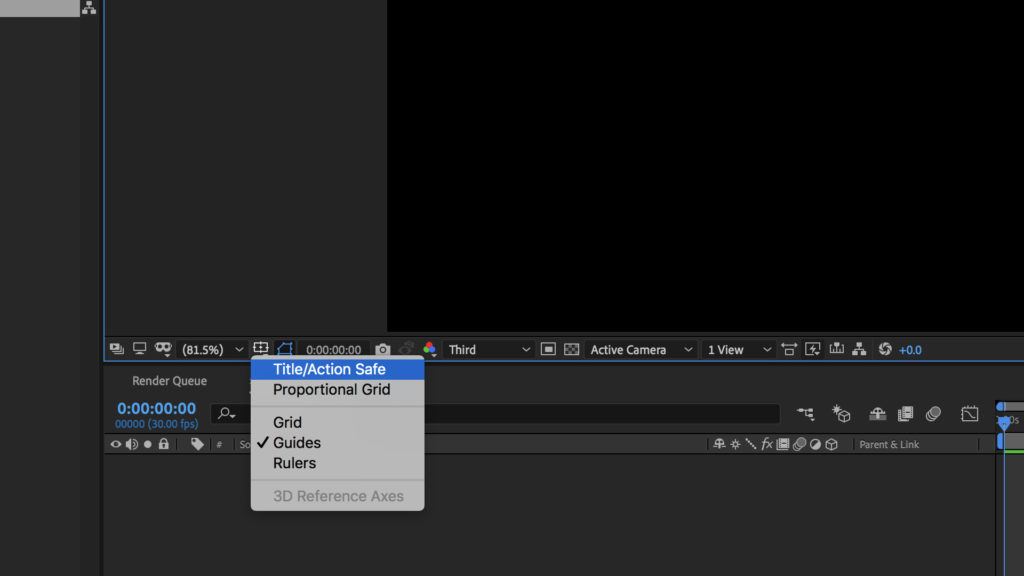
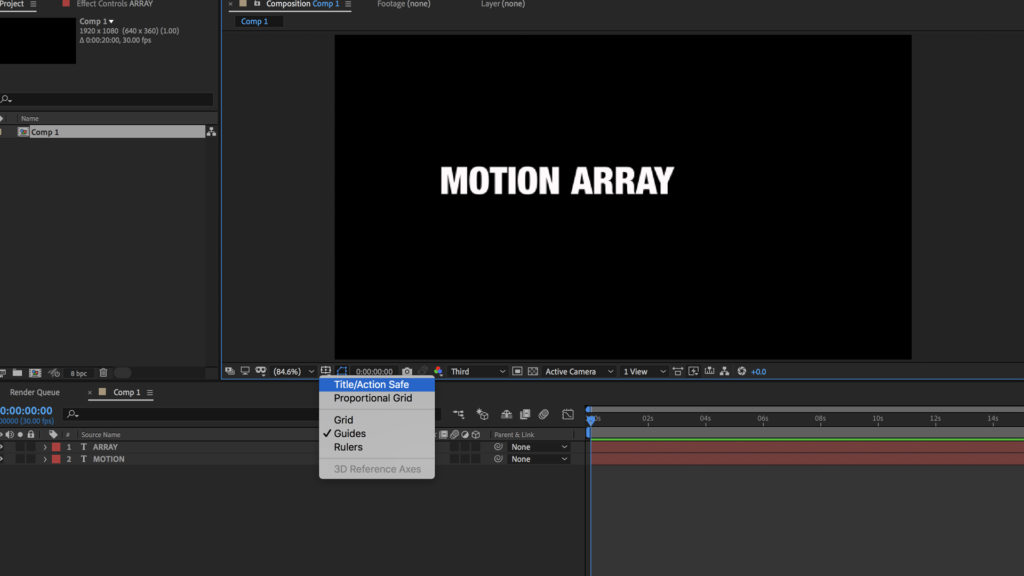
Step 2: Enable Title Safe by going to the crosshair beneath the preview window and selecting Title/Action Safe. This will give you on-screen guidance to ensure you can place your titles in the correct place.
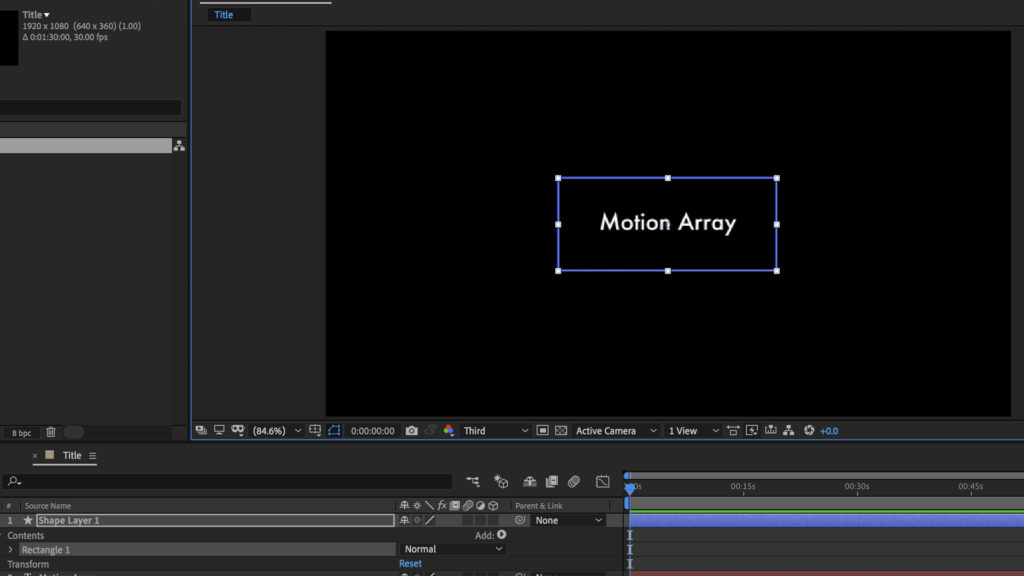
Step 3: Select the Text tool and type out your title roughly in the middle of the screen.

Step 4: Change the font, size, and formatting in the Character window on the right side of the screen.
Step 5: To align the title to center, go to Window > Align and center the text vertically and horizontally.
To Create a Shape around the Title:
Step 1: Click the Rectangle tool and draw a shape around your title.
Step 2: Go to Fill and set it to None.
Step 3: Go to Stroke and set it to a Solid color.
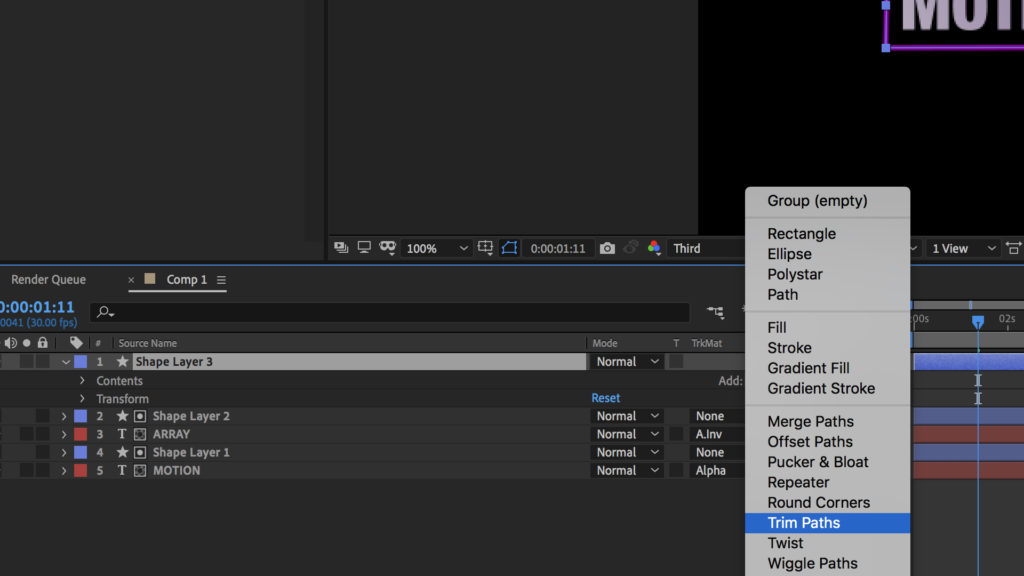
Step 4: Go to the Shape layer, click on the arrow beside Add, then click Trim Paths.
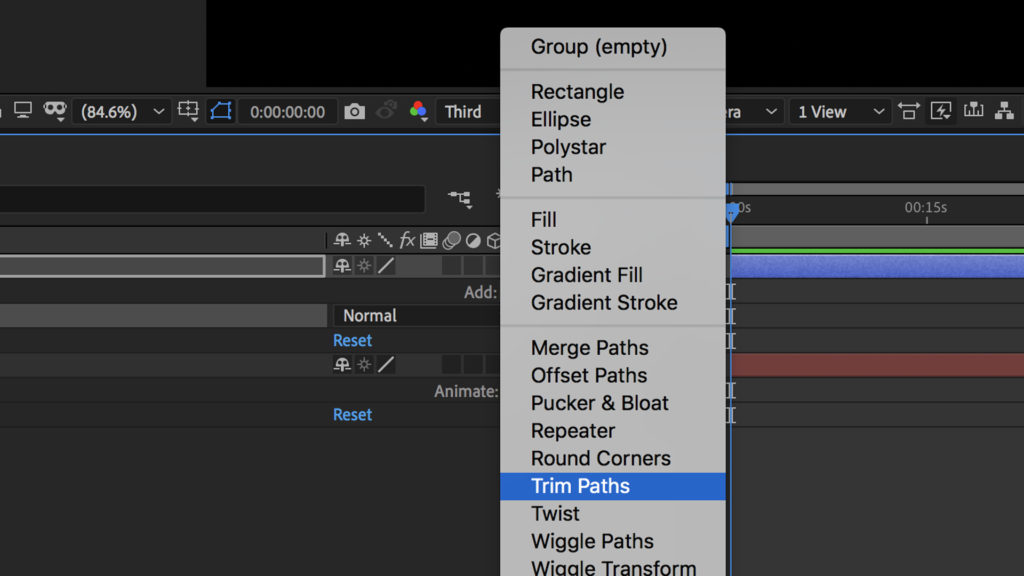
Step 5: Increase the Start and Offset to your liking.
To Animate the Lines:
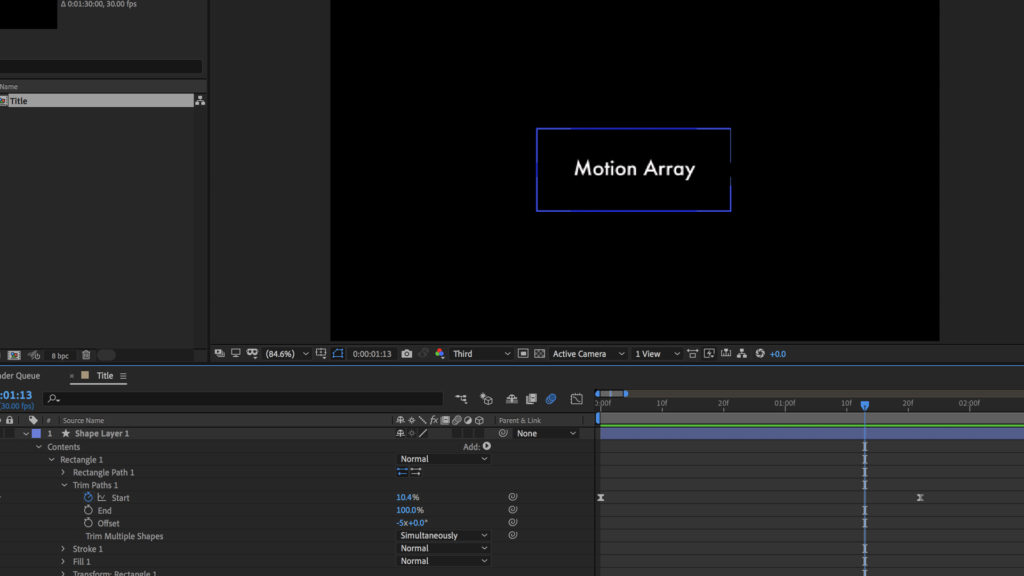
Step 1: Move the Playhead to about 1 second and click on the Stopwatch on the Start icon to create a keyframe.
Step 2: Move the Playhead back to the beginning and change the Start value to your liking.
Step 3: Click the Stopwatch to create a keyframe before the one at 1 second.
Step 4: Select all the keyframes then right-click and go to Keyframe Assistant > Easy Ease. This will start and stop your animation smoothly.
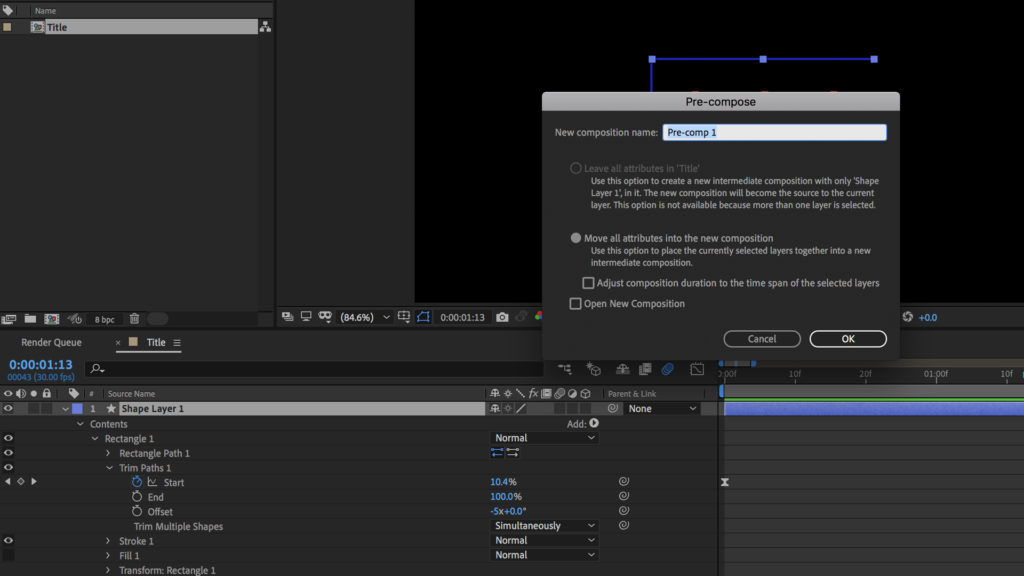
Once you’re happy with how your animation starts, you can design an exit animation. To do this:
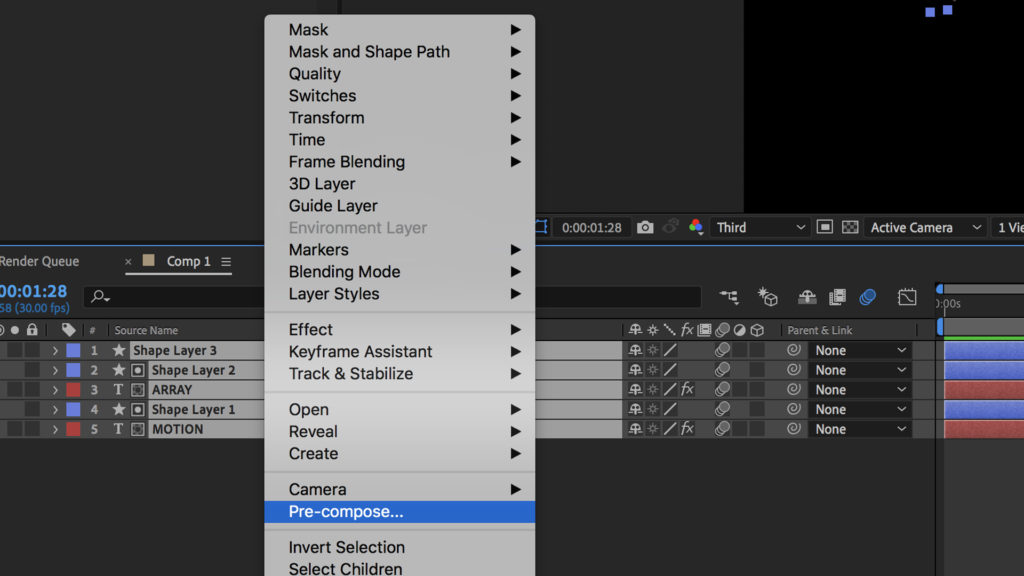
Step 1: Select all your layers then go to Layer > Pre-compose.
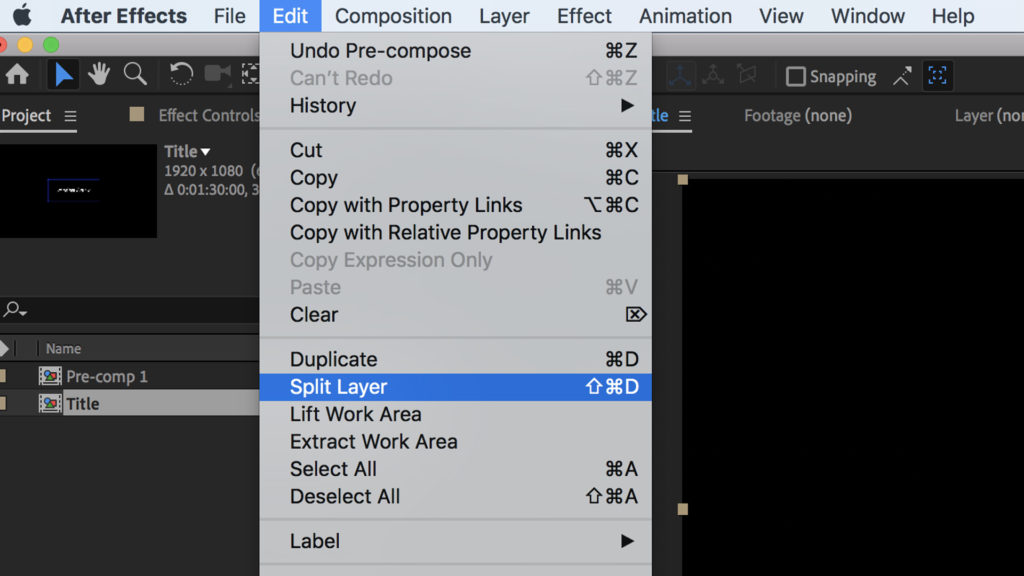
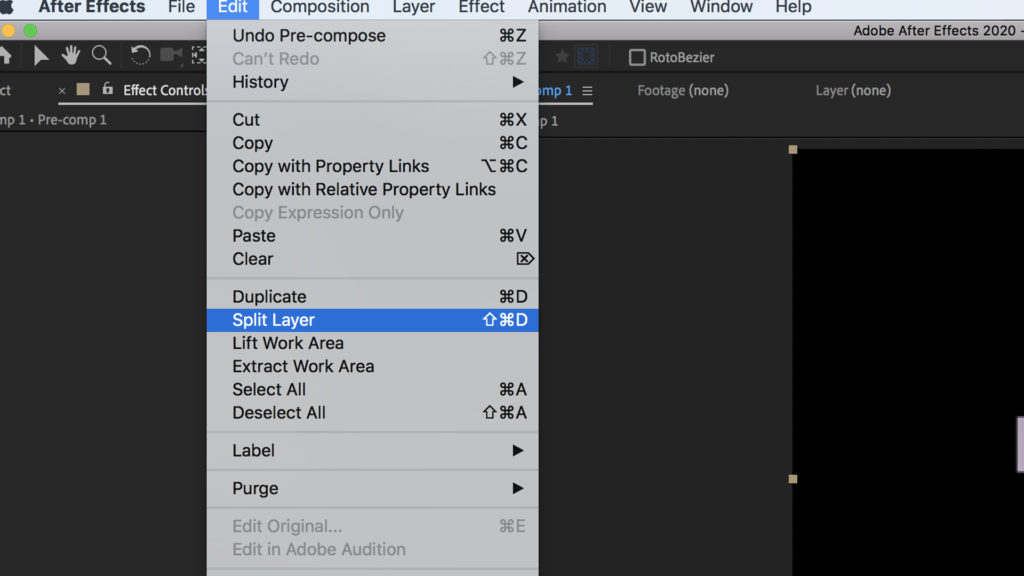
Step 2: Move the Playhead to about 3 seconds and go to Edit > Split Layer.
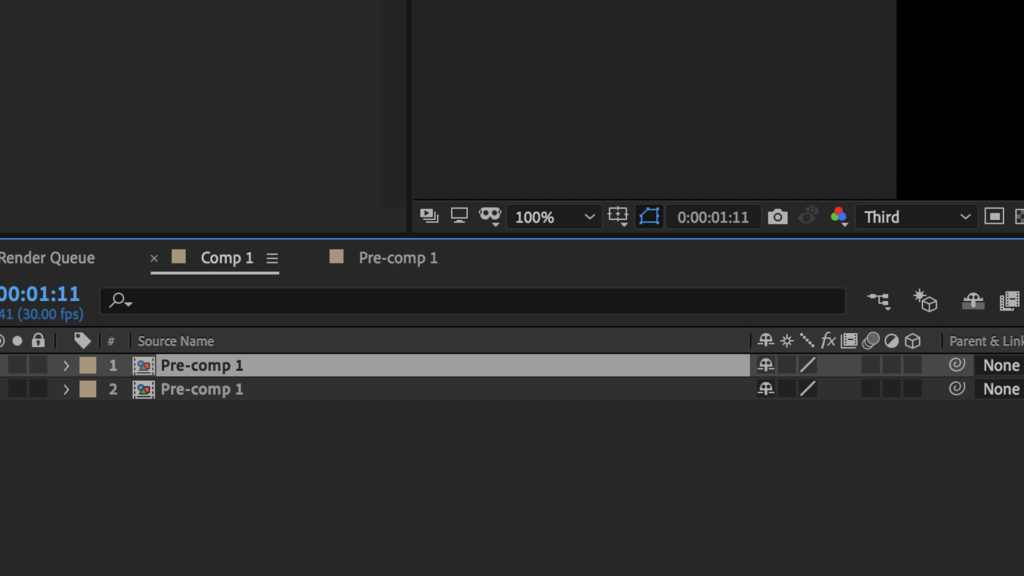
Step 3: Delete the top Split Layer.
Step 4: Select the remaining comp and go to Edit > Duplicate.
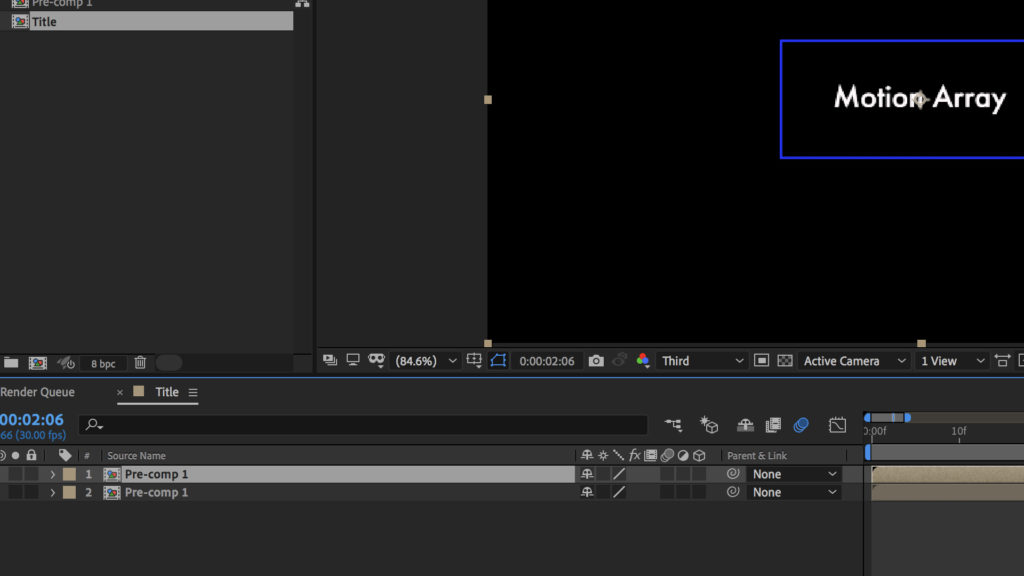
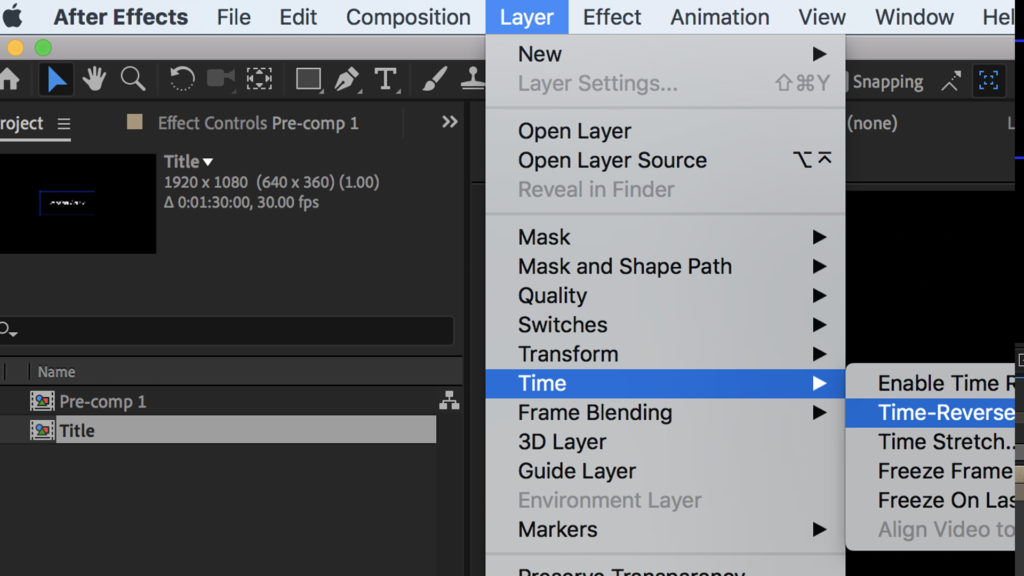
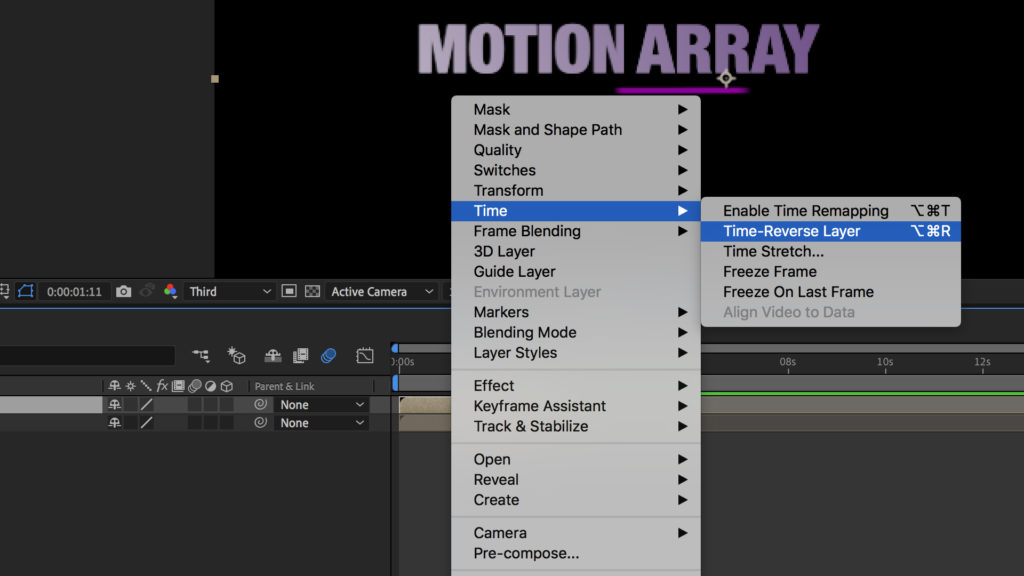
Step 5: Right-click the duplicated layer and go to Time > Time Reverse Layer.
Step 6: Move the duplicated layer to the right until there is no gap between the two layers on the timeline.
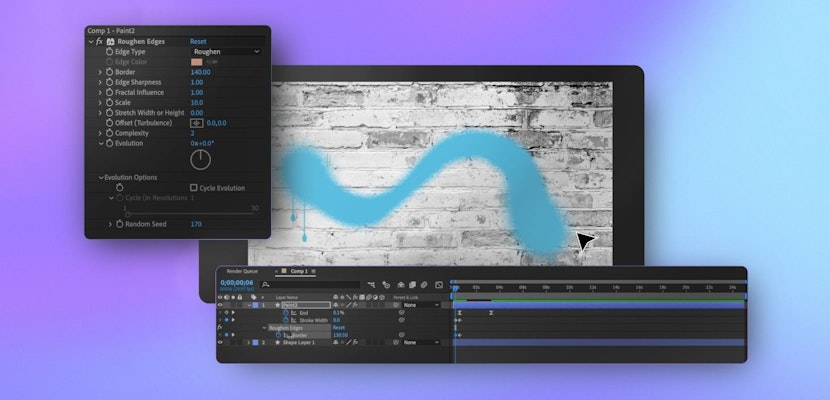
2. Color Title Animation Tutorial
This animation is much more colorful and energetic, and would work great in a fun video.
Step 1: Create a New composition.
Step 2: Use the Text tool to create some text in the size and font you want. You can do this multiple times to create multiple text layers if you want several words.
Step 3: Enable Title Safe by going to the crosshair beneath the preview window and selecting Title/Action Safe. This will give you on-screen guidance to ensure you can place your titles in the correct place.
Step 4: Go to Window > Align and select the icons to center the text horizontally and vertically.
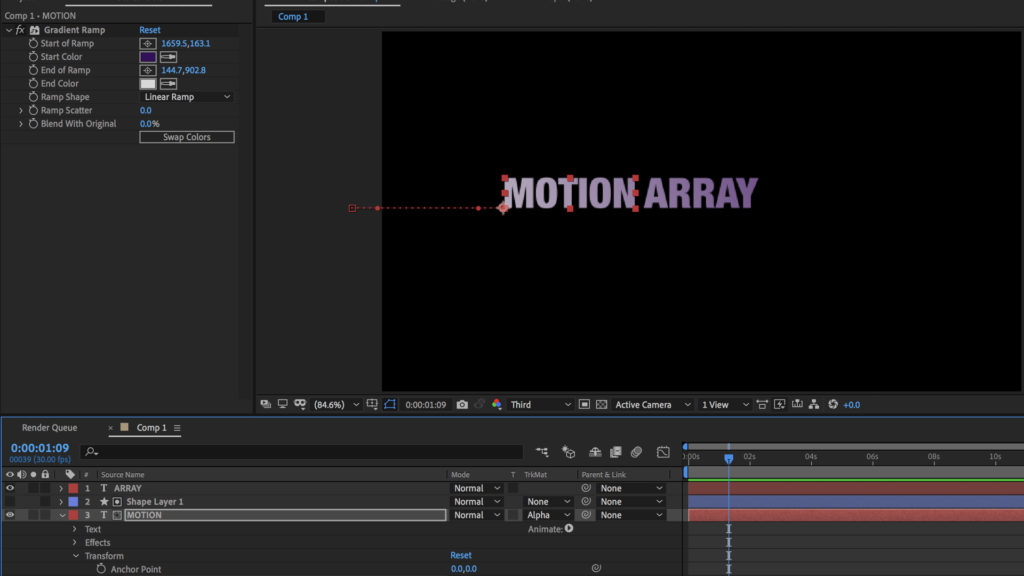
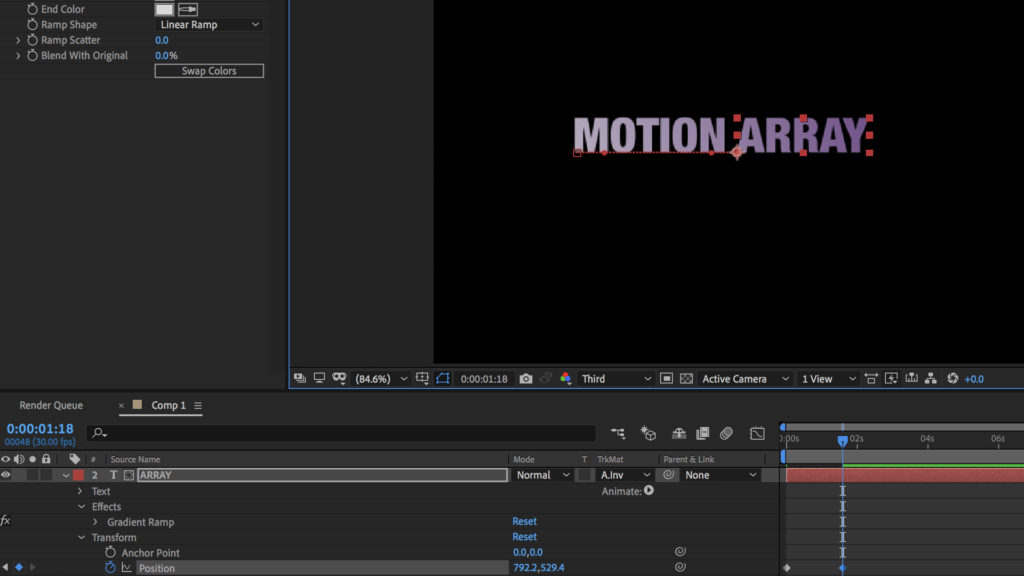
Step 5: Go to Effects > Gradient Ramp and add it to your text layer.

Step 6: Move the points on the screen to adjust the direction and intensity of the gradient.
Step 7: In the Effects window, change the colors to your liking.
To Animate the Text:
Step 1: Move the playhead to 2 seconds on the timeline.

Step 2: Select the Pen tool and create a shape around one of your words.
Step 3: Move the shape just above the word it’s covering in the timeline, and change the Track Matte of the text layer to Alpha Matte.
Step 4: In the Position properties of the text with the alpha matte, select the Stopwatch.
Step 5: Move the Playhead to the beginning of the timeline, then drag the text so it’s hidden by the shape you have drawn.
Step 6: Duplicate the Matte layer and move this one above the first layer of your text.
Step 7: In the dropdown beneath the Track Matte layer on the top text layer, select Alpha Inverted Matte.
Step 8: Create keyframes on your top layer of text and animate it so the two layers of text are moving in opposite directions.
Step 9: Select all the layers (CTRL/CMD + A) and select U to bring out all the keyframes.
Step 10: Select all the keyframes and open the Graph Editor.
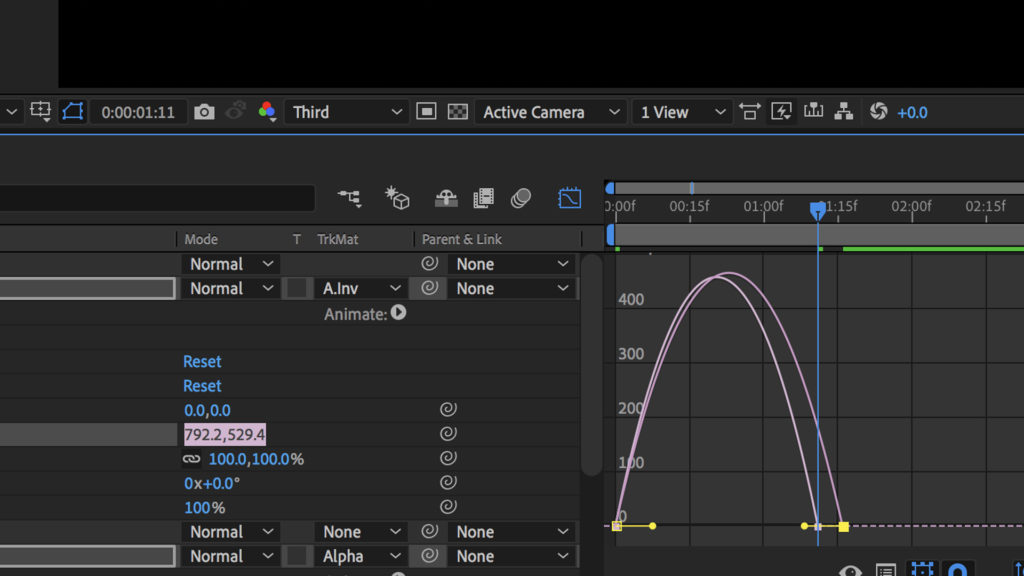
Step 11: Refine the animation to your liking.
To Animate a Shape alongside the Text:
Step 1: Select the Pen tool.

Step 2: Click on the Stroke details and change the value to your liking.
Step 3: Use the Pen tool to create a line shape around the text.
Step 4: Select the Gradient Ramp effect on the text and Copy (CTRL/CMD + C) and Paste (CTRL/CMD+V) it onto the line layer.

Step 5: Add a Trim Path to the line layer.
Step 6: Move the Playhead to the start of the timeline and change the End value to 0. Select the Stopwatch to create a keyframe.
Step 7: Go to 1 second and set the End value to 100. Set a keyframe on the Start property, at 0.
Step 8: Go to 2 seconds and set the Start value to 100.
Step 9: Tweak the position of the keyframes on the timeline until the line image is snaking past the text.
Step 10: Turn on the motion blur of all the layers.
To Create the Out Animation:
Step 1: Select all your layers then go to Layer > Pre-compose.
Step 2: Move the playhead to about 3 seconds and go to Edit > Split Layer.
Step 3: Delete the top Split layer.
Step 4: Select the remaining comp and go to Edit > Duplicate.
Step 5: Right-click the duplicated layer and go to Time > Time Reverse Layer.
Step 6: Move the duplicated layer to the right until there is no gap between the two layers on the timeline.
Part 2: Tips and Tricks for Using Title Animations
If you’re just starting out using title animations, here are a few tips and tricks to consider.
Don’t Overdo It
It can be easy to get carried away with creating elaborate animations and flashy designs, but the truth is that often less is more. Make sure your animation is not distracting the audience from the main point of the video.
Use Complimenting Colors
If you are making a corporate video for a company with brand colors, try using those colors in the titles. This can be an easy way to bring the video together and make it consistent with the brand.
Refine the timings
You don’t want a title to linger on screen for so long it’s all the audience can look at, but you also don’t want it to disappear again straight again. Make sure the title is on screen for as long as people need to read it, and then animate it out in a smooth, unobtrusive way.
Part 3: 7 Cool Title Animation Templates You Can Download Today
The Motion Array library is packed full of awesome title animation templates to try. Here are seven of our favorites.
1. Tip Top Type
This pack contains eight different text animations. Amend the colors, animation timings, font, and the text itself to create bespoke results. Creating beautiful typography for your commercials, online films and social media videos doesn’t get any easier than this.
Download Now
2. Titles
This is a massive downloadable pack of 12 smooth and simple animated titles. Boot up the After Effects project and simply change the font and the colors to get instant results. No plugins needed, this 4K project is the perfect addition to your project.
Download Now
3. 25 Modern Titles
Choose your favorites from 25 animated titles in this After Effects project. Customize the project in mere minutes with easily accessible controls, render it fast and include it in your social media videos. Easy.
Download Now
4. Title Pack
You don’t need a single plugin to make the most of this pack of animated titles. Each layer has its own color controllers to give you completely customizable options. There are 20 different styles to choose from so you’re bound to find something you like in here.
Download Now
5. Cyberpunk Titles
Give your text a retro-futuristic look with this stylish pack of Cyberpunk titles. With a vibrant neon glow and jagged glitch animation, this text would fit right at home in your gritty sci-fi short films. Simply download the pack and change the text.
Download Now
6. Wavy Glitch Titles
This is a pack of mesmerizing, floating neon title animations. Simply edit the text and the colors and hit render to get instant results for your social media videos or presentations. No plugins needed either, so you can jump straight in.
Download Now
7. Pop Titles
This is a bright, vibrant and fun animated After Effects pack with a wide range of styles to choose from. Each one is a unique display of colors, shapes, and eye-catching abstract animation that would be the perfect finishing touch to any video.
Download Now
Animated titles can be the icing on the cake of any video. They are straightforward to create in After Effects, so follow our simple After Effects title tutorials to get started making titles from scratch. If you’re in a hurry, try downloading and using any of the Motion Array title templates from our library. Just remember to change the colors and choose a style that matches the kind of video you are making. Enjoy!