If you’re looking to create your own liquid transition in After Effects, but aren’t sure where to start, this is the tutorial for you! With a quick manipulation of shape layers, a displacement effect, and a liquid squish sound, you’ll have a unique liquid transition in no time.
You can easily customize this tutorial with different colors, positions, shapes, and sound effects, or check out some of the After Effects Liquid Transition presets listed below the tutorial.
Summary
Part 1: Make Your Own Liquid Transition in After Effects
Step 1: Create Liquid or Wave Shapes in After Effects
- Using the Project Panel, click Create New Composition.
- Be sure to set Composition Settings to 15 frames per second. This will give the transition a stop-motion, stylized effect. You can also change this setting later on if you’d like to try a different animation style.

- Using the Rectangle Tool, create a Shape Layer. To this, make sure the Rectangle Tool is selected. Hold down and drag to select the Rectangle if another shape (for example, the ellipse) is selected.
- Pick a color using the color picker. Be as bold and creative as you like!
- Using the selected Rectangle Tool, click and drag to create a solid rectangle that covers the entire composition frame.
- Rename the layer: click the layer name and hit the “Enter” key to do this.
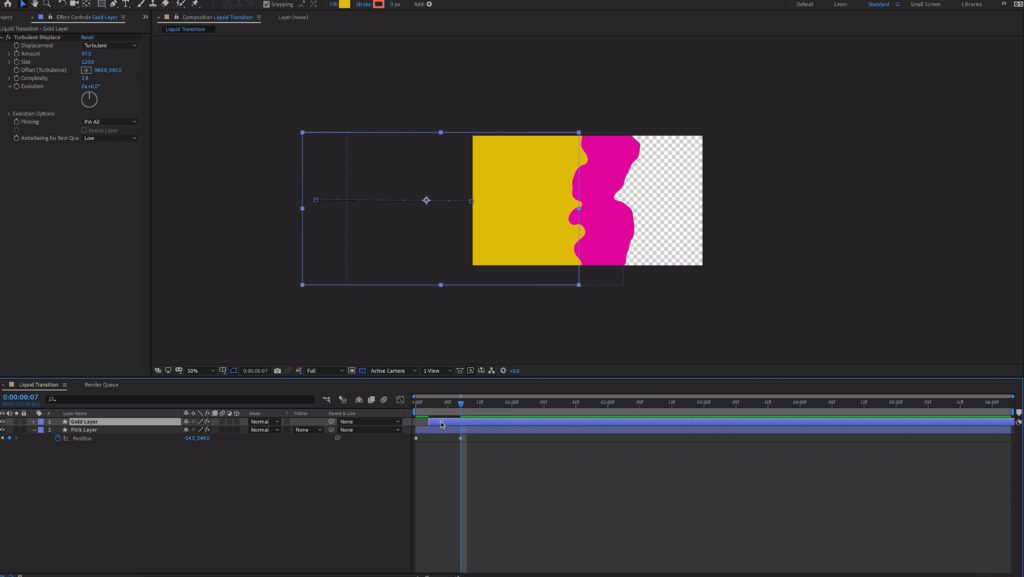
- Move the position of the Rectangle shape to reveal the edge of your composition frame, about halfway.
- In the Effects and Presets menu (or using Window > Effects & Presets if you don’t already see the menu), search for Turbulent Displace.
- Click and drag this effect onto the layer or the actual solid Rectangle in your composition frame. Now, your rectangle will have a squiggly border.
- Notice what happens when you move the position of the Rectangle: the squiggled edges will actually start to animate themselves. Therefore, all we have to do is animate the position to get this effect working!
Note: The Turbulent Displace layer only works with a shape layer and not with a solid layer. - To animate this shape, move the Rectangle Shape completely offscreen.
- Add a keyframe on Position: select the layer, hit the P key, and click on the stopwatch to activate the keyframe.
- In the timeline, move 8 or 9 frames. Now, move the Rectangle Shape over to once again completely cover the frame. Playback your animation, and adjust to your liking.
- Adding another color is incredibly easy. Simply duplicate the first layer, change the color by clicking the color swatch icon, and rename this new layer to its corresponding color.
- Make sure to move the new shape layers by a few frames, so their animation offsets and they aren’t on top of each other.
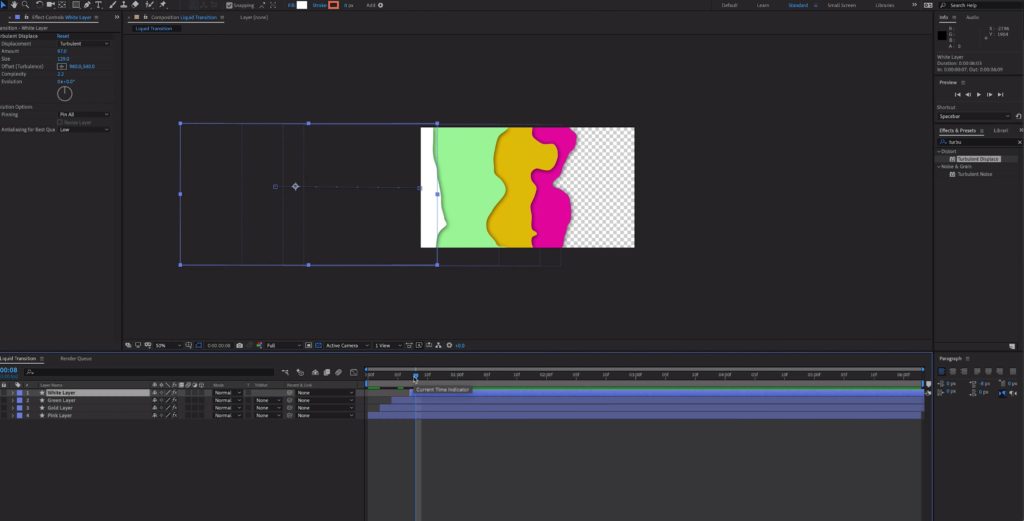
- You can also adjust the settings of the Turbulent Displace effect to further add detail to each later. You can adjust Size, Amount (intensity), Type (Bulge, Twist, Turbulent Smoother, Bulge Smoother, or Twist Smoother).
- Duplicate and create as many colorful layers as you’d like!
- Finally, we’re going to add a White Shape layer. Duplicate your most recent layer, and again offset it by 1-2 frames. The White Shape layer is actually a placeholder for your video footage.
- This transition works as is, but you can also define the separation between the layers by adding a drop shadow. With the desired layer selected, navigate to the Layer menu, select layer styles, and choose Drop Shadow.
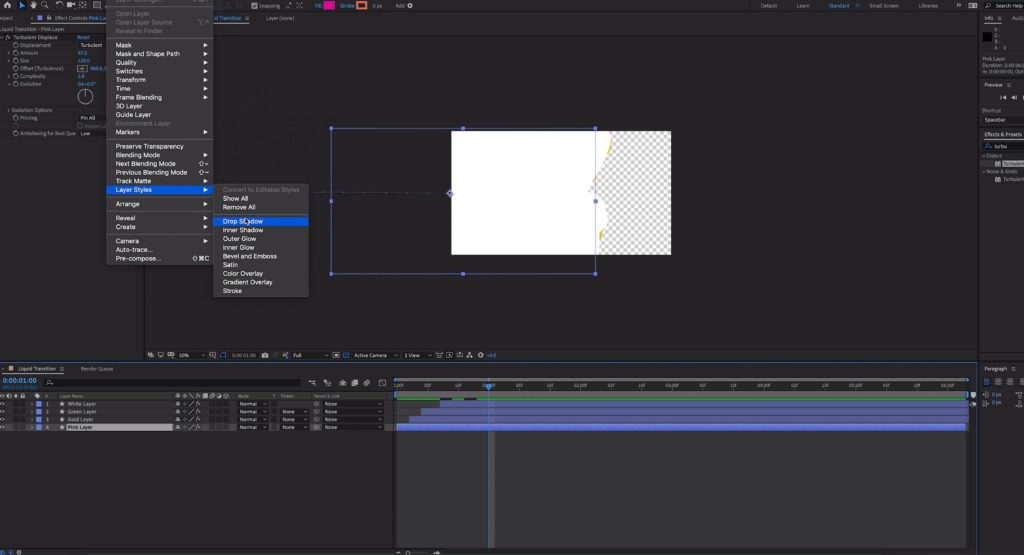
- Increase the size of the Drop Shadow. Click Command or Control + C to copy, and Command or Control + V to paste the effect onto the other layers.
Step 2: Using the Liquid Transition in Premiere Pro
- You can actually drag and drop your After Effects project file into Premiere Pro. Select your composition and hit “OK”.
- Set an Out marker where the transition finishes, Then, drag it to the Timeline, and position it above the two clips, at their transition point, making sure it’s on its own layer.
- Move the transition up one layer.
- Move up the second piece of footage up one layer, so that each piece of footage is now on its own layer.
- Be sure to extend each clip of your video footage, so that both are beneath the transition for its entire duration.
- In the Effects panel, search for the Track Matte Key effect. Drag the effect to your second piece of video footage.
- In Effect controls, change the Composite Setting from Matte Alpha to Matte Luma.
- Under Matte, select the name of the transition’s timeline layer, for example, ours is Video 3.
- Duplicate the transition layer, and drag it directly above the existing transition layer.
- Using the Effects panel, find the Ultra Key effect and drag it onto the top transition layer.
- Set the Key Color to white.
- Where the transition ends, make a cut on your video footage. On this new video clip, simply remove the Track Matte effect.
Part 2: 10 Cool Liquid Transitions You Can Download Today
1. Liquid Transitions
Liquid Transitions is an essential template pack for editors and animators looking to add splashy, dynamic, colorful transitions to their videos, without adding technical difficulty to the creative process.
Download Liquid Transitions Now
2. RBG Liquid Transitions
RBG Liquid Transitions infuses vibrant energy and funky distortion with its collection of stylized but beginner-friendly effects.
Download RBG Liquid Transitions Now
3. Liquid Distortion Transitions
Video creators looking for unique and eccentric liquid transitions need to explore these 12 effects by BlastBeatMedia, featuring stripes of color and a pixel-distorting gradient effect.
Download Liquid Distortion Transitions Now
4. Glowing Fluid Transitions
Glowing Fluid Transitions kicks the liquid distortion effect up a notch, making itself a must-have for video creators seeking dramatic effects with customizable colors.
Download Glowing Fluid Transitions Now
5. Liquid Stripes Transitions
Clean and sophisticated geometry dominates this pack of 12 transition effects, making them perfect for video creators seeking unique but tidy transitions.
Download Liquid Stripes Transitions Now
6. 2D FX Liquid Transitions
Animators and fans of the 2d hand-drawn style will love this 2D FX Liquid Transitions pack, featuring slightly more elaborate versions of the tutorial above, and perfect for animated explainer videos or motion graphics.
Download 2D FX Liquid Transitions Now
7. Liquid Transition
This project by VectorKilla is a fantastic addition to an animator’s toolkit: use these hand-drawn, liquid effect transitions to add style to your digital art, commercials, or motion graphics projects.
Download Liquid Transition Now
8. Liquid Motion Transitions
The hip style of these 2D hand-drawn animated transitions is sure to add some oomph to add style to your videos and makes creating a cohesive style super easy.
Download Liquid Motion Transitions Now
9. Hand Drawn Liquid Transitions
Dynamic shapes and stylish animations make this pack by FXBox perfect for adding funky flavor to your video transitions, especially for fans of the hand-drawn look.
Download Hand Drawn Liquid Transitions Now
10. Handy Transitions
Video creators looking for a clean but still unique and stylized hand-drawn effect definitely need to check out this pack by MisterFlash, a must-have for infusing your videos with a style that’s still commercial and client-friendly.
Download Handy Transitions Now
Creating a liquid transition effect in After Effects is a fun and unique way to transition your footage; it’s also easily customizable to your preference. From this tutorial, you can see how easy it is to manipulate shape layers in After Effects, and navigate between both After Effects and Premiere Pro to use the liquid transition you created.Be sure to check out our other After Effects Transition templates for all your upcoming projects!