Trailers are essential for building interest in your feature and short film projects, but at the end of the filmmaking process, they can become an afterthought. Today, we’re going to take you through a few techniques for creating cinematic titles for your movies in After Effects.
Summary
Part 1: Create Amazing Movie Trailer Titles in After Effects
When creating an engaging and cinematic trailer, it can be challenging to know where to start. Most trailers come down to two primary elements; titles and media. Starting with your title effect can be a great way of building a style for your trailers, allowing you to create consistency when media is added.
Step 1: Build the Base Layer Title
The first step is to build your base title layer. A considerable advantage of this method is that once you’ve made the effect, you can change to the title base layer, and the effect will be applied to the new title. To create this title effect, you will need a background texture – we will use the fantastic White Stained Wall.
- Using the Type tool, add your text to the screen.
- Import your Background texture file and place it below the title on the timeline.
- In the Layers panel for your Background, choose Alpha Matte from the dropdown menu.
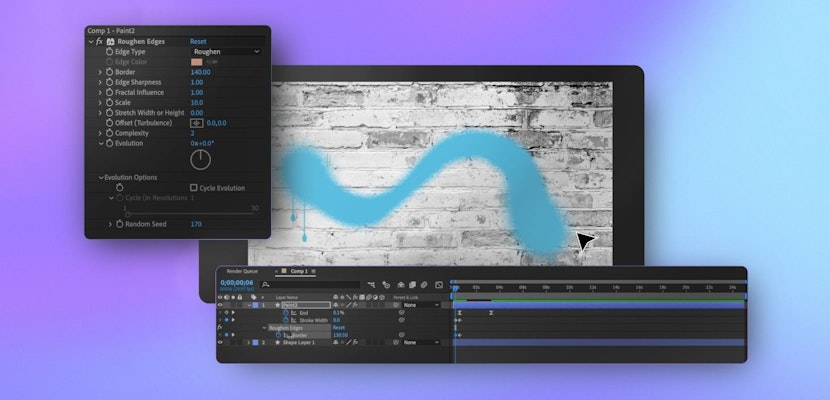
- In the Effects panel, search for Curves and add it to your Background layer. Adjust the Curves setting to brighten/darken the background as needed.
- Right-click in the timeline and choose New > Adjustment Layer.
- With the adjustment layer selected, go to Effects > Stylize > CC Film Burn.
- Place your playback line at the start of the timeline and set the Burn amount to 100%; click the stopwatch to create a keyframe.
- Move along the timeline about 20 frames and create a second keyframe, then change the Burn amount to 0%.
- With the adjustment layer selected, go to Effects > Perspective > Bevel Alpha. Play around with the settings until you are happy with your bevel look.
- Select all of the layers and right-click > Precompose, name the new comp Title.
Step 2: Add an Environment
Next, we’re going to create the environment in which your text will sit, including the background and lighting effects. You can use any background you like, including video and photos, but we’re going to stick with the White Stained Wall.
- Select the title comp and hit Cmd+D or Ctrl+D to duplicate it.
- Select the top of the layers and go to Effect > Generate > Fill, then change the color to white.
- Hit T on your keyboard and adjust the Opacity of the layer to 35%.
- Add the Background layer to the bottom of the layer stack and adjust the Scale as needed.
- With the Background layer selected go to Effects > Color Correction > Curves, then adjust the settings to darken the layer.
- Next, go to Effects > Blur & Sharpen > Gaussian Blur, then change the Blur Amount to 5.
- Create another adjustment layer and place it above the Background layer in the stack.
- Select the Background layer followed by the Curves effect in the Effects panel and hit Cmd+C or Ctrl+C to copy.
- Select the Adjustment layer and hit Cmd+V or Ctrl+V to paste it.
- Grab the Circular Mask tool and create an oval around your title.
- In the Mask controls, select inverse and increase the Edge Feather to create a vignette effect.
Step 3: Add Flares and Particles
Flares and Particles are great for adding style and depth to your trailers. Fortunately, hundreds of overlays and plugins are available on Motion Array, including the Cinematic Lens Flare collection and the Dust Overlay Pack.
- Drag your lens flare to sit at the top of the stack.
- In the Layers panel, change the Blend Mode to Screen.
- Go to Effect > Color Correction > Brightness/Contrast.
- Create a keyframe at the start of the clip for brightness, then a second keyframe at about 1 second, and increase the Brightness to 125.
- Hit Cmd+D or Ctrl+D to duplicate the layer.
- Go to Layer > Transform > Flip Horizontal.
- Select both of your flare layers and hit Cmd+D or Ctrl+D to duplicate, move the copies to above the Background layer, and change the Blend Mode to Soft Light.
- Drag your Particles layer from the project browser to the top of the stack, then set the Blend Mode to Screen and adjust the Opacity to suit your needs.
Step 4: Add Light Leaks and Sweeps
Light Leaks are fantastic for adding a tone to your trailer projects – a simple change of color can take a title effect from creepy to dramatic. Light Leak preset packs are excellent for adding a cool light effect to your composition, and with the CC Light Sweep, your text will react to the change in light.
- Select the bottom Text layer and go to Effect > Generate > CC Light Sweep.
- Play around with the settings until you are happy with the look of your Light Sweep effect.
- Place your playback pointer where you want the sweep to begin and create a keyframe for the Anchor settings.
- Move the pointer to where you want the sweep to end and adjust the Anchor settings.
- Add a new adjustment layer, then go to Effect > Noise and Grain > Add Noise.
- Adjust the Noise Amount until you are happy with the look, uncheck Use Color Noise.
- Next, go to Effects > Color Correction > Curves, then in the Effects Control panel, adjust the White, Red, Blue, and Green Curves settings to get the tone you need.
Step 5: Animate the Composition
The last step is to add a little movement to the composition to create a grunge feel. Adjust the settings to make more or less movement in your shot, depending on your needs.
- Select all layers and right-click > Precompose.
- Open the comps Position settings and while holding Alt, click the stopwatch icon.
- In the expression box type: wiggle(2,25)
- Go to Effect > Stylize > Motion Tile.
- In the Effects control panel, select the Mirror Edges checkbox and increase the Width and Height until the black edges are gone.
Part 2: 8 Eye-Catching After Effects Cinematic Movie Trailer Templates
1. Trailer Cinematic
The Trailer Cinematic project includes 80 Media and 20 text placeholders in a modular structure, allowing you to create trailers of any length. The unique titles include a dramatic zoom with metallic liquid effects filled with glittering particles.
Download Trailer Cinematic Now
2. Cinematic Trailer Intro
The Cinematic Trailer Intro is a fantastic modular project, ideal for epic opening sequences. The smokey backgrounds highlight the 3D style metallic titles, with cool zoom transitions pulling your viewer into your video clips.
Download Cinematic Trailer Intro Now
3. Film Titles Opener
The Film Titles Opener is a stunning set of 21 text placeholders with beautiful RGB split effects. The titles are small and slow-paced, giving an eerie feel, perfect for a horror, thriller, or murder mystery project.
Download Film Titles Opener Now
4. Short Inspire Trailer
The Short Inspire Trailer is a stylish and modern design featuring swirling golden particle streams and elegant shining titles. The beautiful full-screen title slides are incredibly versatile, fitting differently with color and music choice.
Download Short Inspire Trailer Now
5. Investigation Trailer Slideshow
The Investigation Trailer Slideshow includes 15 media and 7 text placeholders in a speedy, modern design. The warping camera movements and whipping titles cards provide a lot of information, ideal for documentaries, thrillers, and horror films.
Download Investigation Trailer Slideshow Now
6. Dark Movie Titles
The Dark Movie Titles sequence is ideal for horror and thriller movie trailers and opening titles. Featuring 13 title placeholders, the glitchy camera-roll style effects, and smooth tracking work perfectly with the dark red particle vein background.
Download Dark Movie Titles Now
7. The Venom
The Venom is a simple but powerful template including 10 title placeholders. The full-screen title cards offer a sci-fi/horror feel with liquid transitions and a bright blue metallic tone with modern scanline flourishes.
8. Neon Trail
The Neon Trailer is a trendy and familiar feeling opening title design. Featuring small floating title elements with incredible human-shaped light particle design, close-ups, and abstract flourishes in everything from sci-fi films to Superhero TV shows.
Creating movie trailers in After Effects is a lot of fun, but you should never forget the trailer’s purpose to get the viewer to watch your film. In this tutorial, we’ve shown you several techniques that can be mixed and matched to create unique title looks. Now, you know how to get creative with your next trailer project!
If you are looking for additional information on expressions, you can read our article on top expressions editors use and everything you need to know about using loop expressions. We also recently published a great tutorial on creating retro effects in After Effects.