


When it comes to learning how to export in DaVinci Resolve, there are a few simple steps that you need to know. This will be useful whether you’re just learning the ropes as a video editor, or you’re well-seasoned in the field, and you’re getting to grips with DaVinci Resolve as a post-production software.
In this tutorial, you’ll learn how to identify the settings that you need to take your project from a DaVinci Resolve timeline to a video that you can share, publish, or send to clients. It’s really simple once you know how! When you’ve got the hang of the basics, there are even a few more advanced tips to help with your more specific exporting woes.
Summary
Part 1: How to Export in DaVinci Resolve
First of all, you need to know the basics of how to export your video. Think of your edited video like a mixture of ingredients in a bowl; it won’t be ready to share—or “enjoy”, in this analogy— until you’ve “baked” it. That’s where the process of rendering your clips through the export comes in. There are a few settings you can choose to do this in, but here are the basic principles.
Step 1: The Deliver Tab
Once you’re in the Deliver tab, make sure you understand the basics of which area will carry out which function. That way, you can know what you need to do to have better control over your final product.
- Click on the Deliver tab on the bottom bar of DaVinci Resolve.
- You can see your timeline at the bottom of the window. Remember that in the Deliver tab, you’ll be unable to change the order of your clips.
- Your Preview viewer is in the middle of the window.
- The top left column is where you will make changes to the settings of your video before you export it. These are your Render Settings.
- The top right column in your Render Queue, where you can see how many timelines are in line to export.
- You can show or hide the selected clips by pressing the Clips button on the top left toolbar.
Step 2: Video Export Settings
You have a lot of control over your custom export settings for a reason. There are settings available for any type of video you may want to export. We’ll look more into some of the presets readily available below, but for now, you will learn how to export a high-quality video in a relatively small file.
- Enter what you want your file to be called in the File Name field.
- Choose your file destination by clicking the Browse button next to the location field, and navigate to the folder where you want your final video to be saved.
- Select Single Clip to make sure your final export is one single video clip, rather than many from all of the edited clips that make up your video.
- Make sure the Export Video box is checked unless you are exporting audio-only.
- Select Quicktime or MP4 from the Format dropdown menu.
- Leave your Codec as H.264.
- Leave your Resolution and Frame Rate to match your project settings.
- If you want to export a different resolution such as square or vertical, select Custom next to Resolution, and enter your desired orientation in pixels.
- You can leave your export quality on Automatic. If you’re trying to limit your file size, try selecting Restrict to and lower your bitrate (Kb/s).
- You can leave the rest of the options on their default settings.
Step 3: Render Your Project
- Click on add to Render Queue. Your project will appear on the list in the workspace on the right of your screen.
- You can queue up several versions of your project for export. Go back and edit their settings by clicking on the pencil icon next to their title in the Render Queue.
- Click on Start Render when you want the exports to begin.
Part 2: 4 Pro Tips to Successfully Export in DaVinci Resolve
The Delivery tab may seem a little confusing at first. Once you get the hang of it, you’ll realize that there’s not that much more to it than what you’ve learned today. Although there are a few eventualities you may want to learn how to manage in advance.
Slow exports are one problem a lot of people run into. There are a huge variety of things that could affect your export time, including the number of programs you are running at the time, and how much space is available on your computer. If you don’t mind losing a little bit of quality, you can also try reducing the bitrate (the Kb/s setting under the Quality heading of your export settings) or the Resolution of your video to see if it helps with your export time.
In addition to long export times, here are some other tips that could help you out when exporting your DaVinci Resolve project.
1. Export Your Project
Sometimes you may need to export your DaVinci Resolve project as a project rather than a video. This allows you to continue to work on it on another computer or pass it to a collaborator. To do this, you need to export your project as a .drp file.
- Open your desired project.
- Click on File > Export Project.
- Select the location you want to save your file. It will automatically save as a .drp file.
2. Export Sections of Your Project
DaVinci Resolve will export your whole timeline by default, but you can also choose to export only part of your timeline.
- Before you add your project to the Render Queue, click and drag your timeline playhead to where you would like your exported clip to begin.
- Press I on your keyboard to set your In point (where the clip will start).
- Position the playhead where you want your export to end, and click O on your keyboard to set your Out point.
- Add your project to your Render Queue as normal.
3. Export with Subtitles
- If you have Subtitles, go to the Video tab and scroll down to Subtitle Settings.
- Check the Export Subtitle box.
- Choose from the dropdown menu whether you would like your video exported as a Separate File (such as an SRT file) or to Burn into Video.
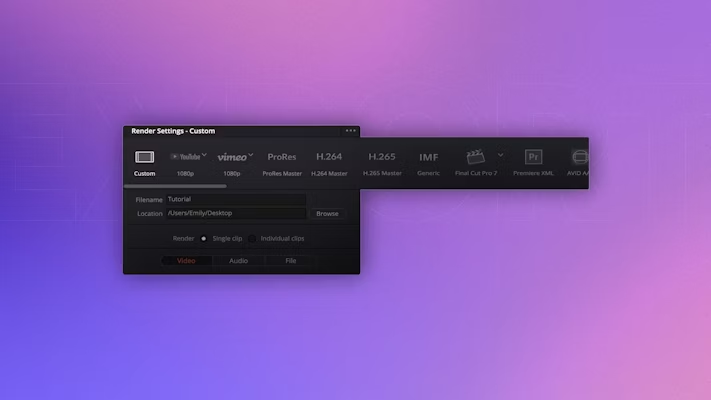
4. Export Presets
Let’s take a moment to look at some of the available export presets made available by DaVinci that you may find useful in your workflow.
- The YouTube preset is available in 720p, 1080p, or 4K resolution. Choose this option if you quickly want a file that’s compatible with a YouTube upload. You can now check the Upload directly to YouTube box and link your account to upload your video straight from DaVinci Resolve to YouTube.
- The Vimeo preset is also available in 720p, 1080p, or 4K. Its settings are similar to the YouTube template. You can now check the Upload directly to Vimeo box and link your account to upload your video straight from DaVinci Resolve to Vimeo.
- The new Twitter preset is available in 720p and 1080p. This option allows you to upload directly as well.
- ProRes (Mac only, not available on PC) is a format where the final file is minimally compressed. Many editors export in Prores to have a high-quality copy of their final work, or as an intermediate file to pass to their colorist, for example, when they have finished editing their video since the large file retains a lot of data.
- H264 is the standard video compression for most online video, and H265 is its successor.
- IMF is a high-quality file to meet the requirements of submissions for streaming services like Disney and Netflix.
- Final Cut Pro, Premiere Pro, Avid, and Pro Tools presets will let you export your project into a new timeline that is compatible with each respective software.
- Audio Only exports just the audio from your project.
Extra: Create Your Own Preset
DaVinci also lets you save your export settings as your own preset to speed up your workflow in the future.
- Set your desired custom export settings.
- Click on the icon of three small dots in the top right corner of your Render Settings space.
- Select Save as New Preset.
- Your new preset will appear in the toolbar with the other ready-made presets.
Now that you know the basics of how to export in DaVinci Resolve, you can see that it’s not so intimidating after all. There are a lot of options that can seem overwhelming, but you’ve already learned how to deal with many of them.
The good news is that DaVinci Resolve is a powerful tool, so some of the advanced settings don’t need to be touched unless you need a high level of control over a bigger project. So now, there’s really nothing to hold you back from sharing your projects with your collaborators, clients, and the world!
If you are looking for details on exporting with an alpha channel, we have a great tutorial link that will show you how to export a piece of footage or title with a transparent background to use in another project or share with another NLE.


