


Plugins are a great way to add functionality to your video post-production software. If you’re not familiar with plugins, they are essentially an extra software component you can add to a program, such as Blackmagic Design’s DaVinci Resolve. A plugin will add a tool or feature that wasn’t originally available within the software. And the good news is, there are already loads of DaVinci Resolve plugins available on the market!
Today, we’re going to break down some of the most useful DaVinci Resolve plugins. Hopefully, by the time you’ve finished this article, you’ll have found some new tools that are going to improve the quality of your videos or speed up your workflow, all within the convenience of DaVinci Resolve.
Summary
Part 1: Top DaVinci Resolve Plugins
There are plugins suitable for everyone, from ones for the beginner filmmaker to ones for heavy lifting post-production work. Here’s our list of plugins suited to a range of budgets and workflows!
1. Motion Array
If leveling up your assets is what you’re after, Motion Array currently has a variety of DaVinci Resolve products designed to help you produce videos faster. From animated titles to effects and transitions, you can browse what’s available to download for free or get unlimited downloads with a paid membership.
The membership includes access to 250,000+ assets for DaVinci Resolve and other leading programs, including stock footage, royalty-free music, and LUTs. With unlimited downloads each month, it’s easier to make high-quality videos quickly.
Download Motion Array Templates and Macros Now
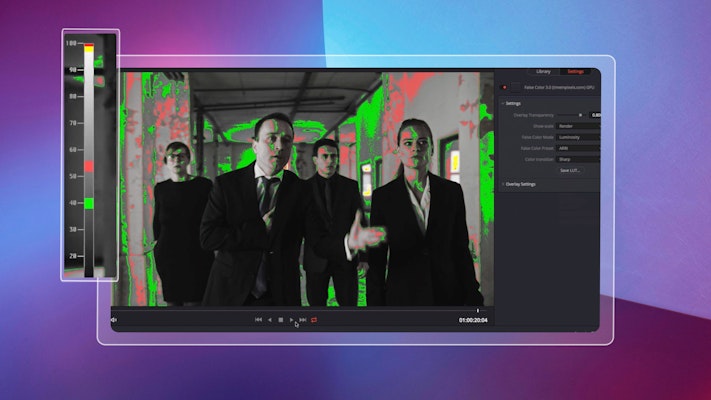
2. False Color
False Color is a plugin that makes it quick and easy to use the false coloring method to analyze the exposure of your footage or a reference image. If you’re not familiar with the method, each exposure level (that is, the varying brightness in different parts of your image) will be represented by different hues on a color scale.
By mapping each exposure level to a color value, it’s easy to see at a glance the brightness of each area of the composition. Many colorists and filmmakers like to use this to plan shots, or even as a 3D representation of brightness in post-production. If you are planning the look of your shots, False Color even lets you export your false color settings as a LUT to use with your camera monitor and try to match your footage’s exposure on the set to your reference image.
False Color for OFX—compatible with DaVinci Resolve—is currently $29.99.
3. DEFlicker
Revision FX’s DEFlicker plugin is great for removing the flicker that can sometimes appear in the footage. Whether you’re shooting at a high frame rate or a time-lapse, sometimes artificial light, in particular, can cause an annoying flickering effect in your footage. DEFlicker smooths this out on almost any quality of footage by using pixel tracking and color analysis.
This plugin could be particularly useful if you shoot a lot of time-lapses or sports content that requires a high frame rate and currently comes in at $250.
4. Neat Video
Believe it or not, the main purpose of Neat Video is to make your footage look cleaner from noise. Noise profiling technology helps to make reducing any type of noise in your footage happens fast. The most recent version, Neat Video 5, includes improved features to reduce scratch and dust from your footage and to improve sharpening or even flicker reduction.
The full OFX licensee for Neat Video is $250, but a demo version can be downloaded for free.
5. Beauty Box
If you’re looking for a plugin that will reduce time correcting the skin of your subject, this might be for you. Beauty Box allows you to easily track your subject’s face and smooth their skin tone through an automatically created mask. The plugin gives you control over a number of values to control the strength of the effect.
You can currently purchase Beauty Box 4.0 for DaVinci Resolve for $199.
6. AudioDenoise2
If you’re looking for ways to speed up your audio editing workflow within DaVinci Resolve, then this audio plugin from FXFactory may be an affordable way to save you some time.
This plugin will target hiss and background noise in your audio in one swoop. Depending on your workflow, the $99 price tag might justify the time it will save you in one project alone. You can download a free trial to start testing it out.
7. Mocha Pro
Mocha Pro is the most popular tool in the industry for planar tracking in post-production. Planar tracking is a technology that analyses the flat surfaces in your footage to track an area or object. This gives a wide variety of possibilities when it comes to masking, adding, or adjusting objects in post-production. Thanks to this technology, the plugin also includes features such as stabilization and supports 3D or 360/VR stereo formats.
In fact, Mocha is the industry standard for many of these workflows, which justifies it being one of the more expensive DaVinci Resolve plugins on the list at $695. Mocha Pro 2020 is compatible with host software that supports OFX plugins, which includes DaVinci Resolve.
8. ERA 5 Bundle (Free Trial)
If you are working with sound a lot in DaVinci Resolve, this great audio cleanup plugin is what you need. Featuring 15 powerful plugins to help you tackle all the audio issues you might routinely face. Quickly clean your sound, salvage tracks without re-recording, just to name a few of what is available in this bundle.
9. Alex Audio Butler
As an editor, it is important to save time when improving your audio quality so that you can deliver results faster. With the Alex Audio Butler plugin, you can easily find the optimum settings for volume, compression, and ducking.
Download Alex Audio Butler Now
10. Sapphire 11 (Free Trial)
Use this plugin for creating impressive visual effects – photorealistic and sophisticated looks – with a high degree of control and an intuitive user interface. From glows, glints, lens flares, light rays, or glares to grunge effects and transition builders, you can use the full suite or just license individual units.
Part 2: How to Install Plugins in DaVinci Resolve
Step 1: Download & Install
Locate the plugin you want and get it set up on your computer. This tutorial will work for the full version of a plugin or for a free trial. In this example, let’s take a look at how to install Time in Pixel’s False Color plugin.
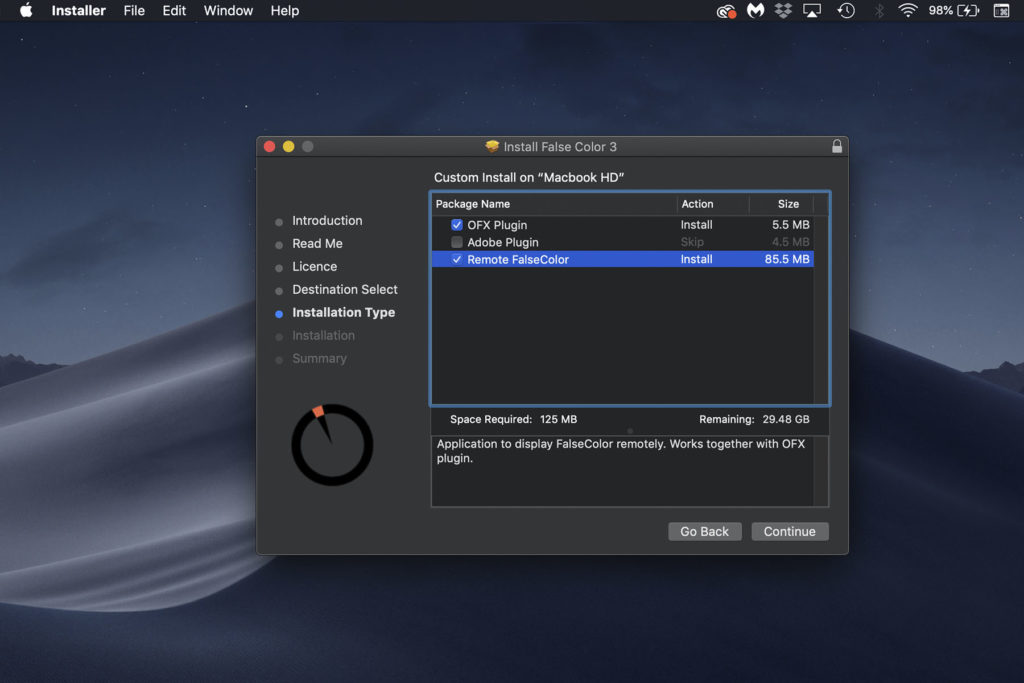
- Find your plugin of choice and download the installation file.
- Your plugin will likely arrive as a zip file. Double click on it to open.
- Double click on the .dmg file that appears to open the plugin installer.
- Follow the instructions to complete installation, and click on Install.
- If given the option between different software compatibilities, select the OFX products since they will work with DaVinci Resolve.
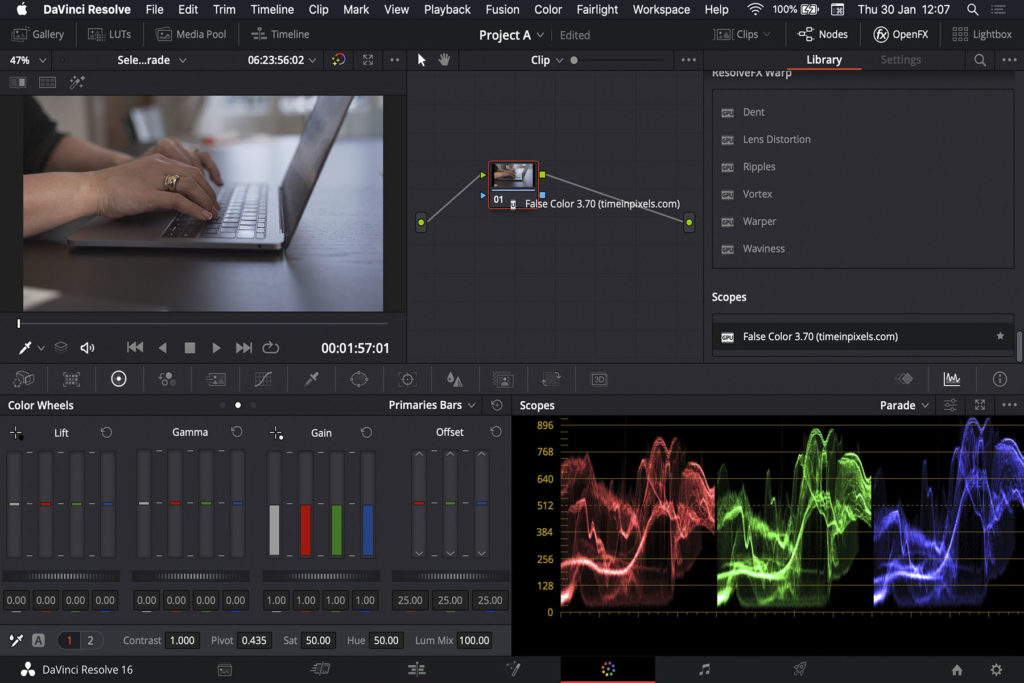
Step 2: Open DaVinci Resolve Plugin
Each plugin could be located in a slightly different place. But open the program to get started on using your new plugin.
- Open your desired project in DaVinci Resolve.
- Click on the Color tab.
- Make sure your Nodes and Open FX workspaces are selected in the top bar.
- Scroll through Open FX until you reach the Scopes menu. False Color will be located under this heading.
- Click and drag False Color onto the node corresponding to your footage.
By now you should be clear on not only what a plugin does, but also which DaVinci Resolve plugins may be right for you and your workflow. DaVinci Resolve is already a powerful editing software with a lot of functionality. However, as you can see, plugins can add a lot of value to film professionals on many levels. Here’s to bigger and better projects now that you’ve unlocked the world of plugins!


