


Today we’re going to be going over how to achieve smooth playback in your DaVinci Resolve templates even if you have an old weak computer. One of the side effects of using a template with lots of effects and graphics and alterations is that it can push your computer a little harder than normal.
So on the timeline we have a template with our own footage placed down, but it’s not playing back at full speed. We can see that it’s choppy, and our number of frames being displayed is less than our playback frame rate of 24 frames per second. Thankfully the process to getting smooth playback in this kind of situation is simple and we’re going to be walking you through that step by step.
Learn 5 Ways to Easily Fix DaVinci Playback Issues
1. Optimized Media and Proxies
Some cameras record in formats like H.264 or H.265 which are compressed and not really designed for editing but rather for delivery. Your computer may really struggle with these files, especially in higher resolutions. Even high end systems eventually reach a limit with high resolution files and visual effects so don’t be surprised if your system bogs down with a 4K H.265 GoPro file.
DaVinci Resolve has a built in solution that helps you overcome this while you are editing. It is called optimized media. DaVinci lets you create files in a format that is better suited to editing, normally Prores 422 on a Mac and DnXHQ on a PC. You can also lower the resolution of the files to speed up performance even more.
The benefit of using optimized media over proxies is that resolve dynamically creates and switches between these files and the originals when needed. The downside is you can’t share these files with other editors or to another computer.
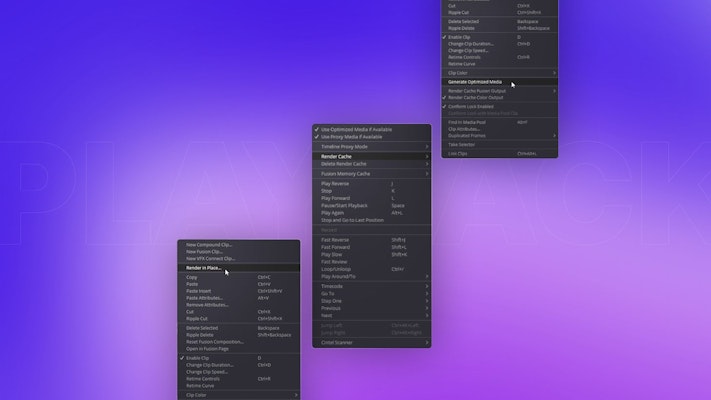
Generating Optimized media is simple. Just follow these steps:
- In the Media page, Edit page or on your timeline select the clips you want to create optimized media for, right-click and select Generate Optimized Media.
- DaVinci Resolve will now generate optimized media for the files you selected in the format specified in your project settings.
- You can change the file type and resolution for optimized media in your project settings under the Master Settings > Optimized Media. The choices you make here will depend on the original file and the performance of your computer. Try different settings until you have smooth playback.
Tip: Make sure Use Optimized Media if Available is checked in the playback menu.
In DaVinci Resolve 17 you now have the option to generate proxies as well. Proxies are just versions of the original files transcoded to an easier-to-edit file, just like the optimized media. The difference is that these files can be kept and shared. It is often part of a more complex workflow and you should do more research before adding them into your own workflow.
2. Render Cache
Another option you can use with or without using optimized media or proxies is Render Cache. When this option is set to Smart from the playback menu by going to Playback > Render Cache > Smart, DaVinci Resolve will determine which clips need to be rendered for smooth playback.
Rendering will only happen when you are not actively editing so it won’t interfere with your work. Items that have been rendering in progress will have a red bar above them in the timeline, which will turn blue once it is done. If you choose to set the render cache to the user you will need to select the clips you want to cache by right-clicking and selecting Render Cache Color Output. This is an ideal option when it is only a few clips slowing the system up (such as heavy color grading).
3. Proxy Mode
A simple, quick and non-destructive method to improve playback performance is to use timeline proxy mode. You will find this under the playback menu. You can select Playback > Proxy Mode > Half Resolution or Quarter Resolution depending on how much improvement you need. The resolution only affects the timeline and will not affect your final render. You can easily switch it on and off.
4. Render in Place
Another new option in DaVinci Resolve 17 is the ability to render troublesome clips in place. This is especially handy for clips with heavy effects or color grading that just won’t playback smoothly.
Right-click the clip in the timeline and select Render in Place then follow the prompts to decide on the file type and location where you would like to save the file and what format you would like to render to.
The only problem with this method is that in order to make changes to the clip again you need to right-click and select Decompose to Original so you can work on the original and then render again if needed. This is unlike the render cache which will re-render every time there is a change. It is, however, space and resource saving when there are only one or two clips that are a problem.
5. Timeline Resolution
When working in resolutions like 4K UHD and higher, it can be useful to drop your timeline resolution while editing as this reduces resources used for effects, transitions or titles which slow up your system.
If you intend to output in 4K or above, you must remember to switch your timeline resolution back to your target resolution before rendering. Also, consider that if the aspect ratio stays the same, you do need to be careful of what may happen to your effects created in the Fusion page at a lower resolution. Make note that not every Fusion effect always scales correctly once you change your timeline resolution.
You can change your timeline resolution by accessing the project settings:
- Go to Project Settings > Timeline Format > Timeline Resolution.
- You can also right-click in your timeline within the media pool and select Timeline > Timeline Settings.
- Check the box Use Custom Settings before making changes.
- Be aware that if you are using the Render Cache option, all your clips will re-render every time you change your timeline resolution, so you may want to turn it off once you lower it.
Note: It pays to start the project in the lower resolution and then change the timeline to the final resolution before export rather than lowering it and then increasing it again. Don’t confuse the timeline resolution with the resolution in the export settings. Do not increase the resolution here, increase it in the timeline and only to the resolution of your original clips
Video editing can be tough on your computer’s resources which can result in playback issues in DaVinci Resolve. There are a few options to help you overcome these playback issues including using optimized media, timeline proxy mode, proxies, render in place, and render cache.
You can even combine them all to help your system out so you can achieve smooth playback in DaVinci Resolve and have a great editing experience. If you are looking for more details on rendering in DaVinci Resolve, we have created this handy tutorial.


