Motion tracking in Final Cut Pro is a cool skill to master when working on creative social media videos or short clips. We will walk through 2 main ways you can track motion – with and without using plugins. Using the Final Cut Pro motion tracking plugins is one of the more functional ways to track motion within your projects. But if you are looking for a free option, we will also show how you can use and adjust keyframes in FCP to aid in motion tracking.
Summary
Part 1: Learn Basic Motion Tracking in Final Cut Pro
The keyframe method works best with high frame rate videos or slow-motion videos. Patience is definitely required! We recommend you use FCP plugins for faster footage or with more than one subject that requires detail.
- You can use some cool social media lower thirds or follow us packs.
- Place the lower third on your footage where it will track the movement of the subject and scale it as you see fit.
- Go to your timeline and select Transform on the left corner of the drop-down. You might need to click twice.
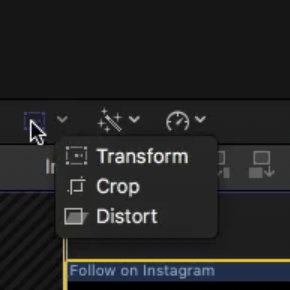
- You will notice on the left top corner the keyframe option will pop up. Add your first keyframe at the start point.
- Scan through the footage using the left and right bracket keys and add in keyframes.
- Guide and move your lower third or object to match the movement of the layer you are tracking using keyframes.
Note: We don’t recommend that you add a keyframe for every single frame, or even the majority of the clip, as it could result in a bumpier and less smooth movement.
Part 2: How to Use Motion Tracking Plugins for Final Cut Pro
Although one of the most difficult editing techniques in video is to master motion tracking, thanks to the different plugins available for editors, the entire motion tracking process has been simplified and is much easier to learn.
Top 5 Plugins to Consider:
1. Pixel Film Studios FCPX Auto Tracker 2.2
The Pixel Film Studios FCPX Auto Tracker is an affordable professional tracking plug-in that is easy to master and comprehend. The FCPX Auto Tracker is one of the simplest video image trackers to use on the market.
2. FXFactory Easy Tracker
CrumplePop’s Easy Tracker for Final Cut Pro is a terrific option while on a budget. It helps you track objects easily in your footage. You can give it a try before buying by downloading its free trial.
3. CoreMelt SliceX Free
The power of mocha tracking comes simple with CoreMelt SliceX for Free. It lets you handle tracking tasks with ease.
4. Pixel Film Studios FCPX Surface Tracker
This tool tracks the surface of your footage. It helps to allow warping of footage to fit certain movements and is incredibly easy to get the hang of.
5. MotionVFX Tracker 3D FCP
The MotionVFX Tracker 3D for Final Cut Pro is one of the slickest motion trackers. It allows you to move in sync with camera motions and track objects without any difficulty.
For this tutorial, we are going to be using the Pixel Film Studios Final Cut Pro X Auto Tracker and show you how to use it for your next project!
Step 1: Installation
You can install the Pixel Film Studios Final Cut Pro X Auto Tracker into Final Cut Pro by first visiting the website and downloading the Auto Tracker software. The next time you open up Final Cut Pro, you will notice that there is a new tab in your effects section that will be related to Pixel Film Studios Final Cut Pro X Auto Tracker.
Step 2: Applying Auto Tracker to Your Footage
The Pixel Film Studios Final Cut Pro X Auto Tracker is extremely simple to use.
- Select the Effects tab in Final Cut Pro.
- You’ll find that Pixel Film Studios has its own section within the effects category.
- Choose the appropriate Pixel Film Studios Final Cut Pro X Auto Tracker option:
- Drop Zone: ideal for images and compound clips.
- Text: perfect for credit sequences and on-screen use of words.
- Drop Zone & Text: gives you both options to pull from for your motion tracking.
Note: If you are using a Basic Title, we recommend that you turn the title into a Compound Clip before using it as a piece of source media for the Drop Zone.

- Drag the Auto Tracker onto your footage.
- Select the Source Media in the Auto Tracker options.

- Drawing from another piece of media that you’d like to implement and use for motion tracking, you’ll need to select the on-screen square in your original footage that you would like to track. This square can be adjusted accordingly to fit whatever object you would like to track. You’ll do this within the in-effect customization area.

- Select Track Editor.
- Outline the area in the footage you would like to motion track.
- When you’re done outlining the area you would like to track on your timeline, simply hit the Export Data button on the effect. After doing so, a box will pop up on your timeline to let you know that the movement is being analyzed and exported.
- When it is finished, you will be able to see that your compound clip or source media is now moving along the same route as the outlined object in the video in your project timeline.
Tips for Motion Tracking in FCP:
- Always bump up the contrast of your footage before applying the tracker.
- Try as much as possible to shoot in slow motion and you can always speed it up by right-clicking, Fast > 2x or 4x.
Utilize motion tracking for a wide variety of projects and implement images and objects you wouldn’t have been able to integrate seamlessly, otherwise. And instead of spending a long time doing it on your own, for an affordable cost, you can track objects in Final Cut Pro in a professional manner that would otherwise add thousands of dollars to your budget in outsourcing a visual effects specialist.