


If you are new to Final Cut Pro, it can be tempting to stick to the FCP easy-to-use, built-in title templates. These excellent titles can be dragged and dropped to your timeline, ready to customize with your message and brand. However, learning how to create your own Final Cut Pro text and title animations from scratch is a crucial skill for any editor and can help you make new and exciting title creations.
Summary
Part 1: How to Animate Basic Titles in Final Cut Pro
The Titles browser will show you a range of pre-animated title templates, which you can drag and drop to your timeline and then customize with your fonts and colors.
The Basic Title is a generic title card with a default font and white color. You can customize it, but there are no built-in animation parameters to add that extra touch of movement and energy. This tutorial will show you how to animate your titles from scratch with various effects FCP has to offer.
Option 1: Drag and Drop Effects
- Go to your Title Browser and search for Basic Title.
- Drag the title to your timeline.
- Select the Title, and in the Effects Control Panel, you will see five tabs. Choose the second from the left to open the Title Settings, here you can add your text and change the Size, Font, Weight, and Color.
- Click on the third icon, a Film Strip, to access the overall layer’s controls; you can also change the Size and Position here, but it adjusts the whole video layer, not just the text.
- Go to the Effects Control Panel and search for your chosen effect; drag it to your Title Layer. Our favorite effects are:
- Bad TV, which gives a faint graininess to the Title.
- Earthquake, which shakes your title.
- Underwater, which offers a relaxed warp movement.
- Select the title in the timeline and go to the Effects Control Panel to adjust the Effects settings until you are happy with the look.
Option 2: Custom Flicker Effect
The Custom Flicker Effect is created with just a few trims to your title but can be combined with other Drag and Drop Effects to create unique looks.
- Create your Basic Title in the timeline until you are happy with the design of your title.
- Zoom in to the timeline so you can see each frame.
- Hit B on your keyboard to access the Blade tool. Create a cut on the first 11 frames.
- Press A to go back to the Arrow tool and select every other title frame.
- With the titles selected, press V on your keyboard to make them invisible.
- You can add additional effects such as Bad TV, but it is easier to do this before cutting your title up.
- Try adding a sound effect and cutting that at the same points as your title so the audio matches.
Option 3: Glitch Effect
The Glitch Effect is an excellent way of animating between titles and involves using a Glitch Transition. You can download some incredible transition templates from Motion Array, such as the Beautiful Glitch transition Pack or the Urban Style Glitch Transitions Set.
- Consider which words you want to animate between before you start. In our example, we’re going to change the text Motion Array to Motion Titles and back again.
- First, create your static text using a Basic Title. Change the Font, Color, and Weight to your desired look.
- Duplicate the Title layer and amend the second title, keeping the branding the same. Reposition this title, so it is sitting alongside your static text.
- Using the Blade tool, make two cuts in your second Title Layer. Select the middle section and change the text to your second word.
- In the Transitions Browser, search for your glitch effect and add it to the title where you made the cuts. Adjust the length of your transition by dragging the ends of your transition glitch effect.
Part 2: Custom Titles in Final Cut Pro
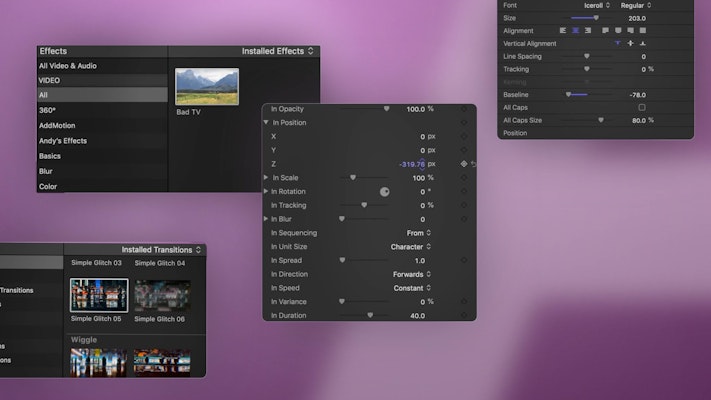
The Custom Title function might look similar to the Basic Title effect, and stylistically, it is. With a Custom Title, you can change the text, font, and style elements precisely as a Basic Title. However, the Custom Titles true power is in the Published Parameters tab in the Effect Control Panel.

The Published Parameters is a title transition effects builder and allows you to add In and Out animations to your title with a few clicks. There are far too many possible effects you can create from the tab, so we’re going to give you a rundown of all the settings, then show you how quickly you can make an incredible title effect.
The settings are divided into two: In effects at the top and Out effects at the bottom; this is great as it means you can have different animations at the start and end of your text.
Many of the settings you will find here, such as Opacity, Position, Scale, Rotation, Tracking, and Blur are all self-explanatory; you can use them to create your animation’s motion.
To create the animation, you don’t need to create keyframes, as FCP does that bit for you. The In Sequencing setting allows you to change how FCP interprets your customizations, going from your chosen state to it or even repeating it as an excellent constant title effect.
If you want to animate words individually, you don’t need to create a separate title for each word or text line. The Unit Size, In Spread and Direction settings, refer to how your title is divided for the animation. You can choose to animate in by Character, Word, or Line; determine whether the animation starts at the beginning or end of your message, and decide how much overlap there is between the units.
Cinematic 3D Zoom Titles
To show you just how powerful the Custom Title is, we’re going to take you step-by-step through how to create a complicated 3D style title.
- Add and customize your Custom Title until you are happy with the final look of your text.
- Place your Playhead at the start of the title on the timeline and go to the Publish Parameters tab in the Effects Control Panel.
- Open the Position Settings and change the Z position to -300+ depending on how far from the distance you want it to travel.
- Adjust the In Spread, so the letters follow one another closely. Change the In Speed to Decelerate, so the animation eases into place.
- Change the In Blur to 100+ depending on how blurry you want to text to be.
- Finally, reduce the Opacity to 0, so the letters fade in. And that is it!
Part 3: Tips & Tricks When Creating Your Animated Text in Final Cut Pro
Now you know how easy it is to create your animated titles in Final Cut Pro, check out our top tips for producing extraordinary compositions.
Make Sure Your Title is Readable
There are so many options for your title effects it can be tempting to go wild. You should never forget the purpose of the title and that the audience can read it. Make sure your text is on-screen long enough and is clear enough for the viewer to read the message.
Add Sound Effects
Sound Effects are a great way of adding emphasis to your title animations. Look for sound effects that compliment your title animations or add effects to your music track to time with the text.
Use as On-Screen Text Effect
A lot of text will be used over live-action video footage, and you should consider this when creating your animations. The best title sequences work with the footage behind them, using a similar motion to the camera’s movement or subject in the film.
Compound Your Clips
You can create stunning typography style videos in Final Cut Pro using the Custom Title, but it can quickly become confusing with a cluttered timeline. If you create word clouds or titles involving more than one layer, turn them into a compound clip. Not only will this clean up your timeline, but it also makes it much easier to move your titles around.
Final Cut Pro will never have the animation functionality or Apple Motion. Still, as we’ve shown you in this tutorial, you can use the Basic and Custom Titles for a massive variety of Final Cut Pro Title animations. For Editors, creating incredible motion titles with a few clicks can help save time and energy without cutting on creativity. Also, if you are looking for some handy title plugins for Final Cut Pro, we have an awesome list here.


