Golden hour photography is like magic. The early morning or late evening sun infuses your images with a warm glow that is sensational. The shadows from golden hour light are soft and the evenness of the light means that it is difficult to over-or under-expose your images. There’s a reason that the golden hour is also known as the magic hour. It doesn’t matter if you are shooting portraits or landscapes: it brings something unmistakably special to your images.
Summary
When is the Golden Hour?
Golden hour happens twice a day: for about an hour after sunrise and at roughly the hour before sunset. Its duration depends on the time of year, the weather, and your geographic location, meaning that it isn’t always an hour, but what you are looking for is the low angle of the sun in the sky. The period of twilight just before sunrise and after sunset is known as the blue hour when the sky is a deep intense blue.
Why is the Golden Hour Light Magical?
Light during the golden hour has 3 particular properties: it is warm, soft, and directional.
- Warm – golden hour light has a temperature of around 3000K, which gives everything a, well, golden glow. The red, orange, and yellow tones of golden hour light can give a fun, happy, positive, and romantic feel to your images.
- Soft – coming in at a low angle means that golden hour light is more diffuse, having traveled through more of the Earth’s atmosphere than the overhead, direct light at midday. This produces softer shadows, but it is also more flattering for skin tones as they appear more even.
- Directional – with the sun’s low angle, you will have long, elegant shadows and the opportunity to model your light to creative effect. Golden hour light can be used for beautiful rim lighting, enticing silhouettes, texture-enhancing side-lighting as well as great backlit and front-lit scenes with the help of a reflector or single fill flash. You can also play with lens flare and sunbursts.
Part 1: Main Settings for Golden Hour Photography
The settings that you will need for golden hour photography will depend on your subject. Try to keep the aperture wide for portraits, so that you maintain a shallow depth of field and introduce background blur to help your subjects pop. For landscape images, a smaller aperture of between ƒ/8.0 and ƒ/22 will ensure that all of your scenes is in focus, but this will require a slower shutter speed and a tripod to secure a blur-free image. Whatever you shoot, aim for the lowest ISO that your exposure will permit.
If you leave your camera set to auto white balance (AWB), it will automatically attempt to adjust your white balance to negate the gorgeous warm tones of the golden hour light so that it looks white. To retain the golden hour tones, set your camera’s White Balance to cloudy or shade.
If you’re trying golden hour photography with a smartphone, remember to tap on the area of your scene that you want to expose correctly, then you will be able to capture the glow.
Part 2: Golden Hour Photography Lighting Techniques
Front Lighting
If you shoot with the sun coming from behind you, or just over one of your shoulders, you will light your subject from the front. Don’t forget that by positioning a reflector beneath your subject, you can lift any shadows that might fall on their faces and create a clamshell lighting effect.
Side Lighting
When scenes are lit from the side, the light catches on every dip and peak, molding them and emphasizing the textures on your shot. If you can capture side-lit landscapes, it can look very special.
Backlighting and Silhouettes
By lighting a subject with the sun behind them, you can create a dreamy-looking image. You can create a silhouette by exposing the background when focusing on the subject. If you want to avoid a silhouette or an overexposed background, use a fill light or reflector to bounce some light onto the scene from the front.
Rim Lighting
Rim lighting is a form of backlighting where the light creates a halo-like effect around your subject. They look as if they are glowing where the light catches at their edges. It’s sometimes known as edge lighting for this reason. It’s easiest to capture rim lighting with a darker background. Start off from a low angle and move around until your subject is blessed with a halo of light.
Lens Flares
If you shoot straight into the sun, light can bounce around in your lens and create artifacts on your image that we call lens flare. Sometimes you won’t want it and at other times it can add a dreamy, romantic feel to your photos. If you position yourself so that the sun is peeking out from behind an object, you can create a sunburst-type lens flare.
Part 3: Top 8 Golden Hour Photography Tips
1. Set Up on Time
Aim to arrive at your location at least 1 hour before the golden hour is expected to commence. The conditions will change quickly throughout the golden hour period and you don’t want to be fiddling with your kit when you might be missing out on the most gorgeous streaked sky.
2. Know Your Geography
Check where the sun will rise and set so that you can position yourself to make the most of the lighting conditions for your photos, whether you want front lighting, rim lighting, or side lighting.
3. Observe the Sky
If you pay attention to the sky in the few days before your shoot, you will get an idea as to how the sun will move and the shadows it will cast during the golden hour. This will help you to prepare and give you some inspiration.
4. Watch the Clouds
Dramatic clouds can make for beautiful golden hour images, but heavy cloud cover can mean that you don’t really get any golden hour light at all. Keep an eye on them.
5. Shadows
Golden hour shadows are typically long and dramatic. Use them to your advantage and build them into your storytelling.
6. Underexpose
By underexposing a little–start with a third or a half a stop and work from there–you will ensure that you maintain the depth and vibrancy of your colors.
7. Adjust White Balance
This has already been mentioned in the settings section, but it’s so important it’s worth repeating. If you leave your camera on auto white balance, you’ll lose the impact of the warm golden hour light. Set your white balance to cloudy or shade.
8. Blue Hour
The blue hour comes after the sun has dipped below the horizon and this can provide you with dramatic light, too. If you’re already out and about, don’t let it pass you by.
Part 4: Popular Golden Hour Photography Examples
Here are 8 popular examples of images shot in the magic hour together with some golden hour photography tips for how to achieve them.
Landscape and Countryside
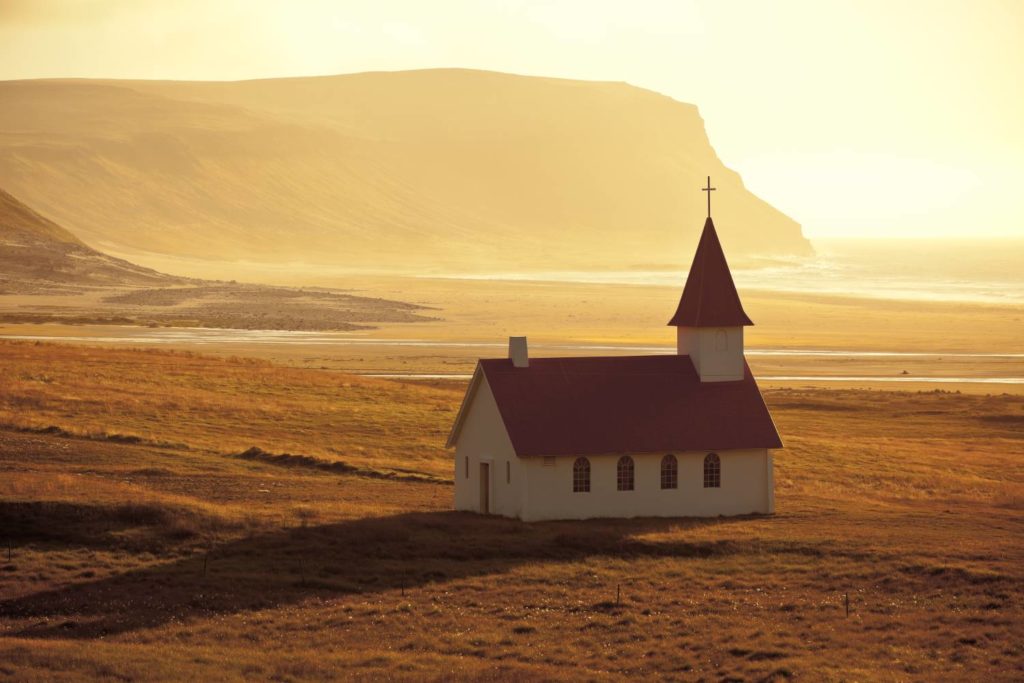
Here you can see how the side lighting is emphasizing the textures in the landscape and the long shadows are adding drama to the scene. While the scene is bright, the warm tones from the golden hour light leave it feeling soft.
The Coast
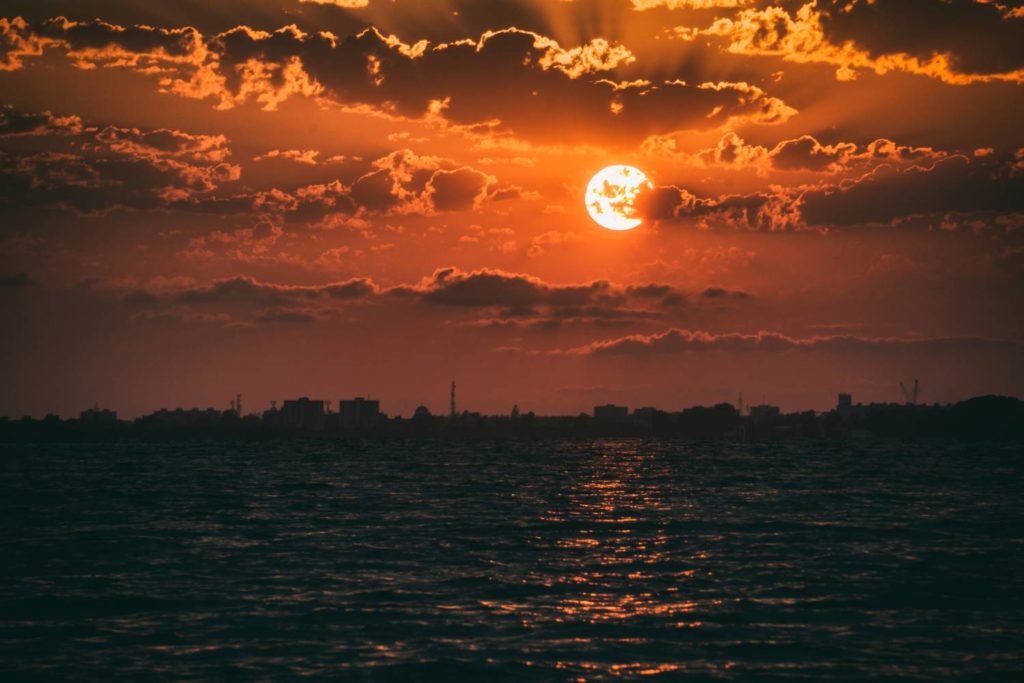
This coastal shot captures the glorious red golden hour sky and the lovely shimmer on the water by being slightly under-exposed. Notice how the clouds add to the drama of the image, too?
Silhouettes
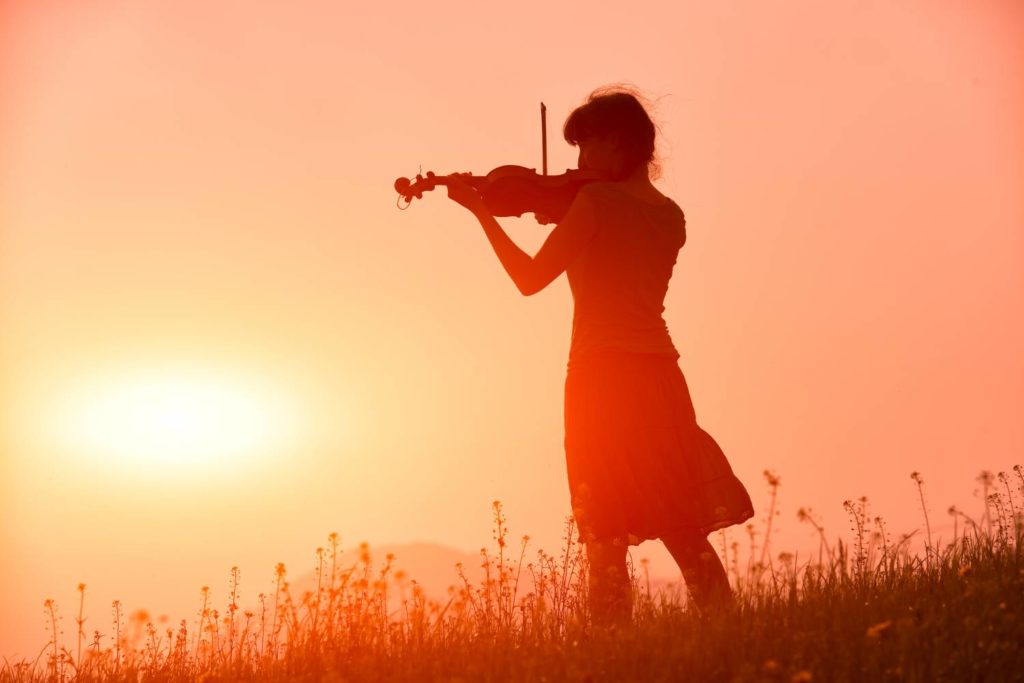
Sometimes the light hits your subject in such a way that the pose or action says so much more than actually seeing all the details. By exposing the red background and focusing on the violin player, you can create an amazing pinkish-orange silhouette!
Close Ups

Sometimes with the extra light in the shot, taking a close-up portrait of your subject creates a very romantic look. It’s bright and very close but the golden hour light gives the subject a lovely even skin tone!
The Couple Shot
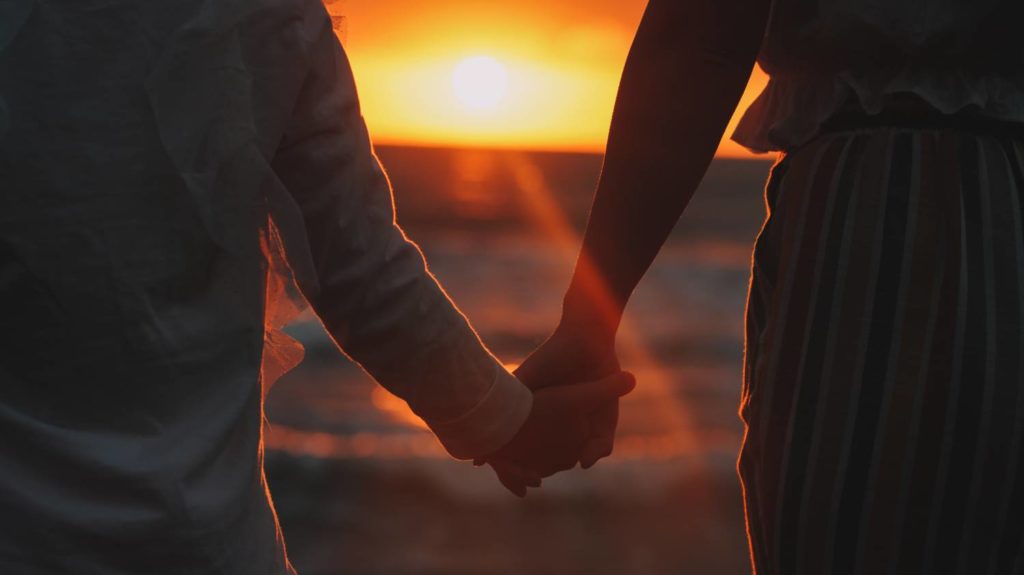
By shooting into the sun, you can create an amazing lens flare! And the light catching the edges of the couple holding hands is an example of rim lighting. Without any faces in the shot, it’s still wonderfully romantic.
A Simple Portrait
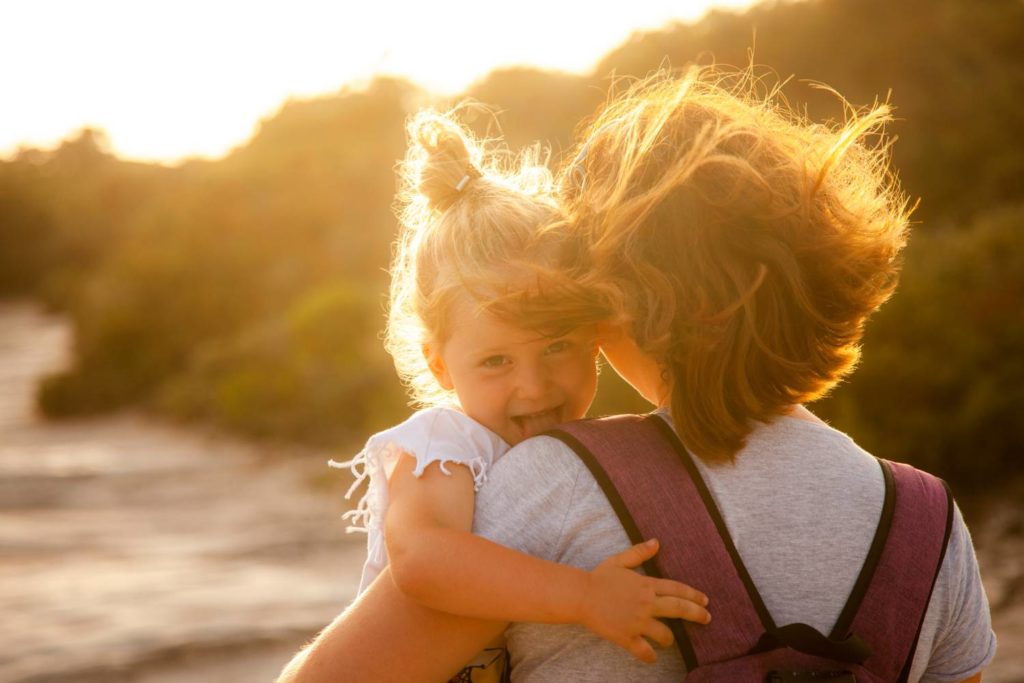
Here again you can see another example using a lighting technique during the golden hour. Don’t miss creating these soft and focused shots. This cute portrait captures a sweet moment enhanced by the halo of rim lighting.
The Family Portrait
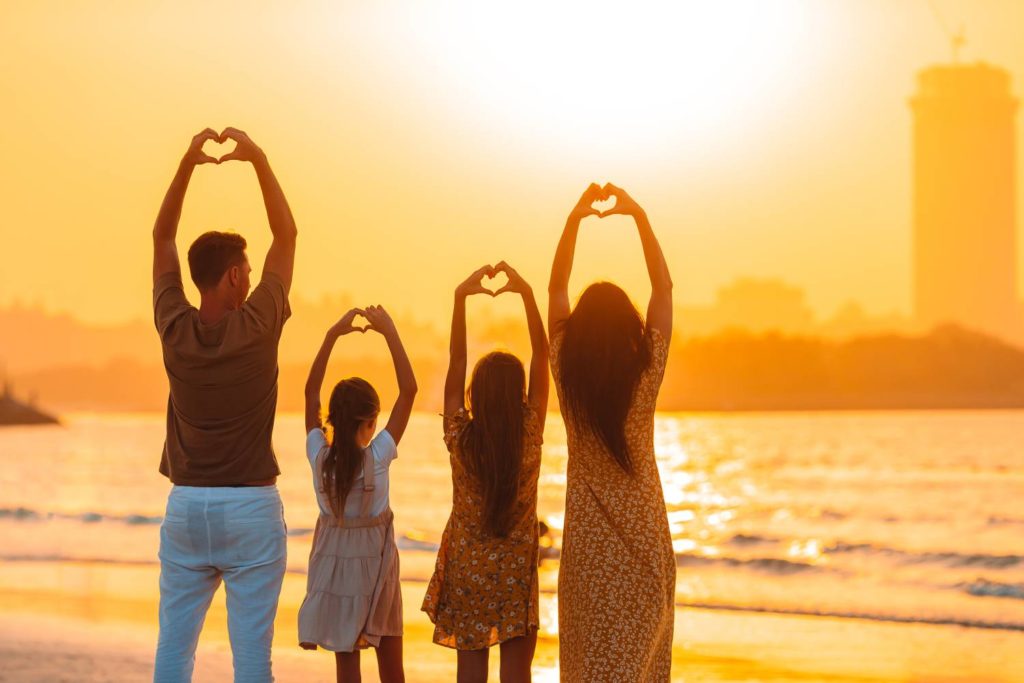
Especially during trips away or photoshoots for Valentine’s day you can easily create a fun and romantic photo for a group. Using golden hour lighting techniques, such as backlighting, adds to the fun feeling of this family portrait.
Using Props

To practice learning how to shoot the light with your camera and trying out different angles, using props like a mirror or glass makes a huge difference. In this example, the glass and the glowing sunlight are suggestive of the end of the day, in a calm, relaxed image. Can you see the spot of the lens flare sitting at the base of the glass stem?
If you’ve not tried golden hour photography before now, take a look at the sunrise and sunset times around you, keep an eye on the weather, and then head out with your camera. Even if you don’t have someone you can convince to model for you, you can try some stunning landscape images or maybe some architectural shots. You can play around with rim lighting, silhouettes, and lens flare, too. Let your creativity flow in the golden hour!
If you are looking for additional photography techniques, check out our article on photography lighting, top photography poses, as well as landscape photography tips.