When we recently discussed ways to avoid client revisions and ways to keep clients coming back, we realized that one of the most important things to do as an editor is to be efficient.
We decided it was worth creating a post just on how to be more efficient as an editor. After all, a big part of getting gigs is being on top of things. An editor has a lot to handle, especially when there is a large amount of footage to deal with. Try working in some of these ideas to make yourself a more efficient editor.
Organize Your Assets
Everyone has a different way that they like to work in their NLEs. That’s fine. What’s important is that you have a method of organization that’s consistent and easy to understand.
Create a folder structure within your projects and on your hard drives that clearly outlines where everything goes.
Take the Deadpool Premiere Pro workspace that we recently wrote about as an example.
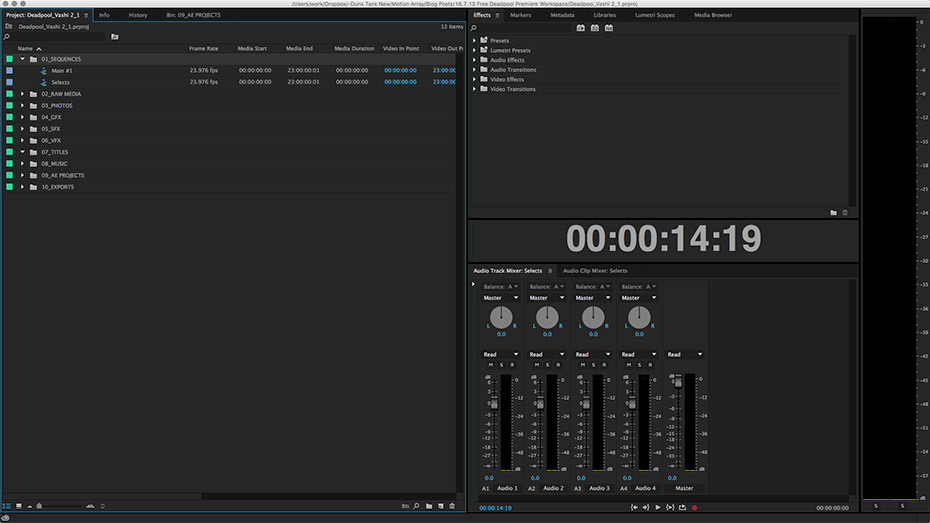
Here, Vashi has set up folders for each type of asset like photos, GFX, Music, and titles. This kind of organization is super important for you to be able to easily locate things. It’s also doubly important if you are sharing the project with another editor, as it will make it easier for them to find things as well.
Also, take a little time to trim your footage to clips that you want to use instead of constantly having to scrub through longer clips to find your shots.
The Sound Of Music
We talk about this a lot, but if your video is going to have music, try and get that picked out early in the process. Using the music to edit too will help you set and keep a pace and rhythm. This will make you faster and more efficient in the end as the music begins to help you shape the edit more easily.
This will also save you time on the backend since you won’t be stuck trying to find music that matches what you’ve already created which can be time-consuming and ultimately lead to changing the edit down the line.

Get A Little Rough
Rough cuts are your best friend in editing, yet some people don’t really utilize them. Trying to go in and make exact cuts for your video from beginning to end will lead to way more revisions then you need. You may work diligently to fine cut the front end, only to find that by the time you get halfway through, you need to rework everything you did earlier.
Instead, start with a very rough cut that just encompasses the selects you think you want to use next to each other. This can be very quick and dirty, but it’ll give you a much better sense of the whole picture more quickly.
This is also important because good editing is not about telling a whole story, but about individual cuts. By creating a quick rough, and then refining over several passes, you can ensure that you are telling the right story first, avoiding an entire recut at the end.
This Is A Title
If you have titles and lower thirds or supporting graphics in your video, just put simple placeholders in for the rough cut stage. Spending time building full titles and graphics before the edit is locked is a recipe for disaster.
No matter what you think, as the edit changes, so to will the graphics. Lengths change, specifics change, sometimes entire graphics or titles get cut. Don’t waste your time on something that might get cut until you are sure it won’t.
Color Last
Just like with graphics, it can be enticing to work on color correction before the edit is done. Especially if you have a shot with particularly bad lighting or coloring.
Don’t do this!
It’s important that your video has a cohesive look and color grading. You can’t really nail that down until all of the shots are in place. Once your edit is locked, start by comparing the exposure and color balance of all of the shots in the sequence. Find a cohesive medium before building a “look”.
Once your footage has a cohesive exposure and balance, begin working on a color grading for one shot. When you are happy, move the shots surrounding that one to make sure the look is consistent and works across multiple shots. Then finish out your color grading on your final edit and be happy knowing that you won’t have to recut and then recolor your video.

Pick Your Battles
When you are editing a video, you may have a lot of tasks to handle in a short period. Consider your options for using pre-made assets when they fit. A good After Effects template for graphics, a Premiere Pro template to get things rolling, or any number of presets can help you work more efficiently and even up your game when you aren’t experienced with certain things, like titles or transitions.
Being a great editor is about having a good eye and being able to tell a good story. But, it’s also about being fast and efficient as you work. Time is money, especially in this business, and your clients will love you for not wasting any of theirs.