Editing audio is a specialized skill set that can take years of learning and practice to master. If you’re starting your editing journey, audio editing can be one of the more confusing aspects. While Premiere Pro has some presets available, much of the audio editing is done from scratch. This comprehensive guide will take you through some of the most popular audio effects in Premiere Pro.
Summary
Part 1: The Main Audio Effect Functions in Premiere Pro
There are many Audio Effects available in Premiere Pro, and it can be a bit daunting if you’ve never edited sound before. Let’s look at some of the most practical and frequently used effects.
Delay
The Delay effect is key to any echo or audio delay sounds you want to create. Delay will give you control throughout the delay as well as the amount, with options for Dry/Wet and Feedback.

Balance
The Balance effect lets you adjust the audio in the Left and Right channels, creating directional sound. Unlike the Panning setting, which alters the position of the L/R Channels, the Balance effect adjusts the levels of audio at their current positions.

Bandpass
Bandpass is a filter and EQ effect that allows you to filter out specific frequency ranges from your audio. Bandpass can be used alone to create a telephone-style voice, but it is also regularly used in music production and film to help with the mixing process.
Bass
Bass is another filter and EQ effect, and as you can probably guess, it helps you add or remove the bass from your audio. This effect can be beneficial when mixing audio that doesn’t have a lot of bass with clips that have too much.
Flanger
Flanger is a modulation effect that duplicates your audio, playing the copy and a slightly different speed to the original. The effect creates a short echo sound within a particular frequency, ideal for creating feedback or robotic-style voices.
Chorus
Chorus is a modulation effect that can take a single audio signal and make it sound like a full chorus. You can turn a single person into a crowd with a voice track as the replicated audio plays with slightly different timings and pitches.
DeEsser
It seems a little obvious when you know what the DeEsser does, but this helpful effect is often overlooked. The DeEsser helps you reduce the harsh sounds often created when recording words with S, Sh, Ch, and F sound.
Distortion
As you might expect, the Distortion effect allows you to distort your sound in various ways. The settings Negative Smooth and Positive Smooth will enable you to round off your audio, smoothing out harsh frequencies.
Dynamics
The Dynamics effect includes 4 separate audio controls: Limiter, Expander, Compressor, and Noise Gate. All of the Dynamics settings help you clean up your audio by limited frequencies or audio levels.
Parametric EQ
Parametric EQ is a fantastic effect that allows you to adjust the frequencies in your audio finely. Using the graph, you can adjust how much of each frequency can be heard; great for creating stylistic sounds and cleaning up voice recordings.

Phaser
The Phaser effect is used to create random peaks and troughs in the frequencies of your audio. The Phaser creates a swirling effect to your audio as if the sound source is drifting closer to and further from you.

Pitch Shifter
The Pitch Shifter is a fun effect that is great for creating cartoon character voices. The Pitch Shifter adjusts the overall pitch of your audio, allowing you to create a range of voices from high chipmunk style to low monster style.

Surround Reverb
Surround Reverb is the primary tool you will need for creating an echo effect in your audio. The incredible Surround Reverb effect offers a range of room-size presets, including Cathedral, Deep Well, and Space Capsule.

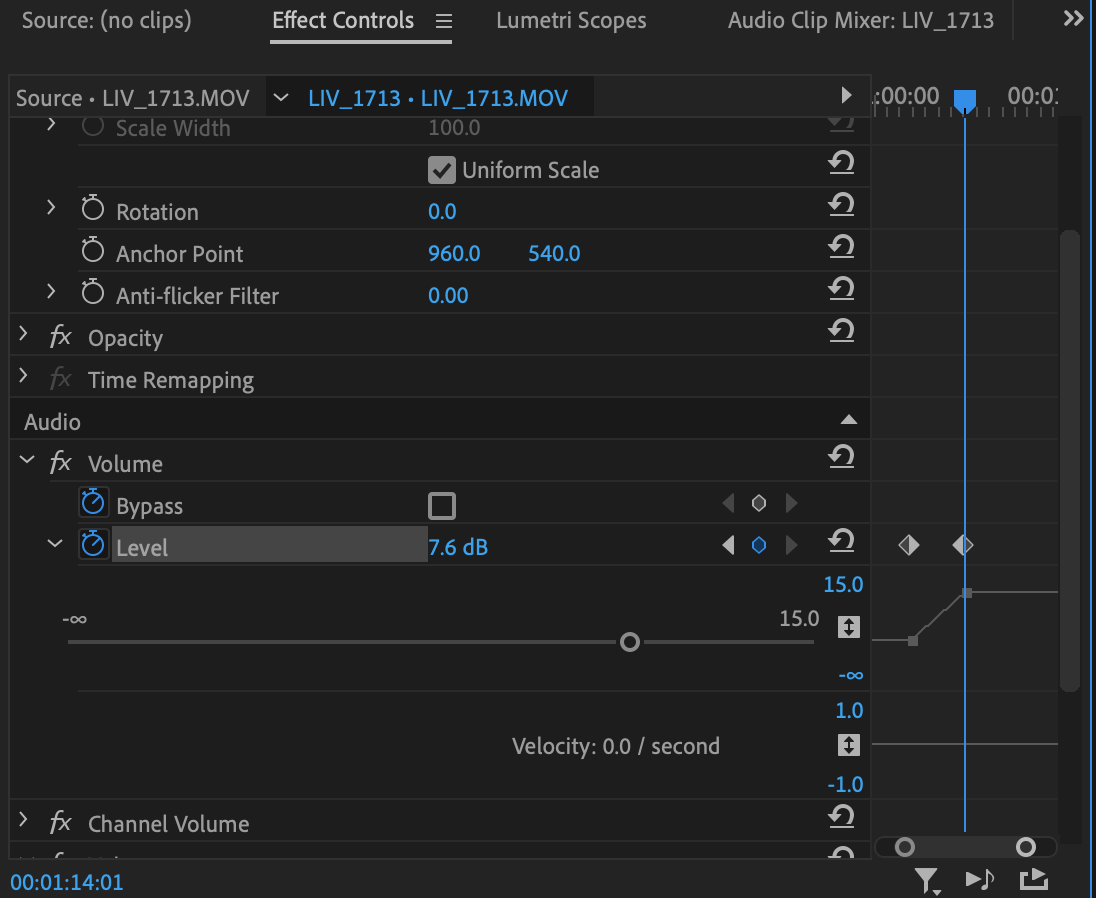
Volume
Your Volume control is the one effect already attached to your audio in the Effects Control panel. The Volume control will help you adjust the loudness of your overall sound, keyframing fades to your audio, and adjust the Audio Pan.
DeNoise
The DeNoiser is another handy effect for dialogue and voice-over recordings; it allows you to remove small amounts of background noise. While the effect might not be able to remove dogs barking and cars passing, it does a fantastic job on constant sounds like air-con.

Mastering
The Mastering effect allows you to adjust the Reverb, Loudness, and Exciter of your audio and is used to help place the source of the sound in a location. The Presets are super handy, giving you shortcuts for everything from Subtle Clarity to entire Dream Sequence effects.

Lowpass/Highpass
The Lowpass and Highpass effects are EQ effects that remove your audio’s Low and High frequencies. Add a Lowpass to create a muffled sound or a Highpass for the effect of audio being played through speakers.

Part 2: 6 Most Applied Audio Effects & Techniques in Premiere Pro
Whether you’re creating a business video or a short film, there are several effects and techniques that are useful across all of your projects.
1. Create New Sounds with Layering
No one clip of audio will fit your video without a bit of editing; in fact, the best way to create a compelling sound design is by layering up individual sounds. Look for sound effects, music, and atmosphere that suit your film, and create layers of audio that you can mix together.
- Edit all of your sound effects and audio into the timeline.
- Use the Essential Sound panel to choose its audio type – sound effect, music, dialogue, or ambiance.
- Adjust the volume of each track in the Track Mixer.
- Use Volume and Panning keyframes to blend the start and end of any sounds that require a fade.
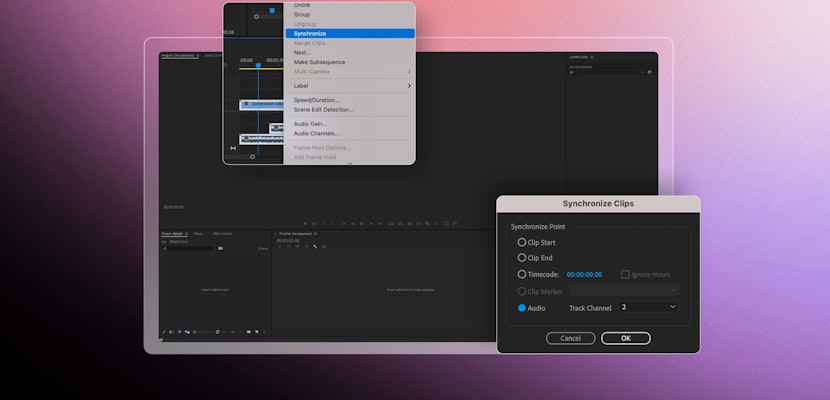
2. Use Audio Swells
An audio swell is an increase in the music or sound effects, followed by an abrupt cut to the next scene. The effect is often used to punctuate a transition and can use your existing audio or a specific sound effect. A common and well-used effect is a cymbal played backward to give a dramatic end to a scene.

- Find a point in your timeline where you want to add a transition sound.
- Drag your Cymbal Hit sound to the timeline so that it ends at the transition.
- Right-click on the sound effect and choose Clip Speed/Duration.
- Click the Reverse Speed box followed by OK.
3. Add Reverb
The Surround Reverb effect is incredible for adding echo to your audio, and the handy room-size presets can help you get started. By adding a small amount of echo, you can make your audio sound natural in any filming location.
- Search for and add the Surround Reverb effect.
- In the Effects Control panel, select the Surround Reverb Edit button.
- At the top of the box, choose a room size from the drop-down menu.
- Adjust the settings to suit your needs.
4. Ring Out Effect
The Ring Out effect adds a remarkable echo at the end of your music, sound effect, or dialogue. You can’t simply add the reverb effect as you’ll have the echo throughout, but this method will help you achieve the trendy effect.
- Add your audio to the timeline and cut (C on your keyboard) where you want the end to echo.
- Select the second half of your clip, trim if required, and right-click > Nest…
- Double click the nested sequence to open it, and drag your original audio file to the timeline below the end section.
- In the Effects panel, adjust the Volume to -1000; this creates a track for the echo to play across.
- Go back to the main sequence and extend your nested sequence to as long as you want to echo to be.
- In the Effects panel, search for and add the Surround Reverb effect.
- Select the Edit button alongside Surround Reverb in the Effects Control panel and make any adjustments you require.
5. Pitch Shifter
The Pitch Shifter effect also has some handy Presets you can use as a jumping-off point to create the type of voice you need, from a ghostly whisper to a cartoon critter.
- Search for and add the Pitch Shifter effect to your clip.
- In the Effects Control panel, click the Pitch Shifter Edit button.
- From the drop-down menu, choose your closest preset.
- Make more fine adjustments to the settings to suit your needs.
6. Radio Sound Effect
The Essential Sound Panel is super helpful for finding Presets to work with, such as the Radio or TV sound effects.
- Go to the Audio panel under Workspaces.
- Select the clip and go to the Essential Sound panel; select if it is Dialogue, Ambiance, Sound Effect, or Music.
- From the Preset drop-down menu, choose the sound effect you wish to create.
- Adjust the effect in the panel using the provided settings.
Premiere Pro is an expansive piece of software, and the audio editing tools are vast. Understanding the basics of sound design and editing is essential to growing as an editor. To find out more about Premiere Pro Audio Editing, check out this handy guide.