The fisheye lens effect is usually something you take the time to remove from your footage, but the organic image warp is now something creators actively set out to achieve. The panoramic-style bend to your clips can be used to create a sense of scope in your visuals, as well as being used for a trendy effect. In this tutorial, we’ll show you how to add the fisheye lens effect in Adobe Premiere Pro. We will also show you how you can remove the unwanted effect
Summary
Part 1: Learn How to Create the Fisheye Effect in Premiere Pro
Creating a fisheye look depends on the type of footage you are working with and the subject of your clips. We’re going to show you two straightforward ways to create this effect, so you can choose which works best for your needs.
Option 1: Using the Distort Effect
Using the Distort Effect can give you precise control over how much warping occurs in your clip.
- Edit your clip in the timeline, and from the Effects Control panel, add the Lens Distortion Effect.
- Adjust the Curvature settings in the Effects Control panel to about -20.
- Right-click on your clip and choose Nest; name your clip to make it easier to find.
- Add a second Len Distortion effect to your nested clip, and adjust the Curvature setting to around -45.
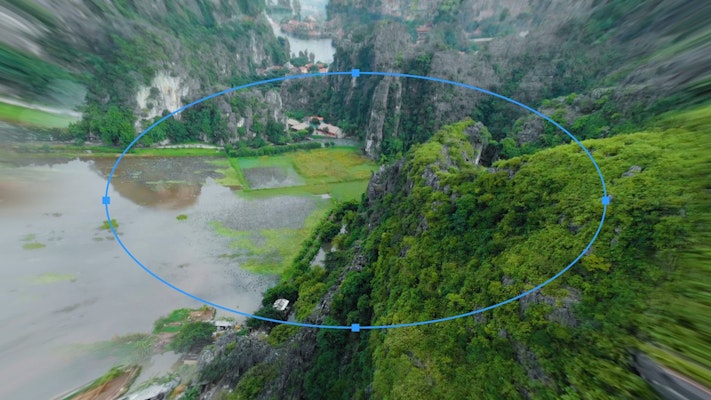
- Grab the Circle mask tool from the Lens Distortion settings and create an Oval mask on the screen.
- In the settings, Invert the mask, so the edges of your frame contain the effect.
- Finally, Feather the mask to 200 to hide the edges.
- For a more dramatic effect, adjust the Curvature setting for one or both of your layers. The nested sequence effect should always have a more substantial impact.
Option 2: Using the Circle Effect
The Circle Effect uses three different effects to create the look, so it might require rendering before you can view your composition.
- Edit your clip in the timeline and go to the Effects panel > Video Effects > Obsolete > Circle.
- Add the Circle effect to your clip and increase the Radius, which is at the edges of the screen.
- Change the Blend Mode setting to Stencil Alpha.
- Search for and add the Spherize effect; increase the Radius to fill the screen.
- Finally, add a Gaussian Blur effect, and adjust the setting to your preferred Blur Amount.
- Add a Circle mask from the Gaussian Blur settings, and increase the size of the mask to create a vignette.
- Finally, Invert the mask and increase the Feather, so the edges are blurred.
- Play about with the effect by adjusting the Blur Amount and Spherize settings until you’re happy with the look.
Part 2: 3 Cool Fisheye Templates for Premiere Pro
1. Fisheye Effect
The Fisheye Effect Presets for Premiere Pro offers 8 unique and stylized Fisheye vignette looks. The footage warp is framed by a dramatic dark vignette and radial lens blur, ideal for music videos, trailers, and showreels.
2. Fisheye Transitions
The Fisheye Transition pack includes 12 fun and dynamically animated transitional effects, suitable for a wide range of project types. The transitions take the form of a film camera roll in various directions with a cool Fisheye look.
Download Fisheye Transitions Now
3. GoPro Camera Effect
The GoPro Camera Effect pack contains 10 beautiful and organic feeling lens warp presets. Ideal for reproducing the look of GoPro footage from your DSLR or Smart Device camera, these effects can add a unique style and tone to your videos.
Download GoPro Camera Effect Now
Part 3: Easily Correct Fisheye Lens Distortion
If you want to correct the fisheye lens distortion from your camera, the fisheye fixer presets from Motion Array are a must-have. Once installed you’ll have plenty of drag and drop effects for an instant fix.
- In Premiere Pro, go to the Effects panel menu and select Import Preset.
- In the Finder window, find the Preset File and click Open.
- Search for the Fisheye effect in the Effects Control panel; drag and drop your chosen effect to your clip.
- To delete the effect, select it in the Effects Control panel and hit Delete.
Adding fisheye effects to your footage may not be something you often do, but when the right project comes along, you’ll be glad to know two super simple ways to create this unique warped look. When needed, removing fisheye from your footage doesn’t need to be a headache either, with drag and drop solutions available to add to your tool kit. Now you know how to produce fisheye effects in Premiere Pro, think creatively about how you can use this trendy style.