Nesting a sequence in Premiere Pro is very simple, and this tutorial will teach you all the basics of nesting. Using nested sequences in editing workflows, however, is the creative part. Nesting has many practical and organizational benefits, so check out the workflow tips to take advantage of them in your edits. Don’t worry; we’ll also show you how to unnest in Premiere Pro. Let’s dive in!
Summary
Part 1: What is Nesting & Why Should You Use it
It’s easier to perform a task on a single instance than repeat it on multiple instances. Combining multiple instances within a container and then performing the task just once is more organized and more efficient. This is the basic theory of Premiere Pro nesting, and understanding it in this way will help you identify when to use nesting in your editing workflow.
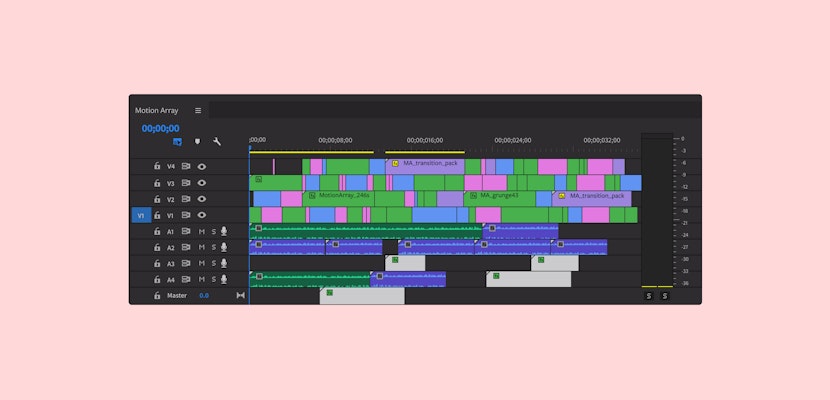
More technically, nesting in Premiere Pro reduces multiple clips into a single “clip” in the timeline. Video and audio clips can be nested side-by-side or stacked on different tracks.
However, it’s important to distinguish that nesting creates a new sequence in your project. Premiere Pro Nested sequences allow editors to edit or add effects to all the clips in the sequence. In addition, nested sequences can live inside other sequences and contain different nested sequences (a nest within a nest).
Part 2: How to Nest Clips in Premiere Pro CC
When you create a nested sequence in Premiere Pro, it will have the exact specifications (resolution, frame rate, etc.) as the current sequence. It will begin at the first frame of the first selected clip in the timeline and end on the last one. It won’t be linked to the parent sequence, and the timecode won’t correlate like a sub-sequence.
Note: Nesting media that’s larger than your sequence resolution) will rasterize your footage, and scaling up the nested sequence will pixelate the image. Consider this before nesting your clips.
Step 1: Duplicating Your Sequence
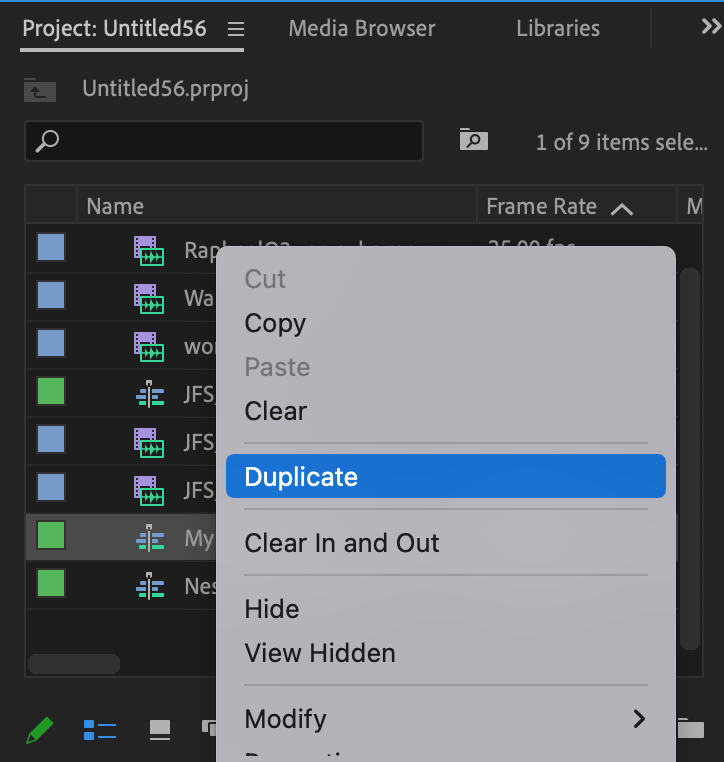
Before creating nested sequences in your Premiere Pro project, make a copy first. While there are ways to ‘un-nest’ a sequence, it is often easier to return to a preserved copy of the original edit.
- Find the sequence in the Project browser.
- Right-click and choose Duplicate from the menu.
- Select the duplicate and hit Return to change the name of the sequence.
Step 2: Selecting your Clips
At this stage, you must be strategic when selecting clips; think about the final result and work backward. Try to develop consistent criteria for nesting; this will improve your timeline organization. (See Part 3 for specific examples)
- In the timeline, identify the clips you want to nest.
- Select clips by clicking and dragging the selection box around them. Or, hold Shift while clicking on clips. Be careful not to select something that should not be nested accidentally!
Step 3: Nesting your Clips
Nesting a sequence in Premiere Pro can be a little stressful as you’re changing the structure of your carefully edited project. But don’t worry; if you make a mistake with your clip selection, you can easily undo the Nest by pressing Command or Control + Z.
- Right-click on any selected clip in the timeline and choose Nest.
- Name your nested sequence following whatever naming convention you use. In general, the more descriptive and specific the name, the better. Remember to organize your new nested sequence in the Project panel.
- The nested sequence will replace the selected clips in the timeline.
Note: The video thumbnail will show the top-most video clip or highest video track number in the nested sequence. On the other hand, Audio waveforms will show the top-most audio clip or the lowest audio track number.
Part 3: Working with Nests in Premiere Pro
Premiere Pro Nested Sequences are fantastic but require a slightly different editing method. If you want to change any of your Premiere Pro nested sequences, follow these steps.
Editing Clips in a Nested Sequence
When you nest a sequence in Premiere Pro, you are moving all of your clips to a new sequence contained within the Nest, so you can still edit your footage as you would normally.
- In the timeline, double-click the nested sequence to open or “step inside” the sequence in a new timeline.
- Alternatively, in the Project panel, select the sequence, right-click, and choose Open in Timeline.
- Make edits to your clips, such as trim or replace clips, add color and other effects.
- Any changes to the clips inside the nested sequence will automatically update all sequence instances in other timelines.
Duration of Nested Sequences
Shortening or lengthening the clips in the nested sequence will affect the total duration of the nested sequence. For example, if diagonal lines appear at the end of a nested sequence, that means there are no media, and the sequence should be trimmed down to avoid seeing empty black space.
- Treat your nested sequence as a standard clip in the parent timeline and drag the ends of it to adjust the duration to match the composition inside the nest.
- Use sequence markers (not to be confused with clip markers) to mark important events or edit points inside the nested sequence. These will appear as clip markers on the nested sequence in the parent sequence. Now you can use the markers to line up and snap to events in the nested sequence.
- Nesting will remove transitions added to the beginning of the first clip and the end of the last. Unfortunately, Premiere Pro doesn’t allow you to set head and tail frames when nesting, so you have to do it manually. To restore the transition, step inside the nested sequence, and extend the header of the first clip and the tail of the last clip. Then go back to the parent sequence and reposition and trim the nested sequence (or click on the Slip Tool or use keyboard shortcut Y) to ensure there are overlapping frames for the transition.
Editing from a Nested Sequence
You can also treat a Nested Sequence as a clip in itself; this is super handy if you want to add effects to a clip before editing. For example, if you are using Green Screen footage, add your Keying and Background effects within a Nested-Sequence, then edit your composition with the nest.
- In the Project Browser, right-click the nested sequence and choose Open in Source Monitor. (You can also drag the nested sequence into the Source Monitor)
- Use the Source Monitor to set in and out points and drag the sections of your nested sequence to the timeline.
- Additionally, you can click the wrench icon in the Source Monitor and choose Open Sequence in Timeline. The nested sequence will open in a timeline and be linked with the Source Monitor, as indicated by the red playhead. Now you can make an insert and overwrite edits from the nested sequence timeline to another open timeline. This is the foundation of the pancake timeline workflow.
Un-Nesting a Sequence in Premiere Pro
Despite many requests by editors, Premiere Pro still needs to add an un-nest button, so reverting to your original edit can be a little trick. For example, you could return to that edit if you created a duplicate before nesting your sequences. Alternatively, a little copy/paste is needed.
- Double-click your nested sequence to open it in the timeline.
- Select everything in the timeline by hitting Command/Control + A.
- Press Command/Control + C to copy the sequence.
- Return to the parent timeline, and using the up/down arrow keys, position your playhead at the start of the nested sequence.
- Hit Command/Control + V to paste the original edit over your nested sequence. It will still be available in the Project Browser as with any other sequence you create.
We hope this tutorial has helped you learn the power of nesting in Premiere Pro. While nesting seems straightforward, your decisions can help you stay better organized as you work on your video edits!