Time-lapses are popular across all types of videos — from corporate promotions to music videos — this type of footage is everywhere. In this tutorial, we’re going to show you how you can quickly make Premiere Pro time-lapse edits, along with some hints and tips on how to shoot it. Let’s jump in!
Summary
Part 1: Shooting a Time-lapse Video Using Photos or Videos
You can create time-lapse videos in Premiere Pro using both photos and recorded video. We’ve outlined the steps on how to capture your footage or stills below.
Shooting a Time-lapse Using Photos
Step 1: Work Out Your Intervals
The first thing you need to do, unfortunately, is a bit of math. The interval between each image captured by your camera will dictate how much time passes in your final footage, and how long you will need to sit and wait for it. That’s why it’s so important that you work out your interval times in the preparation stage.
You can work out your time intervals using the following equation:
Period of time to lapse /
(Desired frame rate x Desired length of the time-lapse clip)
If, for example, you wanted to record a sunset that was going to last 90 minutes (5400 seconds), and turn that into a 10 second time-lapse at 24fps, you would do the following:
- 24 x 10 = 240
- 5400 / 240 = 22.5
Once you’ve done this simple math, you’ll know you need 22 seconds between each photo.
Some cameras will have a built-in time-lapse function, which will time the intervals you worked out earlier. You can also use a stopwatch and a camera remote, but this can be tricky and prone to mistakes. It’s recommended that you use an intervalometer that you’ll plug into your camera.
Step 2: Set Up Your Shot
To shoot your time-lapse video, you will need three things: a camera, a tripod, and your preferred way of measuring the intervals between shots.
- Get your camera into position, ensuring that it’s not a hazard for anyone, and you will be able to stay in place for the duration of the recording.
- Set your white balance, ISO, and shutter speed. Make sure your camera is not using automatic settings as any changes in the light will change how your shot looks.
- Plug your intervalometer in and set the interval time between each shot.
- If you want to add movement to your time-lapse, make sure you use a controlled dolly or jib.
Shooting a Time-lapse Using Video
When you record video footage, the camera is essentially taking a number of still images, dictated by your frames per second. While you can use from a variety of stock video footage to create a time-lapse, it’s probably best that you only use video for recordings over a short period of time. This is because video can eat up huge amounts of space, and slow down your editing system.
- Set up your shot similarly to if you were taking pictures. Pay close attention to framing and exposure settings.
- Press record.
- Wait until you’re satisfied that you have recorded enough footage.
Part 2: Editing a Time-lapse Video in Premiere Pro
Editing Your Still Images
If you have shot a time-lapse using photos, you might have hundreds or even thousands of images to work with. Fortunately, creating your time-lapse video clip is easier than you might think!
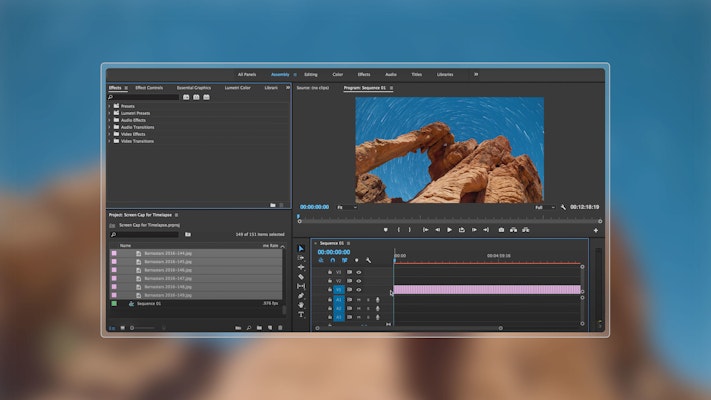
Step 1: Import Your Images to the Timeline
- Set up your Project and Sequence.
- In the Project browser, right-click and select Import.
- Navigate to your folder of images and click Import. You can import multiple images or entire folders at the same time.
- In the Project browser, open the Images folder, select all of the images, and drag them to your timeline. They will all line up in the order they were taken, so long as you don’t change the name of the image files.
Step 2: Edit Image Size & Position
Depending on your camera, you might find the images may not fit the size of the sequence you want to use. If this is the case, the first step is to resize all of the images to fit.
- Select the first image and in the Effects Control panel, then edit the Size and Position of the image until you are happy.
- Select the Motion control and copy it (Cmd+C or Ctrl+C).
- Select all the images in the timeline and paste (Cmd+V or Ctrl+V). All the images will now be resized and positioned.
Step 3: Edit Image Speed & Duration
When you first add your images to your sequence, each will be about 5 seconds long. When you initially worked out the interval times, you specified that each image would last a single frame, so the next step is to edit the image duration.
- Highlight all the images in the Sequence.
- Right-click on the first image in the sequence and select Speed/Duration.
- Change the Duration to 1 frame. Check the Ripple Edit box, followed by OK. All the clips will change in duration to 1 frame.
- Finally, select all the images, right-click, and hit Nest Sequence. Your time-lapse is now one clip so you can grade and add effects as you would a normal video clip.
You can also change the duration of your images before they’re added to the sequence by changing your Premiere Pro preferences. But keep in mind, that you might want to change this back once you’re done. You also need to do this before adding your images to the sequence:
- Go to the Premiere Pro menu.
- Select Preferences followed by Timeline.
- Change the Still Image Default Duration to 1 frame, and hit OK.
Editing Your Video Footage
If you collected video footage for your time-lapse, or if you have a stock clip in mind, you can turn that into a time-lapse style clip quite simply in Premiere Pro.
Step 1: Import Your Clip to the Timeline
- Set up your Project and Sequence.
- In the Project Browser, right-click and select Import.
- Navigate to your video clip, select and import it.
- Drag the clip from your Project Browser to the Timeline.
Step 2: Edit Clip Speed & Duration
- Import your clip and add it to your video sequence.
- Right-click on the clip and select Speed/Duration.
- Enter the new Duration of the clip, or adjust the Speed Percentage, click OK, and you’re done!
Part 3: 4 Top Tips to Capture the Best Photos or Video
- Once you’ve set your camera, don’t move it. Don’t even touch your camera; the slightest movement will have a considerable impact on the final clip!
- Just because the final clip is going to be a time-lapse doesn’t automatically mean it will look cool. Make sure you pay as much attention to framing, lighting, and focus as your other video/photo work.
- Check your camera regularly. If you’re taking photos, you should get a short review of each image as it’s taken. If you’re not happy with how one image looks, you’ll be unhappy with the whole clip, so it’s better to stop and start again. The same goes if you’re recording a video.
- Take something with you! Waiting around while your camera does the work can be pretty dull.
As you can now see, filming and editing time-lapse videos is technically quite straightforward. The hardest part about getting the sequence right is having the patience and stamina for your vision. Many filmmakers are perfectionists, and it can be difficult not to want to adjust your shot as you go. But trust us, this will only create problems later on!