


If you’ve never used After Effects blending modes before, don’t worry, you’re not alone. After Effects users often overlook blending modes, and to be fair, it can be challenging to understand what it is they do. To combat this, we’ve put together a comprehensive guide to After Effects blending modes to give you a shortcut to this powerful tool.
Summary
Part 1: What are Blending Modes?
Blending modes are a set of After Effects tools that tell a layer how to interact with the layers beneath it. There are 38 blending modes in eight different categories, each of which will tell After Effects which parameters to adjust.
When a layer has a blending mode applied to it After Effects will refer to the layers beneath it in the timeline. Depending on the mode you chose, AE will blend your top layer utilizing elements such as the light, dark, or color of another layer.
The easiest way to understand what blending modes can do is to play around with each one and see the differences for yourself. Some of the variants are pretty noticeable, but seeing what they do doesn’t tell you anything about how you would use them.
Blending modes are used for 2 main things: to help blend visual effects and create a stylistic look, such as double exposure. If you create VFX compositions, such as adding fire to a scene, blending modes can blend the effect into the background layer, helping it look more like a part of the scene. Likewise, blending modes are fantastic for creating unique looks, ideal for title sequences, motion backgrounds, and digital artwork.
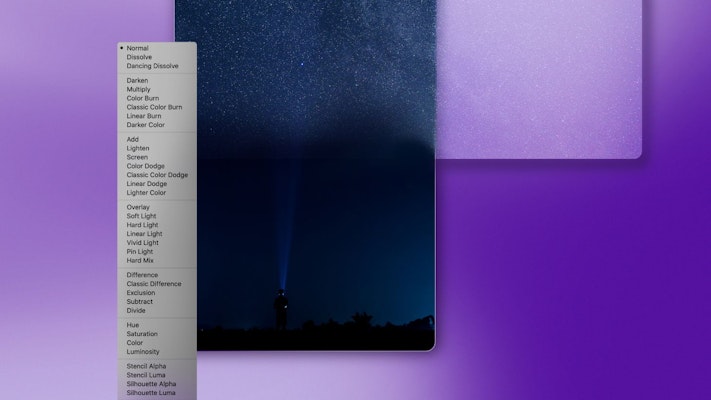
| Grouping | Blending Mode Options | Functions |
| Normal | Normal Dissolve Dancing Dissolve | No Blending |
| Darken (Subtractive) | Darken Multiply Color Burn Classic Color Burn Linear Burn Darker Color | These settings will darken the image and remove the Whites. |
| Lighten (Additive) | Add Lighten Screen Color Dodge Classic Color Dodge Linear Dodge Lighter Color | These settings will lighten the image and remove the Blacks. |
| Contrast (Complex) | Overlay Soft Light Hard Light Linear Light Vivid Light Pin Light Hard Mix | These settings will enhance the contrast in and between your layers. |
Comparative (Difference) | Difference Classic Difference Exclusion Subtract Divide | These settings will highlight the differences between your layers. |
| Color (HSL) | Hue Saturation Color Luminosity | These settings will perform color adjustments based on the Hue, Saturation and Luminosity. |
| Matte | Stencil Alpha Stencil Luma Silhouette Alpha Silhouette Luma | Converts Layer 2 into a matte for Layer 1, adjusting various parameters depending on the setting chosen. |
| Utility | Alpha Add Luminescent Premul | Special use. |
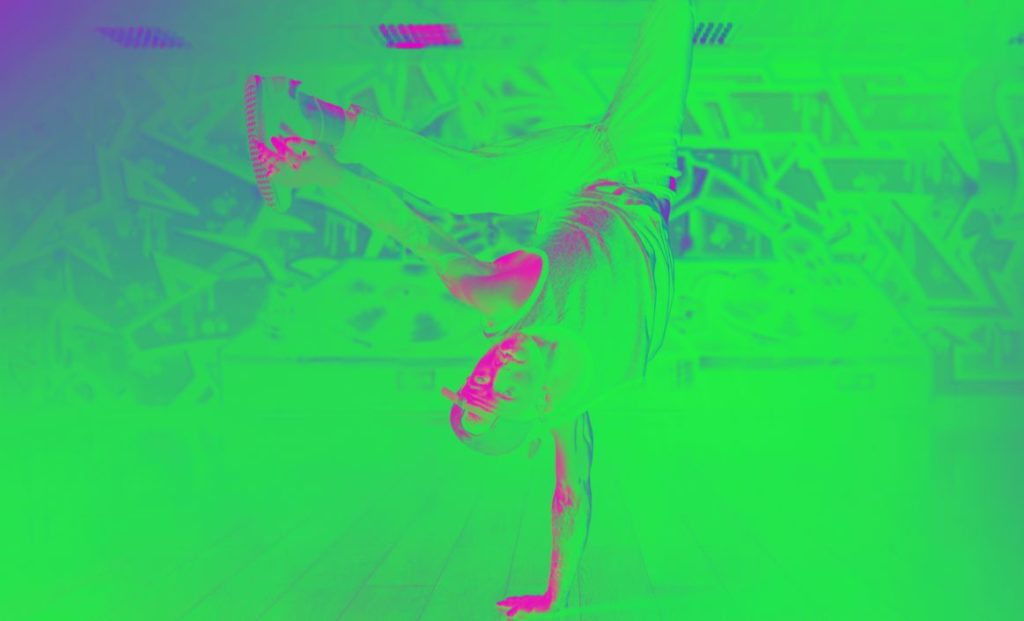
Part 2: How to Use Blending Modes in After Effects (Double Exposure)
You can use Blending Modes on their own or combined with other effects. In this tutorial, we will create an abstract Double Exposure effect, but first, let’s cover some basics.
- To find the Blending Mode options, press F4 on your keyboard (fn + F4 on a MacBook) or click through the icons in the bottom left of the Layer panel.

- Your top layer will always be dominant, so make sure the layer you want to affect is at the top of the stack.

- To easily scroll through the blending modes, select your Layer and press Shift and “+” or “_”.
Using Blending Modes to Create a Double Exposure Effect
In this step-by-step, we’re going to create the effect of a dancer moving across the face of our model, using the Hard Light blend mode. This effect works best with a high-contrast face shot.
- Add your face shot to your timeline.
- Right-click on the Timeline > New > Adjustment Layer.
- To the Adjustment Layer, add the effects Levels and Hue & Saturation.
- Adjust the Levels settings to increase the Contrast in your shot and balance out the image with the Hue & Saturation settings until you are happy with the look.
- Select your face layer and adjustment layer in the timeline and press Cmd/Ctrl + Shift + C to precompose your layers. Make the Compound Clip invisible.
- Drag your 2nd shot to the timeline below your 1st shot and add another Adjustment Layer.
- Search for Colorama in the Effects panel and add it to the Adjustment Layer.
- Click on Output Cycle and change the Preset Palette to Grey Ramp.
- Click on the left of the circle and select Black from the Color Picker. Click to the right of the circle and select White. 2 arrows will have been added to the outer circle.
- Drag the arrows to increase the blacks/whites and decrease the greys until you are happy with the look.
- Make your face compound clip visible.
- For your face layer, choose the blending mode Hard Light. Adjust the Scale and Position of your compound layers until you are happy with the composition.
Part 3: 6 Most Used Blending Modes in After Effects
With 38 blending modes to choose from, it can become quite a time-consuming task to find the right one to do the job. So, here are our top 6 go-to blending modes!
1. Multiply
Multiply is excellent for subtle changes to your footage and can help create natural-looking adjustments and tints to your composition. Multiply is the most used Blending Mode and is similar to adding lighting gels to your scene.


2. Exclusion
Exclusion is the go-to Blending Mode for creating abstract looks with your footage. The Mode plays with the Hue colors, allowing you to create completely different color palettes for your footage, ideal for creative projects like music videos.

3. Linear Dodge
Linear Dodge creates a dream-like effect to your clips, especially when combined with Opacity Adjustments. The mode adjusts the light and brightness of your footage, giving a surreal, overexposed effect.


4. Screen
You may have used the Screen Blending Mode already, as it is a key step in using Alpha Channels. The Screen Mode removes all of the blacks from your image, allowing you to overlay visual elements.


5. Add
Add is the perfect effect for Lens Flare and Light Leak elements. It removes the darker elements of your layer while blending with the color and light in the layer below.


6. Classic Color Burn
Classic Color Burn is a remarkable effect, ideal for creating vintage looks. The mode gives the feel of your colors being burnt into the screen and can also add VFX such as Street Lights to nighttime shots.


After Effects blending modes are powerful tools for both VFX work and for creating stylistic design elements. Once you add them to your workflow, you will surely discover new ways of applying and editing blending modes. If you’re looking for another set of incredible, undiscovered After Effects tools, check out this useful article about expressions.


