


The After Effects Ripple Effect can be used to create a massive range of video effects, from transitions to stunning motion backgrounds. You may have experimented with the AE Ripple Effect, but sometimes you can get better results using other techniques. So today, we’re going to show you how to create a ripple effect in After Effects without using the AE Ripple Effect.
Summary
Part 1: How to Create a Ripple Effect in After Effects
There are several Ripple styles to choose from depending on your needs, and a little planning can help make the animation a lot easier.
Step 1: Create the Wave Ripple Effect
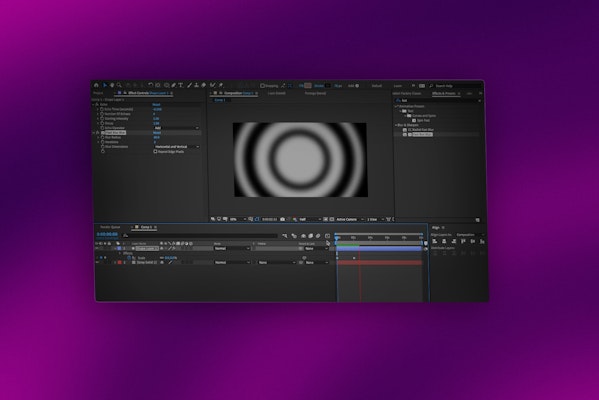
The Wave Ripple effect shows a circular ripple from above as if looking down at a pool of water and dropping something into it.
- Create a new composition for your chosen requirements. Here we are using 24fps and 10 seconds in length.
- Right-click in your timeline and choose New > Solid Layer – select a medium grey for the color.
- Create a new Shape Layer and draw a circle in the center of the screen. Turn off the fill and add a stroke in black.
- Add keyframes to the start of the Shape layer and set the Scale to 0. Move the playhead by 2 seconds and increase the size of the circle to be larger than the screen area.
- Add an Echo effect to the circle, and create a Delay of -1. Increase the number of Echos to 4. Play around with the Echo settings until you are happy with the frequency of your RIpples.
- Add a Fast Blur effect and set the Blur Radius to 60.
- Add Transparency keyframes to the ripples fade over time.
- Finally, duplicate your Ripple layer, and change the stroke to white. Move the second Ripple a little down the timeline so the Ripple appears as black and white circles.
- If you want to use the Ripple as a background and add some color, select all of your layers and Precompose them.
- Add a Solid layer in the color of your choice below the Compound Clip on the timeline. From the TrkMat menu, choose Luma Inverted Map.
Step 2: Create the Vertical Wave Effect
If you want to create a vertical Wave Effect (a droplet falling from the top to bottom of your screen), complete Step 1 and follow the steps below.
- Above your Ripple Comp, add a black and a white Solid Layer.
- Move the white Solid Layer, so it covers the button half of the screen.
- Add a New Adjustment Layer and position it above your other layers in the timeline.
- Search for the Displacement Map effect in the Effects Control Panel and add it to the Adjustment Layer.
- Set the Horizontal and Vertical Displacement to Luminance.
- Play around with the Vertical Displacement settings until you are happy with your Wave shape and height.
- If your wave is a little too perfect looking, you can create a little more distinction between waves by moving the white Ripple Layer slightly in the Ripple Comp.
Top Tip: If your animation is a little too fast or slow, rather than adjusting the keyframes on the ripple layers, Precompose the whole sequence and use Time Remapping effects instead. Check out this handy article for time effects.
Step 3: Create the Water Drop or Circle
You’re now at the stage where the Ripple effect looks like something is being dropped in the water, but you still need to add the object.
- Create a new Shape Layer and add a small white circle (or whatever your preferred shape)
- Find the point in the timeline where the Ripple begins. Place your circle directly over it and create a keyframe. This is the point that the circle needs first to touch the waterline.
- Add keyframes to your circle so that the object moves from top to bottom of your screen.
- Search for and add the Invert Effect to your Circle. Set the Blend with Original setting to 100%.
- Place your playhead just as the circle hits the waterline, and create a keyframe for the Invert Blend with Original setting. Move to just after the circle hits the waterline and add a second keyframe, changing the Blend setting to 0. Your circle will now turn black as it hits the water.
- Finally, add a Fast Blur effect to the circle. Use your Invert keyframes as a guide to making the circle blur when it is in the water.
Part 2: 5 Cool Ripple Effect Logo Reveals for After Effects
1. Ripple Logo
The elegant and stylish Ripple Logo Template contains two images & text and one logo placeholder. The swift and subtle animation is ideal for businesses and content creators that don’t want to keep their audience waiting.
2. Whirl Logo
The powerful Whirl Logo indent features a galactic style ripple and glows effect, warping your audience to your logo. The swirly waves with electric light effects make this template ideal for high-tech and futuristic content.
3. Drop Logo Reveal
The Drop Logo Reveal is a stylish and minimalistic opening indent, featuring a single 3D water droplet hitting the screen to reveal your logo. With full-color control, this stunning logo sting is easy to customize and match your brand.
4. Flip Ripple Logo Reveal
In this fun logo reveal template, your logo is the droplet that causes the Ripple. The fast flipbook style adds a unique animation to your logo before it falls into the screen, creating a straightforward ripple.
Download Flip Ripple Logo Reveal Now
5. Drop Logo
The Drop Logo template includes a smooth 3D transition as the camera pulls to reveal your logo beneath the water. The droplet effect is elegant, with plenty of customizability for colors and fonts.
Ripple Effects are a lot of fun and, once you know how, straightforward to create. Whether you are using a template or creating the effect from scratch, Ripples can be used for various project and business types. Now you’ve mastered the water Ripple, why not heat things up with this excellent Flame effect.


