


Blackmagic Design’s DaVinci Resolve is a huge program, and there are many different ways you can achieve the same outcome. Even for basic tasks, like importing media to work with into your project, can involve different steps and menus to navigate.
DaVinci Resolve is also a very robust program, capable of natively reading popular camera media formats such as RED Raw, ArriRAW, Apple ProRes, Avid DNxHR, as well as H264 media coming from cameras like a DSLR, GoPro, drone, and more.
However, the software cannot read file formats like MKV, AVI, or FLV. These kinds of formats will need to be converted to H264 first.
Read along, and we’ll cover the basics of importing media for video editing. The topics covered today will work for both the free and paid versions of Resolve. Let’s dive in!
Summary
Part 1: 3 Ways to Import Media into DaVinci Resolve
Before you can get started importing media, you’ll first need to create a Project.
When launching Resolve for the first time, you’ll be greeted with the Project Manager. Project management is a little different in Resolve compared to some other programs. Projects are saved in a single database, rather than a standalone project file.
- From here, click the New Project button.
- Give your project a name.
- Click Create, which will launch the project.
Before we continue, please be sure to reset the window layout. This way, your screen following along at home will match what you see in this tutorial. But don’t worry, to revert the interface to default click Workspace > Reset UI Layout.
Perfect! With that complete, you can now start importing your media files.
1. Import Media into the Cut Page
The Cut Page is a recent addition to DaVinci Resolve and is built around the concept of speed. These tools allow you to get up and running with your footage quickly and piece together a rough edit. To get started, you can download a few pieces of free stock video from Motion Array (if you don’t have footage of your own already).
To bring footage into the Cut page:
- Click Import Media to bring in one, or a selected number of video clips. Press and hold the Command (Mac) / Control (Windows) key while mouse clicking to select multiple pieces of video. You can also lasso with your mouse to grab a number of clips.
- Or, click Import Folder to add a folder of media, usually in the form of a camera card, or an entire day’s shoot.
You may be greeted with the prompt “clip(s) have a different frame rate than the current project settings.” If you are unsure what your frame rate settings should be, we recommend clicking “change” to have your project match the footage.
2. Import Media Right into the Edit Page
Alternatively, you can choose to import media in the Edit page rather than the Cut page. It’s important to note that the timeline is the same between either page. When moving between Cut and Edit, you’re still in the same project and the same timeline.
The Cut page is somewhat similar to Final Cut Pro X, with a large focus dedicated to visual trimming. The Edit page is more similar to Premiere Pro, with a traditional “two-up” display of a source and record monitors, full timeline, and effects editor window (by means of the Inspector).
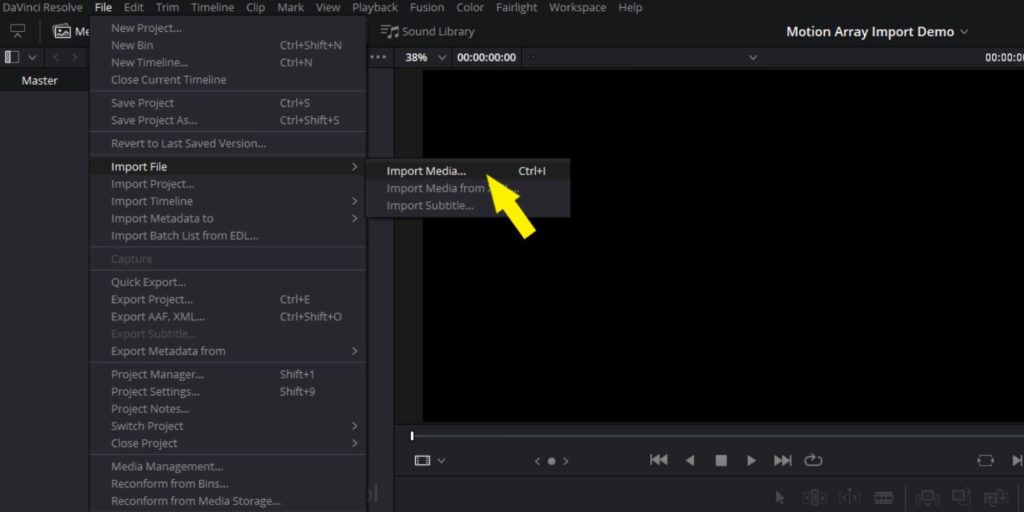
The Edit page does not feature a dedicated Import button. To import media:
- Click on the menu bar and select File > Import > Import Media.
- Similar to the Cut page workflow, navigate to the folder where you media lives, select the clips and click Import.
3. Import Using the Media Page
The Media page in Resolve is a place dedicated to reviewing your files, and deciding what exactly you would like to import. This page features a robust video player that can load many popular media formats instantly.
Why would you use the Media page when you know how to import media in the Cut and Edit pages? One of the main reasons is the ability to watch the video before importing it. If you’re working with a lot of clips and you know you won’t need all of them, the Media page can help sift things down.
To import media in the Media page:
- Navigate to the Media page on the ribbon navigator.
- Go to the media location on your drive that you will want to import by using the directory tree in the top left of the window.
- Click on a clip to preview it in the monitor.
- Simply drag and drop clips from the folder tree into the Media Pool, to bring them into the project.
- A dialogue box about mismatched frame rates may appear. If you are unsure what your frame rate settings should be, we suggest clicking “change” to match the project to the footage.
The same keyboard shortcuts apply here as well. Command (Mac) or Control (Windows) will select multiple clips, and Shift + clicking will select a range of clips that can be imported at once.
Part 2: Pro Tips & Common Issues
1. Imported Files Are on Your Hard Drive
It’s important to know that the video files you’ve imported into your project are still on your hard drive, right where you left them. By importing the video clips, you’re not moving them from one place to another. Importing media simply references the videos on your computer.
2. Relinking Clips
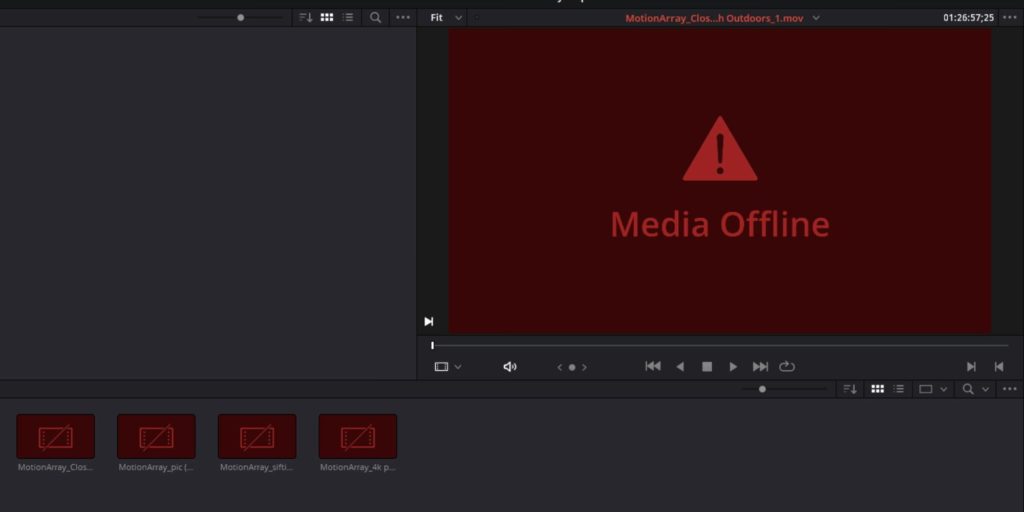
If you see the screen above, don’t panic! Media can go offline from your project. What does that mean? As mentioned above, video files aren’t in your DaVinci project file, but instead, are referenced between the software and the location on your hard drive.
The most common culprit for the image above is that files were moved from one folder to another after they had already been imported into an editing session. It’s easy to relink your media, and this tutorial will show you exactly how it’s done.
Here are just a few different ways on how to import media into DaVinci Resolve and start a new video editing project. Importing from the Cut or Edit pages are very fast and great if you know exactly what media you want to import, and where it can be found on your system. The Media page is built around previewing clips before bringing them into your project. Either method is equally effective!


