


Syncing audio might seem like a challenging task, but if everything in your production is done correctly, you can sync your clips in just a few minutes. Final Cut Pro is a fantastic tool for audio synchronization and Multicam editing, so we put together a quick beginner’s guide to syncing and troubleshooting your audio and video clips. Let’s jump in!
Summary
Part 1: Learn to Sync Audio in Final Cut Pro
When your audio is recorded separately from your video, you will need to perform some audio syncing. There are many instances when you need to record separate audio, such as music videos, large-scale productions with multiple cameras, or if you want to get a better audio quality than your camera.
Fortunately, FCP has a couple of quick and simple ways to sync your audio recordings with your video clips, so long as you have recorded them correctly in the first place.
Recording Your Audio and Video
To record your audio separately, you will need to consider what you are recording and the available kit. If you are recording a large conference, for example, you may take a recording through the venue PA system. If you shoot a talking-head piece, you might be using an external recorder and boom mic.
Whatever your setup is, there are 2 things to remember when recording separate audio:
- Your video recording device must also be receiving audio. While you may have no intention to use the audio track, your editing software needs it to sync it.
- Try to start and end your video and audio recordings simultaneously. The closer you get the timings, the easier Final Cut Pro will find to sync the two tracks.
Sync Audio Options
Once you have recorded your clips, you’ll need to import them into a Final Cut Pro project. Don’t add anything to the timeline yet – all audio syncing is done from the project browser. If you are working with many different clips and need to perform multiple syncs, it can be helpful to go through your project browser and check the name of your video clips to match the audio they need to be synced with.
- In the project browser, select the video clip you want to sync.
- Hold Cmd on your keyboard and select the audio clip you want to sync. The audio and video clips should now be highlighted in your project browser window.
- Right-click on one of the highlighted clips and select Synchronize Clips, or hit Option+Cmd+G on your keyboard.
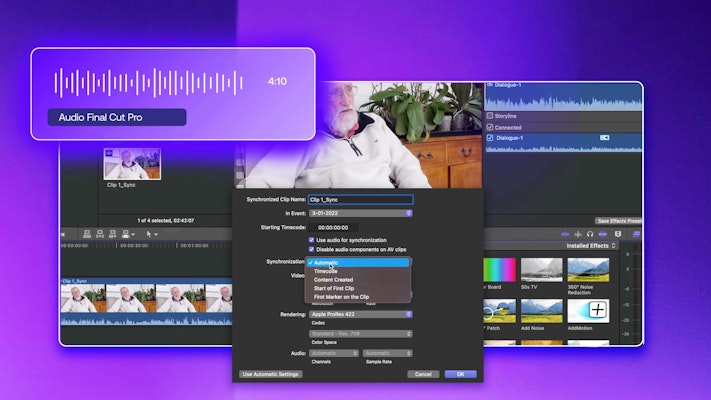
- You will see several options: the first step is to name your clip.
Note: It can be helpful to call it similarly to the original video clip.
- You can choose the event to save the clip in the drop-down menu. If you have set up your Library correctly, you shouldn’t need to change this.
- In most cases, you’ll be asking FCP to sync the audio and video using the scratch audio attached to the video clip, so ensure the Use Audio for Synchronization box is checked.
- The Disable Audio on AV Clips checkbox is handy if you know you will not use the camera audio. Check the box, and FCP will turn off the camera audio after it syncs.
- If you click the Advanced Settings, you have more options, including the aspect ratios and frame rate of the synced clip. You can also choose how the clips are synced, for example, based on timecode. In most instances, you will want to use the scratch audio as the basis for the sync, so make sure Automatic is selected.
- Once you have checked all the settings, hit OK. The pop-up will close, and your synced clip will be in your project browser. You can quickly identify the synced clips by the chain icon in the top left corner.
- You can now drag your synced clip to the timeline and edit as you would any other video asset.
- In the Inspector, you can edit the Volume and Panning Modes. The Audio Configuration setting will allow you to turn the audio tracks on and off independently.
- If you need to adjust the audio syncing manually, you can open the synced clip by double-clicking it in the project browser. In this way, synchronized clips are similar to compound/nested sequences.
Multicam Options
Multicam editing is the second option for Audio Syncing, but this is used when multiple camera and/or audio sources are used. Multicam editing is a lot of fun and can save you hours when cutting from more than one camera angle.
- With your clips imported into the project, go to the project browser and select the audio and video clips you want to turn into a Multicam clip.
- Right-click in the project browser and choose New Multicam Clip.

- Go through the pop-up settings, similar to the Audio Sync settings, and choose how you want to create your Multicam clip.
- Hit OK when you are ready, and your Multicam clip will appear as a single asset in the project browser, marked with an icon of 4 small rectangles.
Check out this handy guide to learn more about using the Multicam process in FCPX.
Part 2: Troubleshooting Tips for Audio and Video Sync Issues
Many issues can arise when editing standard footage, so the FCP Audio Sync can add another layer of the potential problems. Let’s look at the top 5 issues you might come across and how to resolve them.
FCP Not Syncing Correctly
The first and most obvious issue that you might find is Final Cut Pro not syncing your audio correctly. If your audio still doesn’t match the video, it will likely be that FCP can’t get enough information from the scratch track to perform the sync.
If the sync is out by a few frames, double click on the synced clip and manually adjust the audio position until it matches. If the audio is way out, it is worth trying a little editing on your camera audio; modify the scratch audio, so it is as clear as possible, export the clip and re-import it. Try syncing the audio track with the new video track. The clearer audio might help Final Cut sync the clips.
Audio Not Syncing
If you’ve imported a clip with audio attached, but in the timeline, the playback is a little out of sync, it could be to do with your sequence settings. This issue occurs with video clips in various situations and has nothing to do with the audio syncing functions.
The cause is likely that the video settings are different from your sequence settings, specifically the frame rate. To avoid this happening, right-click on the clip in the project browser and choose New Project.

Canvas Size Issues
Occasionally your canvas size will affect the playback of your clips, especially if you are zoomed into a clip. Make sure your media viewer is set to Fit. Check the drop-down menu at the top of the media viewer and avoid zooming in to your clips for playback.

Check Machine/Software Capabilities
Many issues with unsynced or jittery footage are to do with the playback, not your actual clips. Rendering and previewing footage is a tremendous amount of work for your device, especially for more extended or more complex footage types.
Always ensure your device meets the minimum software requirements of Final Cut Pro X, and that your software is up to date.
Export to a Single File
Sometimes no matter how fantastic your device set up is, the footage you are working with has problems playing back. If you use multiple angles with many synced clips, your machine might struggle to preview your composition.
If you’ve checked everything else on this list, try exporting your synced clips to a single file. Exporting can take a while if you have a lot of clips, but by creating a new file to edit with, you are saving FCPX from having to render your audio sync each time.
Working with multiple camera angles and audio sources might seem challenging, but FCPX is a reliable tool for quickly combining your assets. Whether you are using the audio sync or Multicam functions, Final Cut Pro offers outstanding simplicity for this complicated task. Now you’ve got the steps to sync your audio. You can have more freedom and creativity to shoot your projects.


