There have always been trends in documentary filmmaking, usually born from a desire to add excitement to what can be a dull format. Johnny Harris creates new trends with his unique editing style with dynamic animations and textured effects. Today, we will show you 3 ways to get that Johnny Harris style and improve your documentary projects in Premiere Pro.
Summary
Part 1: Create Vivid Still Photos
The Ken Burns effect has been widely used to add movement to still images since the early 90s. While the continuous movement of Ken Burns is still a great choice, this Johnny Harris trick can take your photos to another level.
- Add your Photo to the Timeline and adjust it to its final position and scale.
- Place your Player line about 8 frames in from the start and create a Keyframe for the Position.
- Move back to the start of your clip and create a second Keyframe, adjusting the Position so the image slides from the top.
- Right-click on the last Keyframe and go to Temporal Interpolation > Ease In.
- Click the downward arrow alongside Position settings to reveal the Graph Editor.
- Drag the Handle of the second Keyframe toward the first to create a curve in the Graph.
- Search for Gaussian Blur and add it to the Photo.
- Create Keyframes at the same points as the Position animation.
- Adjust the first Blur Keyframe setting to about 50.
- Use an old camera or projector sound effect over the animation to finish off the effect.
Part 2: Match Cut on Text
The Match Cut on Text effect is a fantastic option for exciting titles in your project. Depending on the number of images you want to use, the process can take a while, but the results speak for themselves.
- Create or find text that contains your chosen word or phrase and take photos or screenshots; you’ll need at least 12 examples.
- Make sure that the line you want to focus on appears at different points in the page or paragraph.
- Import your photos into Premiere and place them on the Timeline in the order you wish to use them.
- Go to Show > Rulers, and line the blue lines with the center of your screen.
- Reposition each Photo so that the focus phrase sits in the center of the screen.
- Adjust the length of each image, so the first few are about 8 frames in length, then faster towards the end.
- Add camera click sound effects to the start of each clip, timed with the cut.
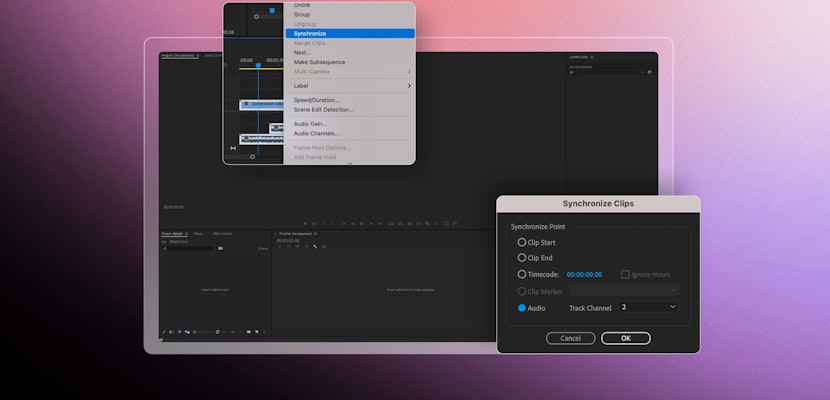
- Finally, Nest the entire sequence by selecting everything, Right-click > Nest…
- If you want to adjust the Scale and Position of your title, you can change the Nested Sequence rather than each Photo.
Part 3: Use Textures
Texture plays a huge role in Johnny Harris’ work, with most graphics and photos including a mix of textured overlays, Film Burns, light leaks, and Noise & Grain effects. You can achieve a vast range of styles using different textures, suiting any documentary subject.
- Place your texture on top of your footage.
- In the Control Panel, change the Blend Mode; play around with the different modes to find the look you want.
- Select everything in the Timeline and Right-click > Nest Sequence.
- Select the Nested Sequence and hit Command/Control+D on your keyboard to duplicate the layer.
- Select the top of the sequences, and add a Gaussian Blur Effect.
- In the Control Panel, grab the Gaussian Blur circular Mask tool and create an oval on the screen.
- In the Effects Control Panel, check the Inverted box for the Blur, and adjust the Feather setting to blend the edges.
Bonus: Top 5 Premiere Pro Documentary Templates
1. The Watch of Story
The Watch of Story template is a fantastic vintage-looking opening title sequence with plenty of media placeholders. The project blends old-style photos or videos across sepia textured backgrounds with beautiful slow zoom movements.
Download The Watch of Story Now
2. The History/Documentary Slideshow
The History/Documentary slideshow is an action-packed title sequence with 12 customizable text and media placeholders. The template mixes Venetian blind and photograph style layouts with beautiful ink explosion transitions.
Download The History/Documentary Slideshow Now
3. Vintage History Slideshow
The Vintage History Slideshow is a fantastic opening sequence featuring 11 media and 12 text placeholders. Your media becomes printed photo style elements over grungy backgrounds with retro postcard stamp flourishes.
Download Vintage History Slideshow Now
4. Newspaper History
The Newspaper History template is a beautiful opening/title slideshow featuring 3D tracking across headlines and images. The grainy black and white style gives a vintage feel. Super easy to use, just drag and drop to replace media and titles!
Download Newspaper History Now
5. The Documentary
The Documentary template includes 16 media and 11 text placeholders in an incredible mix of modern and vintage design. The grain and burn effects offer a retro video, while the neat split-screen and graphical flourishes give the project a unique look.
Johnny Harris’ work is a fantastic example of creating exciting documentary content Premiere Pro. The 3 tricks we’ve shown you today are easy to make, help your work stand out, and improve the viewing experience for the audience. If you want to learn more neat tricks for documentary editors, check out this Old Film Effect tutorial.