Creating focus-based effects in Premiere is a simple and straightforward process with the powerful Gaussian Blur Effect. From creating stunning text backgrounds to faux focus pull effects, you can use the Premiere Pro blur in various ways, and today, we’ll take you through the three most common uses.
Summary
Part 1: Learn 3 Popular Gaussian Blur Effects in Premiere Pro
The Gaussian Blur effect in Premiere Pro is quite a simple effect – it blurs your footage to whatever degree you’d like. When combined with Premiere Pro’s other tools, however, such as masking and keyframing, you can create subtle, gradual blurs or blur people’s faces and even create complex focus pulls. Let us show you how!
1. Gradual Blur Effect
Adding a Gradual Blur effect is a great way to start or end your piece or as a way of giving extra clarity to titles on top of your footage. We’re going to show you how to go from blurry to focused, but you can use this keyframing technique to blur in and out of clips as frequently as you need to.
- Drag your footage to the timeline and trim your clip if needed.
- Go to the Effects tab and search for Gaussian Blur; drag it to your clip.
- In the Effects Control panel, change the Blurriness setting to your desired blur level.
- Place your playhead at the start of the timeline and click the stopwatch next to your Blurriness setting.
- On your playhead, select where you want the blur to end and reduce the Blurriness to 0.
- You will now have 2 keyframes in the Effects Keyframe panel. You can drag them in either direction to extend or shorten your blur effect.
- The blur causes the edges of the frame to darken, as pixels are missing to create the effect. However, this can be fixed in two ways: the first is to click the Repeat Edge Pixels box.
- The 2nd is to create 2 additional keyframes at the same point as the blur effect, this time for Scale. Increase the scale of your video at the first keyframe until the black edges are off-screen.
2. Face Blur Effect
The Face Blur effect is the most often used to cover people that haven’t permitted to be filmed; you will see this a lot in documentaries. You can also use this method to blur brand logos, car registration plates, and other sensitive elements to your shot.
- Edit your footage in the timeline and add the Gaussian Blur effect.
- In the Effects Control panel, adjust the Blurriness setting until you can no longer make out the person’s features.
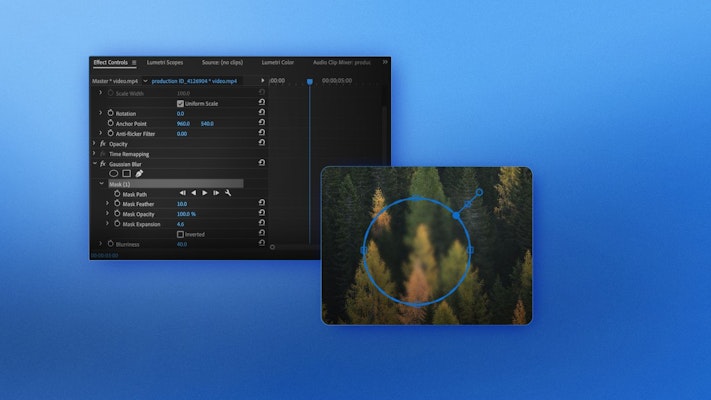
- Select the Mask tool that is most similar to the shape you want to blur; a Circle is often the easiest for a face.
- Drag the mask to cover the face and resize by dragging the edges. If you hold Alt and click on the mask points, the handles will appear, allowing you to adjust the shape further.
- Drag the box to the outer edge of the mask to add a dissolve to the blur.
- Once you are happy with your blur, and without moving the playhead, click the stopwatch icon alongside the mask path to create a keyframe.
- Once the first keyframe is in place you can move your playhead along the clip, moving the mask each time, and a new keyframe is automatically created.
- Go through your whole clip, adjusting the position of the mask until it plays smoothly. Depending on how much movement is in your footage, this step can take some time.
3. Focus Pull Effect
The Focus Pull effect is best applied to footage with clean lines between the foreground and the background of your shot. As you will be using masking for this technique, it is also easiest on footage with little or no movement in the scene.
- Edit your clip in the timeline and apply the Gaussian Blur effect. Set the Blurriness to the level you want your background to appear out of focus.
- Place the playhead on the first frame of your clip. Under the Opacity setting, choose the Pen tool and draw a mask around your foreground object.
- In the Effect Control panel, click the Repeat Edge Pixels box. Change the Mask Feather to 10-15; you can also change the Mask Expansion if you need to give yourself a little more edging for the feathering.
- Finally, hit Invert on your mask, so your foreground element is empty.
- In the timeline, hold Alt and drag your clip up a layer to duplicate.
- Select the bottom of the two layers and delete the mask. Reduce the Blurriness to 0, and you will have your elements separated by the blur effect.
- To change the focus from the foreground to the background, we need to add keyframes to the Blurriness level. With your playhead at the start of the clip, click the stopwatch alongside Blurriness level for both layers.
- Move the playhead to the point you want the focus pull to have completed, and create a second keyframe for each level.
- Change the Blurriness level of your background layer to 0, and the foreground Layer to your desired blur; your footage should now pull from the foreground to the background.
- You will notice that your mask does not perfectly match your shot and can be some way off if there is a lot of movement in your scene, this can be fixed by adding keyframes to your mask.
- Select the mask layer in the timeline, and make sure your playhead is at the start of your clip where the mask perfectly aligns. Create a keyframe alongside the mask path setting.
- Go through your clip, adjusting your mask to match the clip. At the points where both clips are out of focus, you shouldn’t need to be as precise.
Part 2: Top 5 Blur Transition Templates to Download Today
1. Light Blur Transition
Light & Blur Transition offers an elegant range of 10 vibrant light leak transitions to utilize for your projects. This Premiere Pro template is ideal for adding style to your photography portfolio, family photo albums, or presentations.
Download Light Blur Transition Now
2. Panoramic Blur Transitions
If your project needs a touch more of a contemporary feel, then the Panoramic Blur Transitions for Premiere Pro is the template you need. Modern and sleek in design with 12 uniquely animated transitions, this is perfect for slideshows, opening credits, or as a neat transition between scenes.
Download Panoramic Blur Transitions Now
3. Sliced Blur Transitions
For high-energy content that needs that extra something, Sliced Blur Transitions has a lot to offer with its 20 impactful transitions that provide a range of inventive ways to divide the screen. Perfect for music videos, exercise tutorials, sports highlights, and so much more!
Download Sliced Blur Transitions Now
4. Fast Blur Transitions
This high-powered template has 11 stunningly animated transitions to choose from to add immediacy and visual flair to your project. Fast Blur Transitions is an ideal addition to your event promos, sports reviews, trailers, slideshows, and social media videos.
Download Fast Blur Transitions Now
5. Rotating Blurred Transition
The Rotating Blurred transition pack contains 8 incredible zooming, rotating, blurring transitions. Offering both clockwise and counterclockwise animated rotation, this is perfect for music videos, intros, credit sequences, or give your slideshows and presentations that extra movement.
Download Rotating Blurred Transition Now
The effects you can create using the Premiere Pro blur effects will depend on how the footage has been shot and how much time and energy you want to put into your mask and keyframes. However, there is no doubt that the Gaussian Blur effect is a powerful tool when applied creatively, and it can also be a lot of fun to use. If you’re interested in finding out more, check out this tutorial on 3 Creative Ways to use blur in Premiere Pro.