After Effects offers a range of tools that will allow you to create pretty much any effect, the trickiest part of creating incredible digital effects is knowing the methods to making them. In this step-by-step tutorial, we’re going to show you how to bring subjects from a 2D photo into the 3D world of your film.
Step 1: Filming your Clips
To create this effect, you will need to shoot some specific shots, and planning is essential in this step. Knowing how you will achieve the effect in AE before you shoot your scene can help for a smooth editing workflow.
- Set up your camera to include the whole background scene and the areas your performer(s) will be positioned.
- Film a clean plate of the scene with no action and without moving the camera. You’ll want to make sure this is longer than your action sequence.
- Once you have your clean plate recorded, make sure you don’t move the camera and record a second clip with your action. For this example, we are placing the photo frame over the dog’s head.
- Once you have completed your actions, keep the camera rolling and record a second clean plate in one continuous take.
- If you need to re-record your action sequence, remember to ensure you get a full clean plate at the end of the sequence. This will help account for differences in lighting, etc.
Step 2: Setting up your Clips
Once you’ve filmed your clips, you’ll need to import them into After Effects and do some work to set the project up. This step shouldn’t take long but will make the process a little easier to understand.
- Create a New Comp and add your footage to the timeline.
- The first step is to divide the long clip into separate sections; play through the clip and use Ctrl+Shift+D or Cmd+Shift+D to split the clip into your Action sequence and your Clean plate clips.
- Delete any portions of the clips you don’t need, or trim the ends using Alt+[ or ] or Option+[ or ].
- Place your Clean plate below your Action sequence in the timeline.
- Adjust the project’s end point so you are only working with the clip’s length. Place the playhead where your clip ends, then press N.
- Right-click at the end of the timeline and choose Trim Comp to Work area.
- Using Cmd+D or Ctrl+D, duplicate your Action sequence layer.
- Rename your layers so that the top is called Still Frame, the middle is Main Footage, and the bottom layer is Clean Plate.

Step 3: Creating the Still Image
Next, the photo frame needs to be filled with the still image of our subject; it is crucial to choose the right frame, as this will dictate when the magic happens.
- Scroll through your timeline and choose the point you want your still image to come to life.
- Right-click on the Still Frame layer and choose Time > Freeze Frame; this will turn your top layer into a still image.
- Grab the Pen tool, and with the Still Frame layer selected in the timeline, draw around the inside of the photo frame.
- With your playhead in the same position, select the Still Frame layer and use Cmd+] or Ctrl+] to trim the clip length.
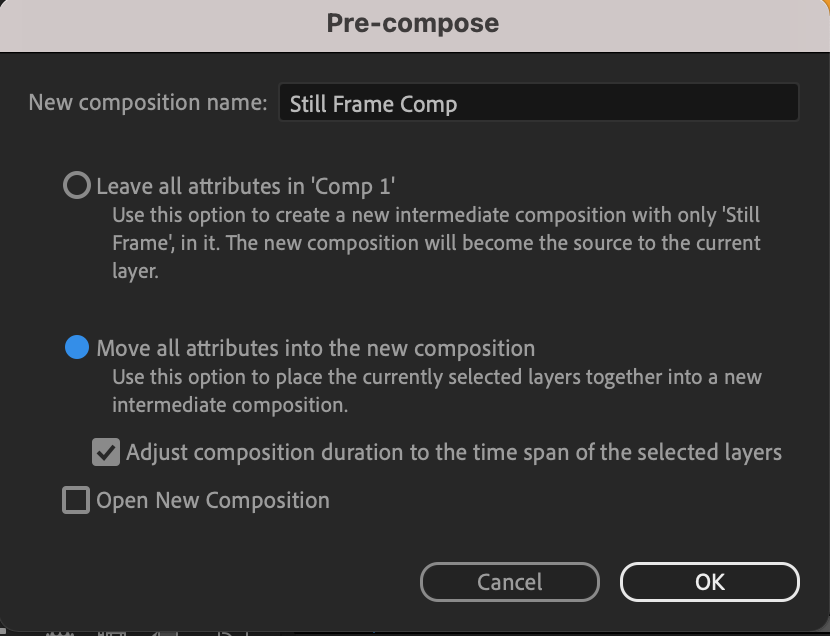
- Right-click on the Still Frame layer and choose Precompose…make sure you choose to Move All Attributes to the New Layer.
Step 4: Adding the Tracker
After Effects Trackers allow you to map a layer onto another and follow the movement in the scene, the tracker will work best with clips that have a lot of definition and clear contrast between the shapes you want to track.
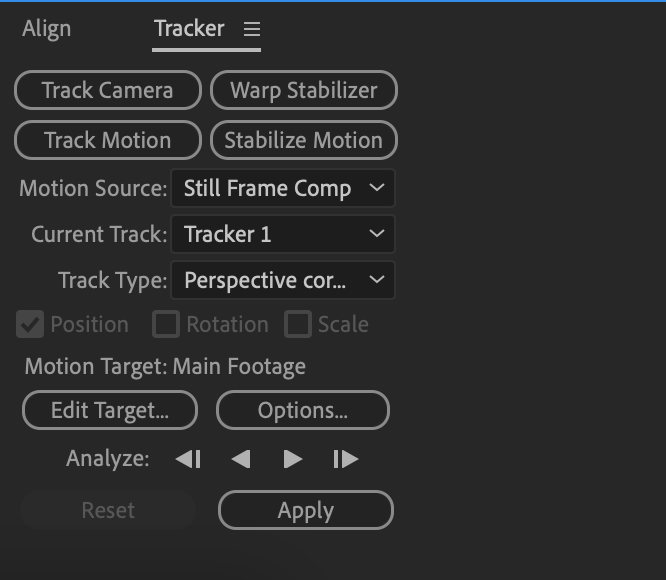
- Select your Main Footage layer and go to Window > Tracker.
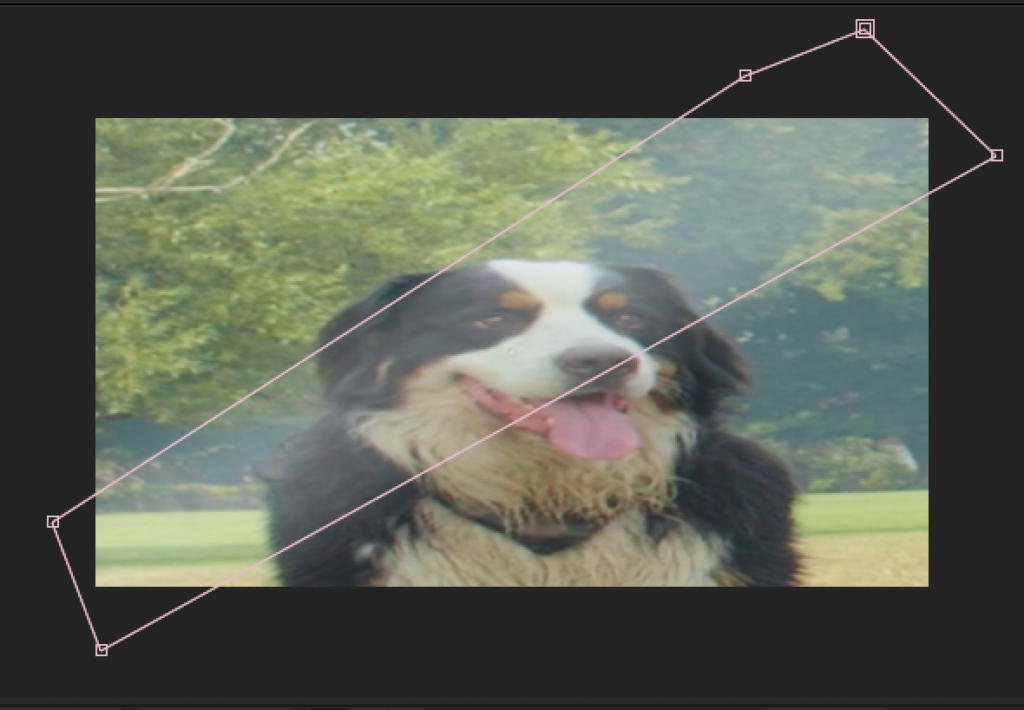
- Choose the Track Motion option, and then under the drop-down menu, choose Perspective corner pin. Then 4 tracking boxes will appear on the screen.
- Move the boxes to the inside corners of your photo frame; be as precise as possible.
- Increase the size of the boxes to cover the whole corner of the photo frame
- Using the arrow keys in the Tracker panel, track backward one frame at a time, ensuring with each frame that the tracking boxes are in the correct places.
- Select your still frame layer and hit S for the Scale properties.
- Click the box to turn off the Shape Uniform and adjust the Scale and Position to fill the screen as much as possible.
- Right-click the still frame layer and choose Precompose.
- In the Effects Control panel, search for Corner Pin and add it to the Still Frame layer.
- Drag the corner pins in the still frame layer to stretch the image to full screen.
- Precompose the Still Frame layer one more time; don’t worry about how the image looks at this stage.
- Select the main footage layer and go to the Tracking panel; check that the type is still Perspective corner pin.
- Change the Tracking Target to the Still Frame Layer and hit Apply.
Step 5: Hiding the original Subject
The effect looks pretty cool at this stage, but we still need to remove the subject from the first part of the Main Footage. This is where the Clean Plate comes in; we’re going to cut a hole in our Main Footage Layer to reveal the empty plate below.
- Select the Main Footage layer, and using the Mask tool, create a mask over the subject.

- In the Layer panel, choose Subtract from the mask drop-down menu.
- Increase the Mask Feather to blend the edges.
- Move your playhead to the point your photo comes to life, and create a keyframe for Mask Path.
- Move forward a frame at a time, adjusting the mask to match the movement of the photo frame.
- Keep adding keyframes and adjusting the mask until the action sequence is complete.
Step 6: Finishing Touches
You can leave the effect here if you are happy with the look, but a couple of minor effects can take your composition to the next level.
- Open the Still Image precomp to reveal the full-screen image.
- Right-click in your timeline, then choose New > Solid; make sure the solid color is white.
- Using the Pen tool, create a mask over the solid in a Rectangle shape, diagonally across the screen, and increase the Mask Feather.
- Open up the Layer Opacity settings by pressing T, and create a keyframe at the start of the clip; set the Opacity to 25%.
- Go to the end of the clip and reduce the Opacity to 0.
Pro Tip: Add a camera shake effect to your sequence for a more organic and authentic feel. Check out these fantastic camera shake presets, available to download today.
Bringing 2D images into a 3D world might look like a complicated and time-consuming effect. However, with some practice, and planning, you can bring your photos to life in After Effects and impress your audience with the magic of editing. What smore, you can use this technique for anything with a frame; why not try bringing characters out of a TV Screen or laptop for a unique narrative device.