


Low contrast, noise, and softness… Growing up in the VHS age was great! Well, maybe. Learn how to add a bit of texture and some vintage flair to your projects by creating the VHS look. This 2-part tutorial is going to walk through how to build up this effect on your own timeline.
Summary
Part 1: How to Make Vintage VHS Effect in DaVinci Resolve
How to Add the VHS Aesthetic
Images of a VHS effect might suggest that this is a motion graphics project and that you would start your project in the Fusion page. However, this is not how we are going to tackle our project. We are going to start on the Color page to do quite a bit of the heavy lifting, and follow-up with an adjustment clip on the Edit page.
Step 1: Prepare Your Timeline
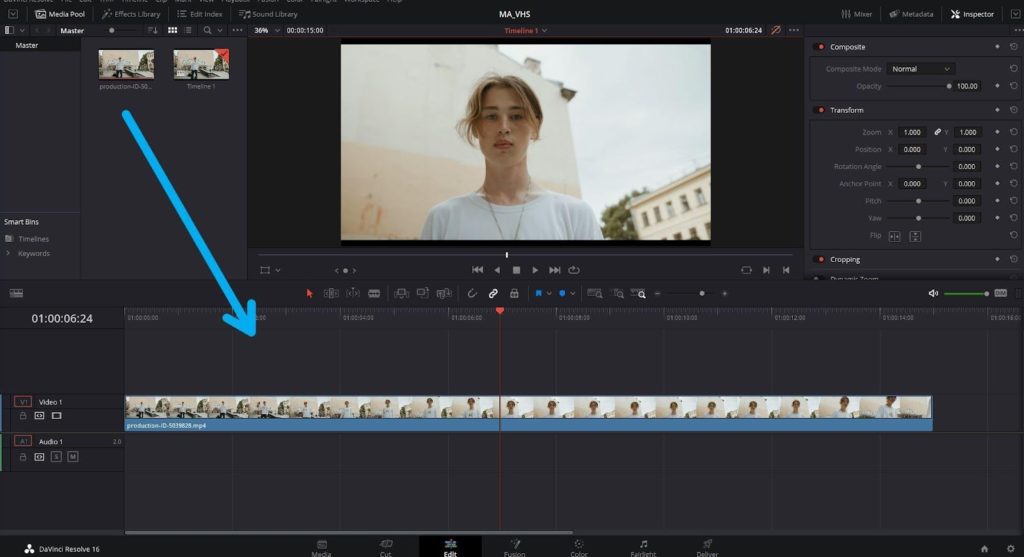
Pick which clips you want to work with – either a whole project or just a few shots.
- Drag and drop your footage from the Media Pool into the Timeline.
- Place your playhead overtop of the clip you want to start with, and click the Color panel on the lower navigation ribbon.
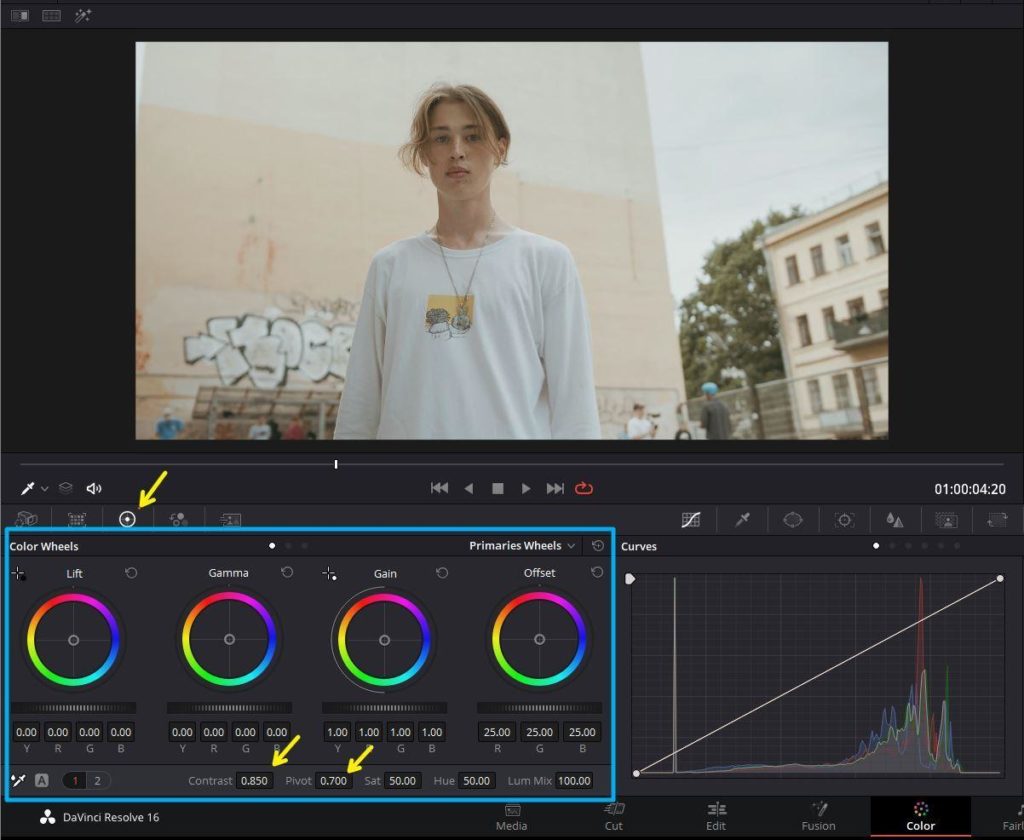
Step 2: Set the Mood
VHS was a very limited format in terms of quality, especially with regards to home camcorders. We’re going to start to degrade our footage using DaVinci Resolve’s Color tools.
- On your first node lower the Contrast. This can be done by opening the primary wheels tool (3rd panel from the left) and clicking and dragging your mouse over the contrast value in the lower left of the screen. The base value is 1.0, try something around 0.85.
- Adjust the Pivot to your liking. The pivot controls the offset weight between the darkest and brightest regions in your shot. Baseline value is 0.435, to reveal more detail in the midtones raise this value to 0.700.
Step 3: Chromatic Aberration
Video files are comprised of a combination of separate red, green, and blue images. These individual color channels are merged behind the scenes and form the video files we normally work with, without any thought into how this process exactly works. It is possible though to break out those channels individually and make adjustments to each channel. This process is known as chromatic aberration – when there is an anomaly with any one specific color channel.
- On the menubar select Color > Nodes > Add Splitter/Combiner Note
- Add another node at the end of the graph by going menubar Color > Nodes > Append A Node
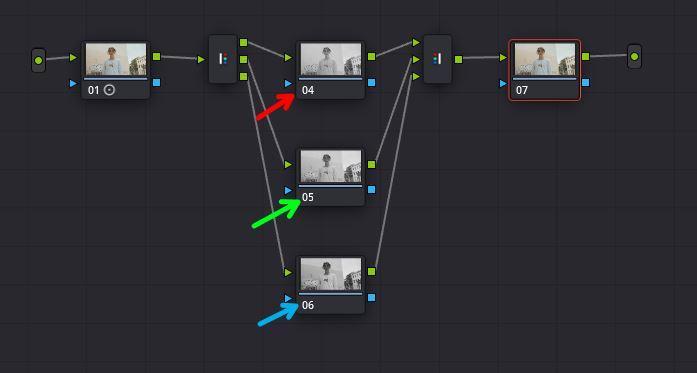
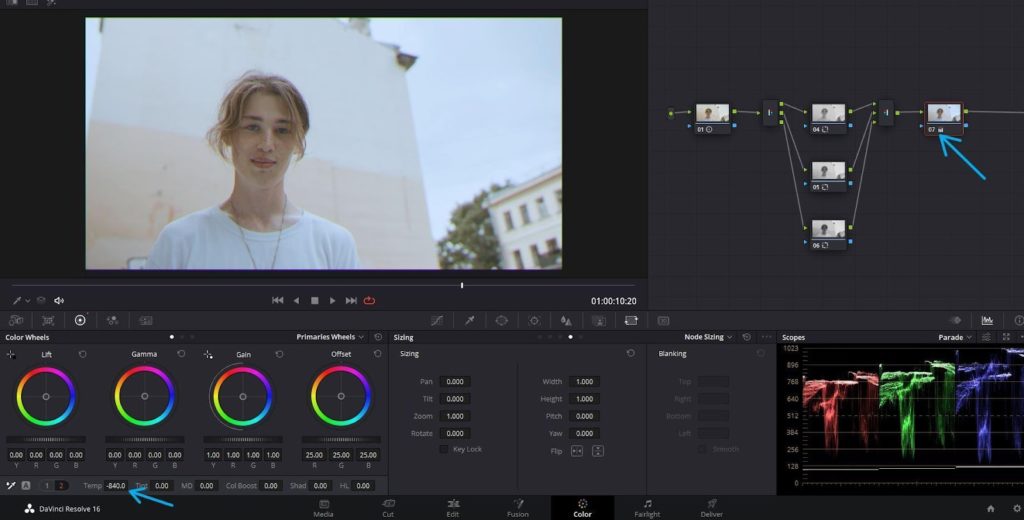
Notes 4, 5, and 6 represent the red, green and blue channels.
- Select the red node (node 4) and move into the Sizing tab. Ensure you have the Node Sizing sub-tab open, and move the pan value to 2.000.
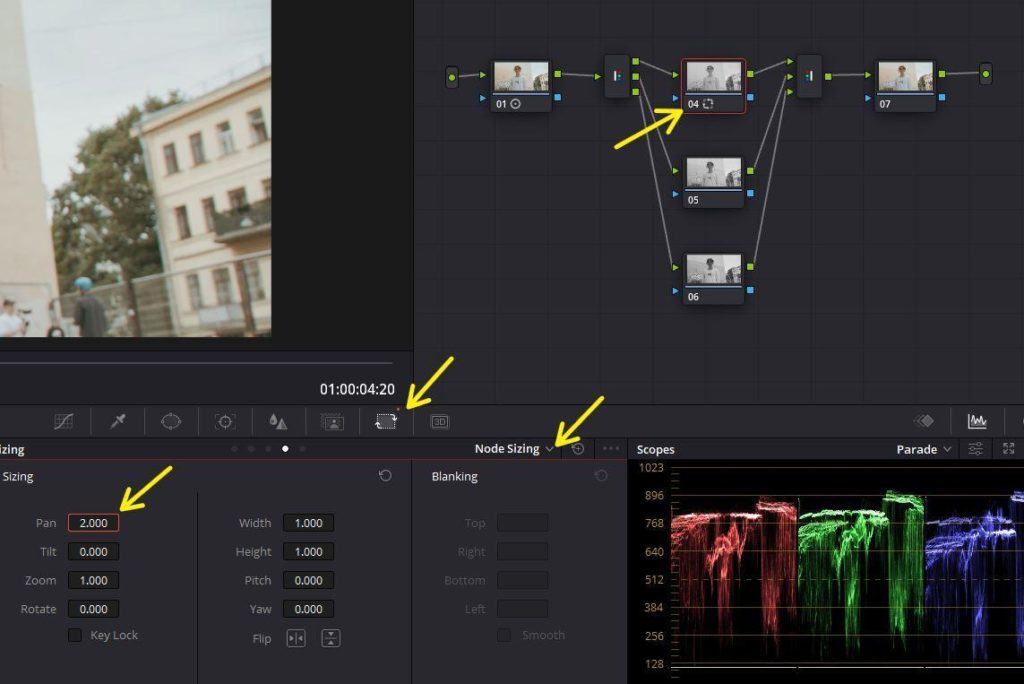
- Repeating this process, click node 5 which is the green channel, set the Node Sizing value to Tilt: 2.
- Click node 6 which is the blue channel, set the Node Sizing blues to Tilt: -2 and Pan -2.
This results in a softer image overall. The red channel is being moved over from the other channels. By offsetting tilt and pan for the blue channel, there is some purple tinge in the subject’s hair.
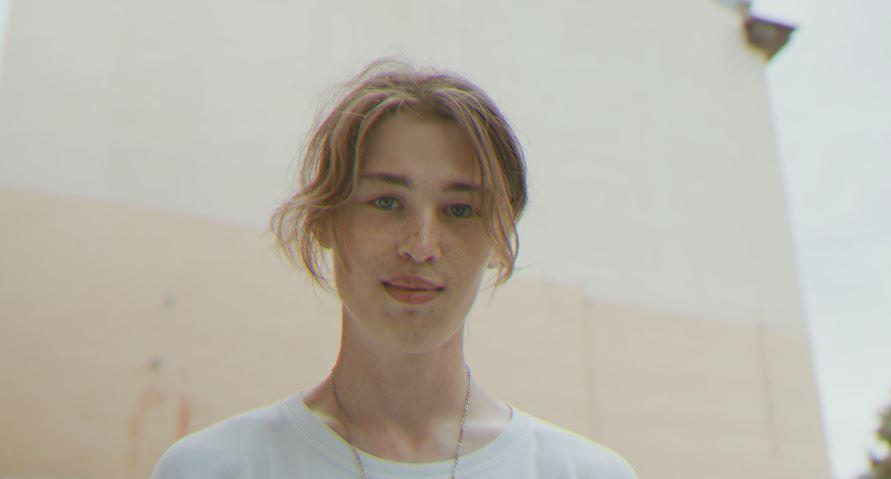
We added one more node to the end of our node graph when we started this exercise. Click on node 7 now. By adjusting the global color temperature, the footage can look more stressed on the highlights.
- With node 7 selected, move into the 2 tab within Primary Wheels. Adjust Color Temperature (this may just read as Temp) to -800 to add additional blue in the highlights.
This will serve as the base look for our effect.
Step 4: Adding Texture with Adjustment Clip
- To create an Adjustment Clip select the Effects Library panel, Effects, Adjustment Clip. Drag and drop Adjustment Clip to the timeline on Video 2.
- Trim the Adjustment Clip to run the full length of your timeline, or, just the range of shots you want to alter.
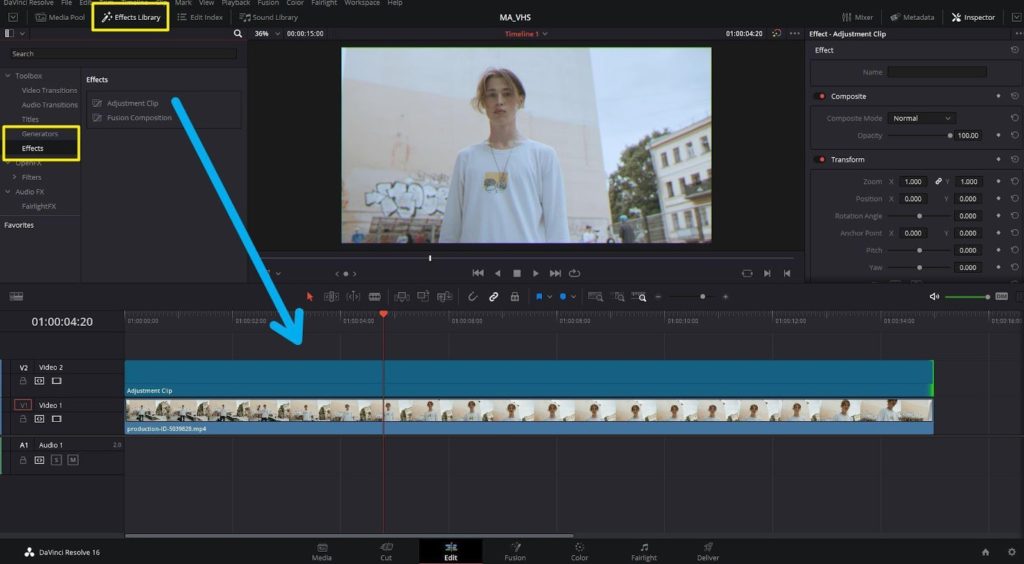
- There are a few different effects we can use to build out the texture. Film Grain, Film Damage, JPEG Damage all look great. Pick Analog Damage. Drag and drop the Analog Damage filter to the Adjustment Clip.
- Nothing happens… Yet. Open up the Inspector tab in the top-right of the interface. Ensure the OpenFX sub-tab is selected.
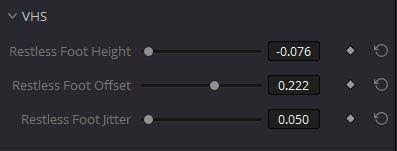
- Scroll down to the VHS menu, Adjust the Restless Foot Height to -0.100 and Foot Jitter to 0.050.
- For more degradation, modify TV Construction > Phosphor Brightness and raise to 0.400.
- And lastly, select Broadcast Signal > Signal Noise, raise this to 0.350.
Part 2: Top 5 VHS Effect Templates for DaVinci Resolve
There are lots of great VHS packages pre-made for DaVinci Resolve available at Motion Array. Ranging from the subtle to outright grungy.
1. VHS Minimal Urban Opener
A fantastic introduction with a retro style to display your photos, and video clips! Make use of the stunning blend of effects to reveal and feature your next best online story.
Download VHS Minimal Urban Opener Now
2. VHS & Glitch Logo
Create a great animated logo with glitch and retro style screen effects, using this trendy template for DaVinci Resolve. Reminisce on your brand’s success with this vintage style logo reveal.
Download VHS & Glitch Logo Now
3. VHS Slideshow
Featuring VHS tape overlays and retro footage treatments, easily take your viewers on a trip down memory lane. This template has everything you need to revive your old media or create something completely new and different.
4. VHS Retro Styles
Instantly add a retro aesthetic or an old old VHS tape look to your project with this selection of 8 VHS effects for DaVinci Resolve. Just open it up, add your media, and hit render.
5. Retro Slideshow
Using a projector-style design with soft light leaks, and simple text animation, this slideshow is perfect for family reunions, anniversaries, valentine’s day, romantic moments, and special occasions. A creative way to show off all your photos in a pinch!
How to Use DaVinci Resolve Templates
Step 1: Importing
- Unpack the .ZIP archive to where you want to work on your computer
- Launch DaVinci Resolve
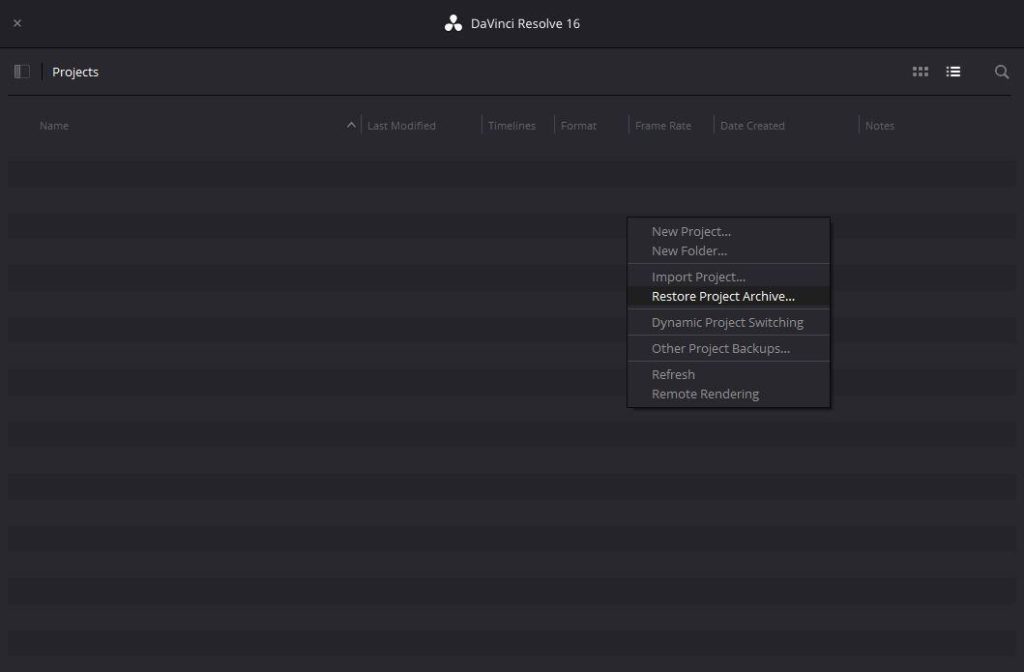
- In the Project Manager, right-click anywhere in the grey field and select Restore Project Archive from the context-menu.
- Navigate to where you extracted the folder. Note that you are going to select the file folder itself, and that it has a .DRA extension
- Launch the project
Step 2: Build out the VHS Templates
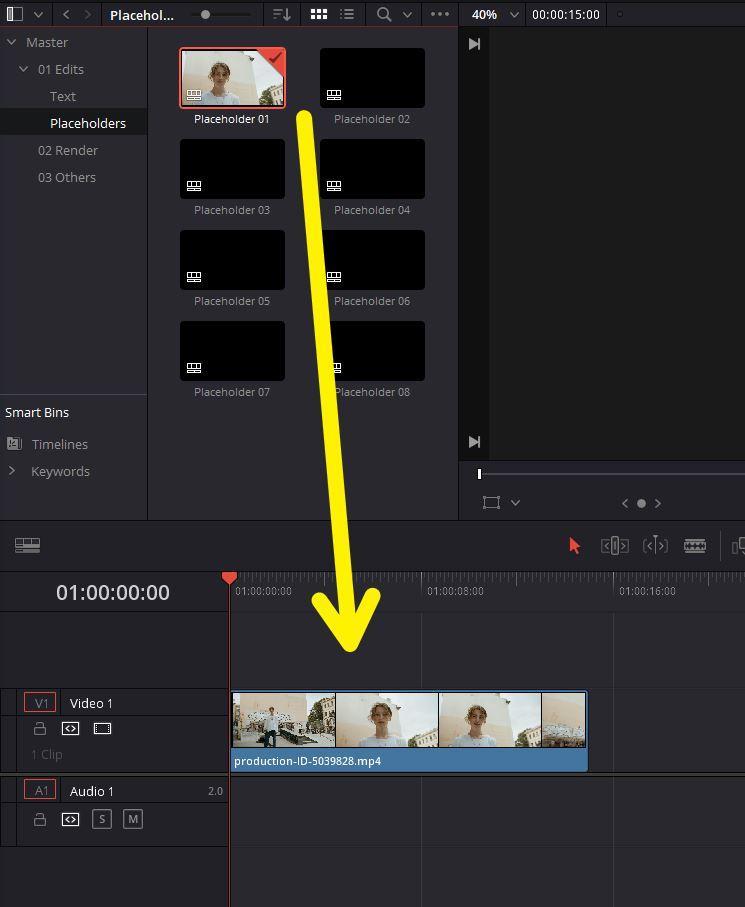
- Select any of the templates from the 01 Edits bin. Double click to open up these timelines. Within the timeline you’ll drag and drop your footage.
- Move into the 02 Render bin, and find your corresponding sequence. If you used Placeholder 01 you’ll want to load VHS 01.
- There is no step 3! That’s it.
If you build it out yourself, or use a template as a starting point, adding VHS tape effects can add a lot of texture and pop to your images. Start with a small filter, like chromatic aberration, and move up to nasty tracking errors, blown out cool highlights, and lots and lots of static. Did we mention lots of static?
As you can see, creating your own VHS Effect in DaVinci Resolve isn’t that overwhelming. Although you may find the techniques covered a bit too long, learning this new skill in DaVinci Resolve can really help to step up the quality of all your projects. If you are interested in learning more about the best effects to use for your projects, then check out our tutorial article on how to use different types of effects for your DaVinci Resolve projects.


