


Color correction is one of the greatest pieces of post-production wizardry in a video producer’s bag of tricks. Like most modern editing software, Final Cut Pro X comes with an “Auto Color Correct” feature. And hey, this is fine in a pinch, but learning to adjust your color corrections manually will give you the creative control you need to produce a top-notch video.
In this tutorial, you’ll get the low-down of the basic workflow of color correction in Final Cut Pro. We’ll also briefly go over the built-in automatic tools, and cover a few bonus pro tips to really help you master the art of color correction. Let’s get started!
Summary
Part 1: The Basics of Color Correction
Before diving into Final Cut Pro X’s color correction workflow, you may want to review the basic concepts of color correction. If you’re already familiar with Hue, Saturation, and Luma, as well as the Waveform, RGB Overlay, and Vectorscope, then feel free to skip this section and head on over to part two.
Color Attributes
- Hue refers to the shade of a color on the color wheel. Red, green, and blue are all hues—as are purple, orange, and all the other colors. When balancing hue, you may find that your footage is cool (too blue), or warm (too red). White Balancing is the standard procedure for correcting hue in the footage.
- Saturation refers to the intensity of color in your footage. Decreasing saturation all the way will result in a black and white image. While increasing it completely will result in oversaturation, where the colors look unrealistically vibrant.
- Luma means the brightness of your image. When adjusting the Luma properties in Final Cut Pro, you will work with controls for different levels of Exposure, adjusting the Shadows, Midtones, and Highlights of the image.
Video Scopes
- Waveform similar to an audio waveform, this scope displays the highs and lows in your image. It can be configured to display Luma, showing you where the brightest and darkest parts of your image are. Or you can use Waveform to view the Chroma aspects, such as the levels of red, green, and blue.

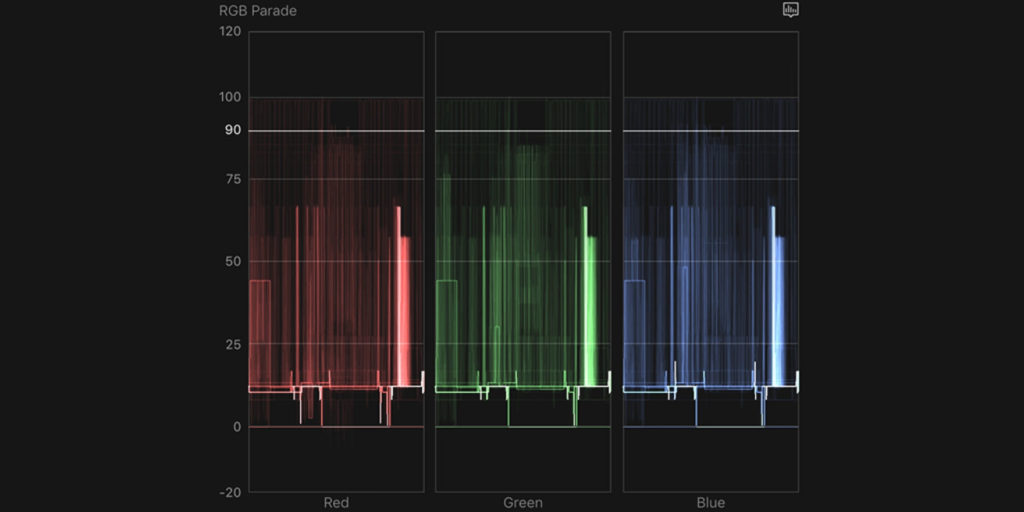
- RGB Parade – This view separates the red, green, and blue channels from your image and displays their levels in the selected scope. RBG Overlay and RGB Parade are two useful views for balancing hue in your video.
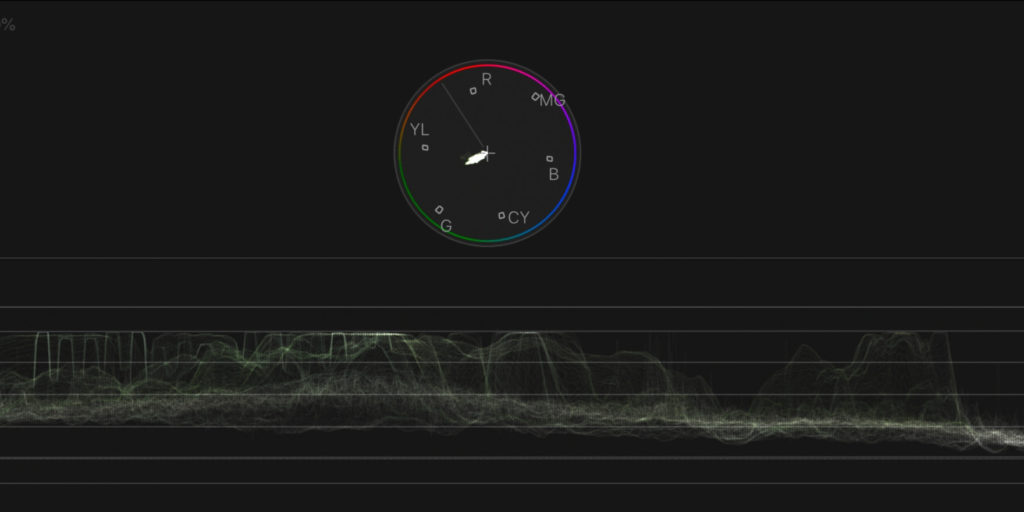
- Vectorscope – this overlays the color values of your footage on a color wheel. The Vectorscope comes with a helpful “Skin Tone Indicator” which can be used to adjust color balance if your subject’s skin color looks a bit off.
Part 2: Manual Color Correction in Final Cut Pro X
Manually color correcting footage is an advanced skill, but still fairly intuitive. Once you get the hang of the workflow, you’ll be able to color correct any camera angle in just a couple of minutes. Seeing your camera footage improve through color correction is also very gratifying.
Step 1: Prepare Final Cut Pro for Color Correction Workflow
Final Cut Pro X comes loaded with all the tools you’ll need to achieve industry-standard color correction without any additional software. The Inspector, Color Boards, and Video Scopes can all be opened easily with the Color & Effects Workspace preset.
- Open or create your Project and Event and add your footage to the timeline.
- On the top menu bar, navigate to Window > Workspaces > Color & Effects.
- In the Inspector, press the Color Inspector icon to bring up the color controls.
- If the video scopes in the top left of your interface are too small, drag down the border above the timeline to expand those interfaces.
Step 2: Correcting Exposure
Exposure is the first step in color correction, and it also results in the most pronounced improvement in your footage’s quality. Using the Luma Vectorscope, you can easily visualize the light levels in your image and adjust them accordingly.
- Choose the clip you’d like to correct in the Timeline and move the playhead to an appropriate position.
- In your Color Inspector, choose the Exposure tab.
- First, you’ll be adjusting the Shadows control in the Color Inspector. Turn your attention to the Luma Waveform on the left side of the screen.
- The goal is to bring the lowest points in the Luma Waveform just above 0.
- Now do the same with the Highlights control, trying to bring the highest points of your Luma Waveform just below 100.
- Finally, look at your image and decide if you’d prefer it lighter or darker. You can adjust the Midtones or Master levels in the Color Inspector to your liking. If you do this, you’ll need to fine-tune the Highlights and Shadows when you’re done.
Step 3: Fixing the White Balance
You should already see some big changes in your footage after correcting the exposure levels. Next, you’ll adjust the color balance of your image, which is best done by analyzing a white section to make sure the red, blue, and green levels are all equal.
- Scroll around your clip to find an object that should be perfectly white, like a cloud, highlight, or brightly lit white object.
- Switch back to the Video Inspector and zoom in using the Transform and Anchor controls. Zoom in until the white object fills the screen.
- Now switch back to the Color Inspector, and select Color Wheels, and turn your attention to the RGB Parade on the left side of the screen.
- The goal is for red, green, and blue to all be equal value, near 100. If the values are not equal, you can adjust the Temperature and Tint controls below the Color Wheels until they are even.
- Now switch back to the Video Inspector and undo the changes you did in step 2 by setting Transform back to 100, and both Anchor coordinates back to 0. This should reset your image to its original position.
Step 4: Adjust Saturation
Saturation adjustment is largely a matter of personal taste and what you feel is appropriate for the scene. You may choose to lower saturation to mute the colors, or to increase it to make your colors pop. This can all be done on the Saturation Board.
- Open the Color Inspector and choose Color Board.
- Out of the top 3 options, choose Saturation.
- Use the Master Slider to adjust the overall saturation of the scene. You can also make adjustments to saturation levels in the Shadows, Midtones, and Highlights.
Now that you’ve completed all the steps of manually color correcting your footage, turning off your color adjustments in the Video Inspector to see the difference with your original footage. If the footage looks a lot better with your corrections, then congratulations—you’ve successfully learned to color correct footage in Final Cut Pro!
Part 3: Automatic Color Correction
Manual color correction gives you a lot of control over the final results of your footage. Still, it can be time-consuming, especially if you have many different clips and camera angles. Luckily Final Cut Pro has two instant color correction features that can come in handy. Both can be found by clicking Modify on the top menu bar.
- Balance Color – this is Final Cut Pro’s built-in Color Correction tool. All you need to do is select the clip you’d like to fix in the Timeline and then press Balance Color. You should see the results instantly. This quick solution can be hit or miss depending on how much your footage needs to be color corrected.
- Match Color – when you select this tool, you will see a second viewer appear. In the Timeline, navigate to the clip you’d like to emulate and click it. The frame should freeze in the 2nd viewer window, and a blue button will appear “Apply Match.” Click this button, and Final Cut Pro will automatically attempt to match the colors of the first and second clips.
Part 4: Pro Tips and Troubleshooting
If you’ve followed the tutorial this far, you’ve already come a long way learning how to color correct your footage in Final Cut Pro X. Here are three more helpful tips to up your game!
1. Copy and Paste Color Corrections to Save Time
You don’t have to color correct every clip in your video from scratch. If you shot your scenes under similar lighting conditions, the color correction adjustments you need to make are minimal, so there’s no need to duplicate the work. You can copy and paste your previous color corrections onto other clips.
- Select a clip you’ve already applied color corrections to and copy it by clicking Edit > Copy on the menu bar.
- Find the new clip you’d like to color correct and select in the Timeline. Now click Edit > Paste Attributes.
- Make sure all of your color corrections are included in the checklist and press Paste.
- Your previous color corrections should copy over to the new clip. Make minor adjustments as needed.
2. Apply Masks to Color Correct Part of a Video
Using masks, you can apply a color correction to just a portion of your image. This is especially useful for adding a virtual spotlight on your subject’s face if it’s too dark, or for specifically adjusting other parts of your image independently.
- Find Color Board in the Effects Browser and drag it to the clip you’d like to correct.
- You should see a new Color Board appear in the Video Inspector.
- Click the Mask icon to add a Shape Mask or Color Mask. Shape masks are useful for adjusting a circular section of your image, and color masks are great for making adjustments to a single colored background like a blue sky.
- In the Color Inspector, make adjustments to this color board and notice that they only apply inside the mask.
- If you’re using a Shape Mask and your subject moves, you may need to add keyframes and adjust the mask’s position to follow your subject.
3. Prevent Detail Loss by Avoiding Clipping
One thing you’ll want to avoid when making color corrections is losing image data by clipping beyond the limits of what can be shown in your outputted video. Clipping can happen with both Luma and Chroma channel information, and there are a few ways to avoid it.
- Above your viewer, press View and select Range Check: All. This will highlight any sections of your video, where data loss is occurring because of clipping. The highlights will appear as wavy lines moving across the clipped sections of your video.
- If you see any clipping, check the RGB Parade and make sure none of your color values are exceeding 100. If they are, you may need to decrease saturation.
- Also, check the Luma Waveform and make sure none of your darks are dropping below zero, and none of your highlights are exceeding 100. If they do, you can fix this by adjusting the Highlights and Shadows controls in the Color Inspector.
Color correction is one of the most satisfying skill sets to master as a video editor because it allows you to bring out the very best in your footage. Now that you’ve practiced manually color correcting in FCPX, as well as using the built-in automatic tools—you can transform any source footage you work with going forward and begin color grading.
Color correction in Final Cut Pro X is easy, powerful, and produces great results! If you’d like to check out more tools for color correction, head to Motion Array’s hundreds of Final Cut plugins and filters for color correcting your footage.


