When working with complicated software like Final Cut Pro, problems can arise that seem impossible to solve. Some errors will directly result from corruption or issues with the software or device; other issues will come from how the project is set up or used. Fortunately, there are several ways to Troubleshoot in Final Cut Pro, so we put together a list of the 8 most common FCPX fixes.
Summary
Part 1: Learn the Basic Software Fixes
Before troubleshooting some more specific FCPX errors, there are a few solutions that everyone should try, no matter the software they are using.
Turn it Off and On again
It might be an obvious one, but closing down the program and restarting it or turning your device off and on can solve various issues. Occasionally errors can occur in loading, and reloading them is the best option.
Check for Updates
Another simple one to remember is to check for updates. Sometimes errors can occur when an old version of the software conflicts with a newer element, like a plugin. Go to the App Store to see if there are any updates to the software.
Reinstall the Software
Reinstalling software is a step you’d usually take if you’re experiencing errors after an update. While all software developers do their best to make their program updates as stable as possible, users will always uncover unexpected glitches. If you’ve recently updated and are experiencing crash issues, uninstall and reinstall the previous version.
Part 2: 8 Must Know Fixes in Final Cut Pro X for Editors
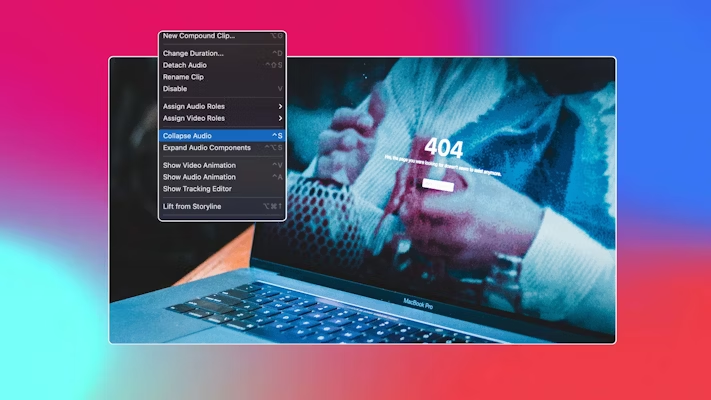
1. Expanded Audio Fix
Expanded audio in Final Cut Pro isn’t an error but is the way FCPX is supposed to work. However, if you are new to editing, seeing your audio and video expanded can cause a bit of panic, especially if you don’t know how to undo the expansion.
Final Cut Pro allows you to expand your audio to create L and J cuts, and in most instances, you will need to select the Expand Audio option deliberately. Occasionally, Final Cut Pro will automatically expand a clip’s audio, such as when you place a clip over another in the main timeline.
Whether expanded or not, your audio will function similarly and is still attached to the original video. If you want to collapse your audio again, you can do so by right-clicking the clip and choosing Collapse Audio or hitting Cmd+S on your Keyboard.

2. Missing Media Issue Fix
The missing media red screen of death is something that frustrates even the most experienced editors. As with many of these issues, the missing media error is most likely a human one.
When you are presented with missing media clips, it quite literally means that Final Cut Pro can’t find the clips you have previously imported. If you have imported the clips correctly in the first instance, the media will be copied to the FCPX project bundle and will connect every time you open the project.
If your clips have been imported by dragging and dropping them to the timeline, the media won’t copy them to the FCPX bundle. Instead, your assets will be referenced from wherever they are saved on your machine. If you subsequently move or delete the clip or disconnect a hard drive containing the footage, Final Cut Pro will show it as missing.
The missing media issue can be terrifying, especially if you have already done a lot of editing and the timeline is filled with empty clips. To relink your clips, select them in the Media Browser and choose File > Relink Media. From here, you can navigate to the location your clips are saved and reconnect them.
Of course, the missing media issue is a prime example of why setting up and importing clips to your library correctly is so important. Remember, this fix will only work if you still have a copy of the original media used.

3. Importing Footage Issue Fix
Occasionally a clip might appear as missing media and have a small camera icon in the bottom left corner of the thumbnail. This is a similar issue as above but is usually the result of a camera or SD card being disconnected before the footage can be fully imported to the project.
When you import footage directly from a device, the clip thumbnails will appear before the import is complete. It is super important you check that the import is complete before disconnecting your device. To see the progress of any import or export, hit Cmd+9 on your keyboard.
If your media is missing due to the Import being interrupted, follow these steps.
- Reconnect your camera or SD card.
- Open your FCPX Project.
- Select the missing media clips in the project browser.
- Go to File > Import > Reimport from Camera Archive > Continue.
- Wait for the media to complete the import before disconnecting.

4. Big or Full Library Fix
Footage can take up a lot of room on a hard drive, so the Library is Full error message is one of the most common issues for editors. Fortunately, there are a couple of ways to free up some space so you can continue editing.
Check Where the Library is Saved
One of the first mistakes many newbie editors make is saving the library to the device’s internal hard drives. Macs have very little internal storage, so you should always use an external drive for your work. The first thing to check is the library location – the error message will tell you where the library is saved. To change the location of a Library, go to the Inspector and click on the Information tab. Here, you will see where each element of your library is being saved. Click Modify and choose new external locations for your work.
Clear Some Space
Another excellent option for a full library is to clear some space on the hard drive. Go through and delete or move any files that you don’t need from the library location. Be sure not to delete any assets that are not contained in the FCPX bundle.
You can also delete cache files from your library folders, but make sure you relocate your library before removing anything. Sometimes your project will include clips you don’t need, so it is always worth looking at the project from within FCPX and deleting any superfluous or duplicated content.
5. FCP X Library Corruption Fix
If your library is refusing to open, or crashes when you try to do anything, it could be that your library is corrupted. There can be a number of causes for this happening, and as a result, there are a number of fixes to try.
Not Opening
If the library isn’t opening at all, it could be that the saved location has some corruption. First, try to move the entire library to a new location on a separate drive. If the library still doesn’t open, you can be pretty sure the corruption is within the library.
- Go to the FCPX Bundle and right-click > Show Package Contents.
- Select the Settings.Plist and CurrentVersion.flexolibrary folders and delete them.

Opening but Crashing
If your library is opening but immediately crashing when you try to edit, something in the project is likely corrupted. Often, it might be a single video clip causing the problem, and it can be challenging to locate. First, copy the library to a new location, as sometimes copying the clips can reveal a corrupt file.
Final Cut Pro also saves backups of your project, which can help you restore your timeline. Locate the backups folder from your Library Media folder, and select the most recent autosaved version. Double click to open it, and FCPX will take you through the restoration process.

6. Zoomed In Viewer Fix
The Zoomed in Media viewer issue is another problem that occurs for beginners but isn’t an actual error. If you have never changed your media view before, it can be a little odd when you first see a zoomed-in/out view.
FCPX gives you the ability to zoom in to your footage to see isolated areas better or out from your footage to help make specific techniques easier. At the top of the Media Viewer is a % dropdown. Click the icon and choose from a range of views, including Fit, to match the size of the viewer.
When zoomed in on a clip, two boxes will appear on the right side of the media viewer. The red box indicates the portion of the clip you are viewing, and the whole box represents the entire clip. To move around your shot while zoomed in, drag the red box around the inside of the white one.

7. Undo a Compound Clip
There are plenty of reasons you’ll need to create compound clips, such as organizing your timeline, adding effects to a sequence, or resizing a single clip for keyframing. Many beginners are hesitant to use compound clips, as there seems to be no clear way to undo the move.
If you have only just created the compound clip, you can undo it by pressing Cmd+Z on your keyboard. If you’ve made it a little while ago, there are two ways to break it apart.
Paste it Back In
Double click on the compound clip to open it and copy everything in the timeline. Click on the timeline back arrow to go back to the main sequence, and paste the clips. You can then delete the compound clip from the timeline. A huge advantage of doing this is that the compound clip still exists in the Project Browser, with the edit untouched.
Use a Shortcut
The second, much easier option is to use the shortcut. Select the compound clip in the timeline and hit Cmd+Shift+G on your keyboard. Your original editing will replace the compound clip, however, the compound clip will no longer exist in the Media Browser.
8. Frozen Drop Zones Fix
If you are using FCP templates, you will likely add footage via drop zones. Occasionally you will experience what appears to be a frozen frame toward the end of the dropzone sequence.
Don’t worry this isn’t an error, it is Final Cut Pro trying to help you out. The video freezes on the last frame because the clip you choose is not long enough for the Template you are using. Rather than cut to black, FCPX creates a Freeze Frame for the rest of the template sequence.
There are a couple of ways to get around the issue;
- Choose a new, longer clip.
- Shorten the template until the clip fits.
- Create a compound clip of the footage you want to use, either slowing the footage down or duplicating it. When selecting the Media Dropzone, choose the compound clip from the Media Browser instead of the original footage.
So there you have it, 8 common issues in Final Cut Pro and ways to fix them. Now that you know how to troubleshoot Final Cut Pro errors, we hope you have a problem-free editing experience. If you’re still experiencing crashing in Final Cut Pro, check out this article with even more solutions.