Working with audio is consistently an area within video editing that gets overlooked. But it’s just as important as your visuals in order to make your project stand out as being high quality. And one of the simplest ways to work with audio in Premiere Pro is to use the Audio Track Mixer. This is different to the Audio Clip Mixer, which we have an entirely separate video for. So let’s jump into Adobe Premiere Pro and take a look at the Audio Track Mixer.
So here we are inside of Premiere Pro. And we have a couple clips on the timeline here to view. We can see that in addition to video there’s multiple layers of audio that are each contributing to the final product. And if we go up here to the workspace sections, we can see that we’re in our audio workspace. So once you’ve entered this mode your screen should look similar to mine and you should be able to see in this box here that you have the audio track mixer available to use.
Right off the bat I want to clarify the difference between these the Audio Track Mixer and the Audio Clip Mixer. While functionally there’s many differences, basically the difference is in the name. The Audio Track Mixer controls each track as a whole that the video layers are placed into, while the clip mixer controls individual clips within each of those tracks. But to get a better understanding of the Audio Track Mixer, let’s start looking at it’s interface and functionality.
So basically you can see here that there are a certain number of track mixers and that number directly copies to the number of audio tracks that are available in our timeline here. Let’s just add 2 and we can see that 2 additional tracks appear as well in our mixer tab. And you can probably guess that each of these controls it’s own specific track. It’s pretty intuitive. Let’s start by going here to the audio track 3 and rename it. Let’s name it Music. Because that’s the track that we have our music on in this example. You can name yours whatever you want but I would suggest keeping it very easy to understand and to make sure that you keep similar items on the same tracks. Now we can see that down here the audio track has recognized the change helping us to further specify that this mixer controls this track.
Any adjustments we make in the track mixer will make adjustments for the entire track and anything that’s in it. I’m just going to quickly add names for all the tracks here. Let’s quickly play it to see what things sound like to start with.
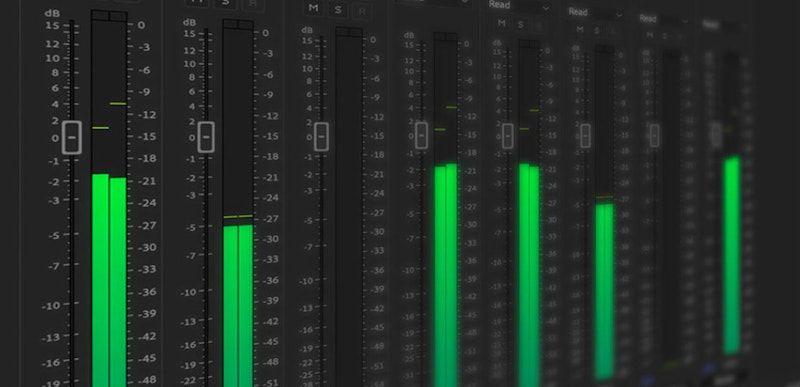
We can also see that when we played the music, we can see the levels of each separate audio track displayed in isolation with a colored bar. Keep in mind that your objective is to not only make everything sound great when it’s put together in combination, you also want to keep an eye out for levels that get too hot and start to enter into either the yellow or red section of your meter. If your audio starts to enter red and hit this clipping indicator bar at the top here, it means that your audio has clipped and is starting to lose information and won’t be processed with full integrity. So as you’re adjusting you audio levels, just keep an eye on that.
Now let’s start working with adjusting volume. Here we can easily decrease its volume here of the music track in case it’s too loud for example. We can do that in a couple of ways. We can either input a number here where it says 0 to raise or lower the volume. Inputting a number between 0 and 6 will raise the volume. While inputting any negative number will decrease the track volume. But we can also achieve the same goal by grabbing this slider, and dragging it up or down. Let’s drag it down to decrease the volume.
Nice. In track three we can see that we get a new number here by using this method as well. Instead of 0, we have -5.2 decibels and that same number appears down here on the track. We’ve decreased the volume of audio playing in that track by that much. Let’s play back our project now.
And we can hear that the music is much softer now. This is an easy way to save time if you need to adjust the overall parameters of a very long video. But that’s just the basics of adjusting audio volume in the audio track mixer. Let’s go back up here and check out some more functions.
You can see that to the right of all of the track we have here is a track labelled master. This track is very special because it controls the overall volume of everything together. It will allow all of the changes that you’ve made to the individual tracks to remain as they are, but it will also go above and beyond to give you the ability to control everything at once as well. If you raised or lowered the volume of a clip before making adjustments to the master slider, those proportions will be respected, but the overall volume will be changed accordingly.
Next up here you can see that above our slider here we have multiple letters – M, S, and R.
M stand for mute. If you click it, it will highlight green and it will prevent that track from being played at all. Next up is solo-ing. Hit this layer to hear only that layer alone. The result is that it will mute everything else. And finally we have the record button which you can use to record audio directly onto that track of your timeline. We’re going to leave that for this video because we already did an entire video on recording audio in Premiere.
Next up we have the Automation Modes under this section here. They should be set to read by default, but if you click any of them here, you should see “Off Read Latch Touch” and “Write”. These don’t intuitively tell you what they each do, but let me quickly explain each one.
Read like we said before is the default state, and as such reads any changes that have been implemented to the volume of your tracks. By default you shouldn’t have any so you won’t notice a difference at first.
Write mode you can think of as continuously recording any keyframes of your slider. So if we play our clip for example, and in real time move the slider around, as long as it’s in write mode, it will record our movements over time and lock them in place. But as long as we have this set to write, it will re-write over whatever we play over. So make sure to set it back to read once you’ve finished your changes. Then you can view what you’ve just done. But if you wanted to know what your track keyframes are doing, but you don’t want to go back and replay the whole thing, there’s an easier way to visualize it. Going down here to the track in question, and double clicking on the left hand side will add keyframe options. These are your clip keyframe options by default, but if you click this diamond to the left, and select track keyframes, volume, you can see that all of the keyframes that we just wrote onto the track are here easy for us to view. Now with this in mind, let’s go back up and keep going with the automation modes.
Touch is an interesting one as it will record your changes over time but it requires you to be “touching” your audio slider in order to keep it wherever it is. Holding it in a position will record it for future playbacks but as soon as you let go, it will fade back to the default position. Depending on what audio editing you’re doing, this can be a really fun and useful feature.
And finally we have Latch, which is the same process as touch except it does not return to its original position until you’ve stopped your playback and then re-started again.
Next up here we have the Track Panner. Here we can control how each track is balanced between the right and left side of where the audio is being heard from. So if we take this and move it all the way to the right side, we can only hear the audio for that track out of the right side of our headphones or speakers. Pretty neat right? This section of the track mixer is also responsive to the automation modes we just looked at. So setting it to touch for example will allow us to move our panner around while recording its movement in real time, and then let go to let it fall back into its default state.
Using the panner can really help to immerse your audience if for example, something is going across the frame of your video. You can pan the sound so that you’re hearing it go from that direction.
And guys the very last piece here is at the very top left of your panel. If you click this arrow drop down here, what you should see is a set of slots that you can place different effects and send assignments (highlight each). Audio effects I’m pretty sure you can grasp how that would work. Click on one of the available slots for a particular track or the master track, and you can see all of the different effects that you can attribute to the entirety of the track. So let’s go to one that you might not use as much but is really easy to tell the difference for. The Pitch Shifter. Click on it and you can see in this box down here you can control the parameters of this effect. So if we click and drag this effect up or down, we can easily hear that the pitch of the music alone is shifting up and down. And if you want to keep the effect, but just mute its effects, click this little Fx button in the corner here. And we can add multiple effects to occur at the same time. And if we want to get rid of an effect, just click on it and select none in its place.
Cool. But there’s one type of audio track that we haven’t talked about yet that I think could be really beneficial to you. It’s called a submix. And you can add one by going to your timeline’s left hand side, right click, and select add audio submix track. Now you should see a slightly darker audio slider here that you can use. And it’s labelled as a submix.
So what is a submix. Well it’s a track that you can make adjustments to that you can apply to multiple other audio tracks so that you don’t have to do the same adjustment multiple times. It’s almost like the audio version of an adjustment layer.
Kind of … So if we add a Pitch Shifter effect again to the submix, and then play our footage, nothing changes. But if we go up here on each of our channels and set the track output assignment to submix 1 instead of master, now we can hear the effect take place. And we can control all of the tracks we’ve linked to submix 1 with this slider here.
But the last question you might have is, when you find that you make a mistake, and you want to delete keyframes that you’ve already created on a track, how do you do that? It’s simple, go down to the track in question on the timeline and make sure it’s set to track keyframes. Then grab your pen tool and highlight all the keyframes you want to delete, and hit the delete key. Simple as that you’re back to square 1.
And guys that’s the Audio Track Mixer in a nutshell. I hope this helps you to be able to use it better and to understand another piece of Premiere Pro that you can use in the future.
We hope you found this tutorial helpful. If you did, we’ve got lots of other tutorials for Premiere Pro, After Effects, and filmmaking in general!