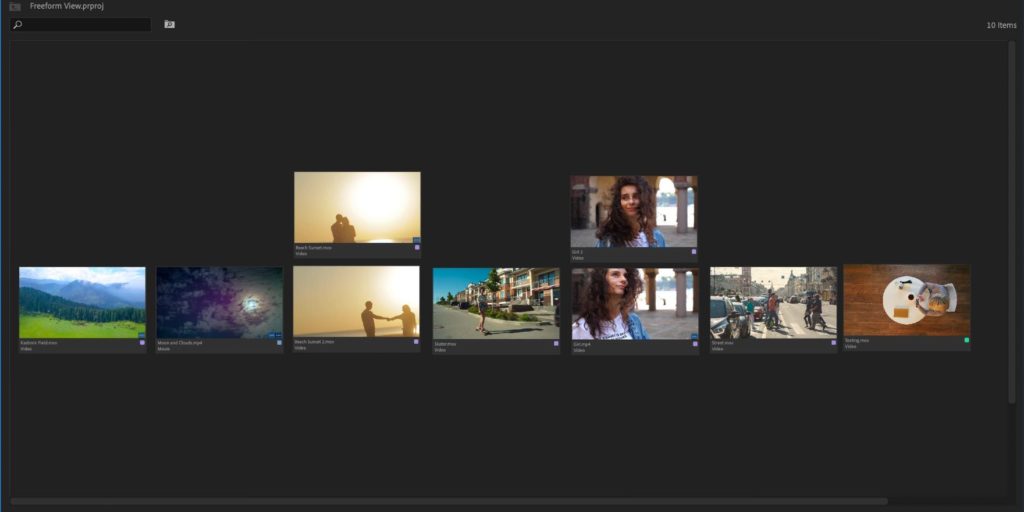
Freeform View is a view option in Premiere Pro CC 2019 that allows you to organize footage in new ways. Much like Icon View, with Freeform View, you can preview thumbnails, set in and out points, and re-order your clips right in the Project panel.
Freeform View is different in that you can freely arrange clips without them snapping to a grid. You can create any visual arrangement, including stacking clips on top of each other or resizing individual clips. Ultimately, this allows for more flexibility in how you conceptualize your project. Freeform View debuted Spring 2019 as part of Premiere Pro version 13.1. To take advantage of this new feature, always ensure you have the latest version of Adobe Creative Cloud!
In this tutorial, you’ll learn all of the ways you can customize Freeform View to help visualize your footage and get a head start on editing. Then, we’ll explore some of the many ways to use this view for different kinds of workflows and projects.
Summary
Part 1: How to Use Premiere Pro Freeform View
Follow our step-by-step guide to get started in Freeform View. Once you know all of the options available, you can really dive into customizing the panel to work for you.
Getting Started with Freeform View
- Switch to the Assembly workspace and click the Freeform View icon in the Project panel.
- Use the slider or a trackpad to adjust the zoom in your workspace.
- Start organizing by dragging and dropping clips in the panel. There are no rules here — you can even stack clips on top of one another!
- Resize individual clips or groups of clips by selecting them, right-clicking, and choosing Clip Size.
Customizing Freeform View
Custom Metadata Display
To customize what metadata appears under each thumbnail, click the panel menu > Freeform View Options. Select up to two metadata descriptors to display for each clip.
Set Poster Frames
A Poster Frame is the thumbnail image displayed in the Project panel to represent your clip. Setting a Poster Frame that accurately reflects the clip can help you quickly identify which clip is which. To set the Poster Frame, hover-scrub across the clip to select a frame, then use Command + P (Shift + P on a PC) to select the frame.
Assign Labels
Right-click clips to choose Label to assign color labels to clips. These color labels will be reflected in the timeline as well.
Save Layouts in Freeform View
Once you’ve created one layout in Freeform View, it might be helpful for your process to experiment with different storyboards.
- Right-click in the Project panel choose Save as New Layout.
- Name the layout.
- Continue experimenting with different flows and arrangements.
- Restore saved layouts by right-clicking and choosing Restore Layout.
To start over with a grid, right-click the project panel and choose Reset to Grid. From here, you can sort by any metadata.
Editing in Freeform View
In addition to organizing footage in Freeform View, you can begin assembling a rough cut.
- Set in and out points on each clip by hover-scrubbing across the clip. Press i to create an in point and o to create an out point. Pro Tip: Use the spacebar or J-K-L keys to play and pause the clips while editing in Freeform View.
- Begin arranging your clips in order in the Project panel.
- Select the group of clips you’ve edited and drag them to your Timeline.
Part 2: Creative Ways to Use the Freeform View
You can get pretty creative while working in Freeform View, but there are essentially two ways to think about your footage:
- Arrange by Type
- Arrange Sequentially
1. Grouping Clips by Type in Freeform View
Organizing clips into groups is a great way to get started with editing. In List View, this kind of organization might be done using Bins, but in Freeform View, you can see much clearer what you are working with. Here are some categories you might use to group footage:
- Shot: Do you have multiple takes of the same shot? Stack them up to get started, and then go back through and pull selects.
- Angle: Keep close-ups together and establishing shots together.
- Character: When cutting dialogue, it can help to keep all shots of one character together.
- B-Roll: Have your cutaway shots handy to pop them in during assembly.
- Action-Items: Do certain clips need special attention like color correction, effects, or titles? Group them by action-item.
There are a few ways you could visually group clips in Freeform View. Your strategy will depend on how much footage you have, the type of footage, and your personal work style. For example, you could line clips in a row or stack them on top of one another.

2. Storyboarding in Freeform View
Because video editing is a visual exercise, it makes sense to prepare a sequence in a visual way. When storyboarding, consider how stacking or overlapping clips in Freeform View could represent cuts in your final edit. In the example below, the topmost clips could indicate either alts or cutaway shots, depending on your workflow.
Saving Layouts is another perfect feature for storyboarding. Experiment with different cuts and save your ideas as Layouts. Consider Layouts as well when creating multiple versions of the same video for different platforms. For example, you may save one layout for a YouTube video and a different version for IGTV.
The simple act of organizing your clips is a great way to review and begin to contextualize your footage. Doing this upfront prep can save time in the editing process, and help you visualize your project in new ways. Freeform View in Adobe Premiere Pro offers a visual way to wrap your head around new footage. Dive in, and let us know if you use the Freeform View in other, creative ways!