In Adobe Premiere Pro CC, playback lag is a common issue faced by editors. Whether it’s just a few frames or larger chunks of your sequence, playback lag is incredibly frustrating. After extended periods of editing, it can definitely make you feel like your patience is being tested beyond its limits.
However, there are plenty of things you can troubleshoot to improve the performance of your editing system speed. While a permanent (or singular) solution is unlikely, here are the top tips to fix Premiere Pro CC’s playback lag issues and help prevent those dropped frames.
Summary
Part 1: How to Check for Dropped Frames
The first step is the check if you’re actually dropping frames, and there isn’t another issue such a corrupted media files. A lot of playback lag issues will be easy to spot as your playhead will jump across the sequence, and the video will look noticeably stuttery. You can also hear playback lag in audio, similar to a loose connection in your headphones; the audio will drop in and out.
Occasionally, the dropped frames might be less noticeable. Premiere Pro has a Dropped Frame Indicator with a green icon that will turn yellow when dropped frames are present. You can also hover over the indicator to reveal how many frames were dropped.
To add the indicator to your playback window:
- Click on the wrench icon.
- Select Show Dropped Frames Indicator.
Part 2: Top 15 Troubleshooting Tips to Reduce Playback Issues
Now you know how to spot dropped frames, let’s jump into ways to improve playback speed and quality.
Settings Tips:
1. Confirm System Requirements
It’s worth mentioning before we get started, Adobe software comes with specific system requirements. There are certain things that your computer will need to be able to use the software. These requirements include your Processor CPU, Video Card GPU, Memory Ram, and storage, all of which work to support your editing.
Without meeting these specifications, the software may have issues performing your tasks. For example, on some devices, you will not be able to edit 4K footage. We’ve created a handy guide to Adobe Premiere Pro system requirements if you’re interested in learning more.
2. Increase the Memory Allowance
RAM is required for each application your machine is running, so having lots of programs open with editing can reduce the speed of your system. Premiere Pro allows you to choose how much RAM you dedicate to other applications, and how much is saved for your video editing.
Go to Preferences > Memory, here you can change the amount of RAM your system is using for editing, and for the other applications, you’re running. Be realistic, though! This doesn’t mean you can open all your applications at the same time, shutting down non-essential programs is still a must.
3. Check for Updates
Otherwise known as the editor’s version of ‘turning it off and on again,’ this simple task can solve a lot of editing-based problems. Close down all the applications and check your system for updates. Don’t forget to make sure both your system software and your Adobe programs are up to date. If your system software needs updating, you will likely need to restart your machine.
This is not just a great tip for solving playback lag issues. It’s a key step when troubleshooting any problems you have.
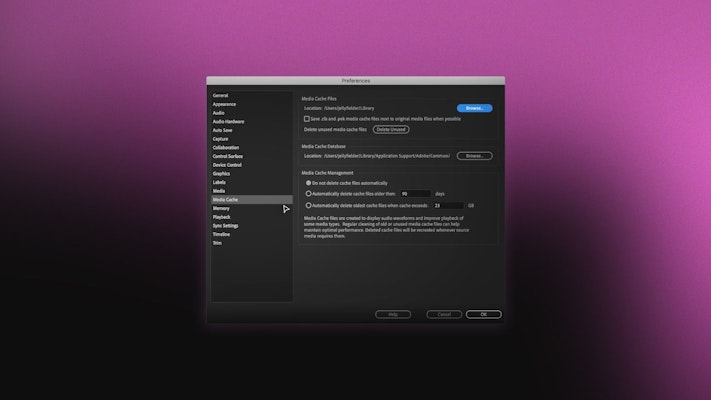
4. Adjust Media Cache Settings & Location
Premiere Pro’s file management system means that all the media is filed away and it’s referenced from its location. When your media is imported, it’s processed, and cache files are created. A cache file is a version of your video or audio in a format that allows Premiere Pro to access and read the file quickly from your drive.
A problem with these cache files is that, while each on its own is quite small in size, after a while they begin to clog up your machine. So, you must manage your media cache size and location.
If you’re suffering playback lag, try changing the location of your Media Cache to a local drive and delete the unused ones.
- Go to Preferences > Media Cache.
- Select Browse and choose a new location.
- Select Delete Unused to remove all the unused cache files.
- You can also change the settings to automatically delete cache files that are a set number of days old. Hit OK, and you’re done.
Workflow Tips:
5. Work with Proxy Files
Some media assets are quite significant, and working with them could slow down your system. Fortunately, Premiere Pro has a solution for this with proxy workflows.
A proxy file is a lower resolution version of your media. It’s created for the sole purpose of editing. Working with a lower resolution allows your system to process your edits faster, and playback to be easier on your machine. With a click of a button, you can switch your edit back to the full resolution once your edit is complete and you’re ready to export.
6. Use a Lower Playback Resolution
Sometimes the reason for a lag might be apparent. For example, if it’s only lagging over a part of the sequence with several effects attached to it. If this is the case, we’d recommend you lower the playback resolution. Unlike using proxy media, this doesn’t change the quality of the footage, just the quality of the visual player window.
From the player window, select the Playback Resolution drop menu and change to ½, ¼, or ⅛ resolution.
7. Turn Off High-Quality Playback
Not only does Premiere Pro have Lower Playback Resolution options, but it also has a High-Quality Playback option hidden away in the wrench icon settings. The High-Quality Playback setting should display the highest quality visuals possible, but this can often cause a bit of lag. In reality, there isn’t an awful lot of difference visually when using the setting.
8. Disable Auto Save
While working on your project, Premiere Pro will frequently auto save your progress which can slow down your computer. We recommend you try this option with caution as you don’t want to lose any final edits. Simply go to Preferences > Auto Save, then uncheck the Automatically save projects checkbox.
9. Use GPU Acceleration
Explaining this can get quite technical, so let’s try to keep it simple. Your Graphics Processor Unit (GPU) is the part the takes care of processing your visuals. GPU Acceleration is when the system looks at all of the processes a piece of software is running and splits the workload between your GPU and CPU.
Check that your project is set to use GPU Acceleration, as it will take some of the workload from your GPU, freeing it up for faster graphics processing such as playback.
- Go to File > Project settings.
- Check the Renderer drop-down menu is set to use accelerations.
For Mac users, there will be two options OpenCL created by Adobe, or Metal created by Apple. It’s worth giving each option a try to find out which one works best for your systems. PC users will need to select CUDA.
10. Match Your Footage & Sequence Settings
If your footage is a different size to your sequence, for example, you have scaled-down 4K footage to fit a 1080p sequence, it might cause some playback issues. A better option is to match your editing sequence to your footage settings, so your system doesn’t need to use processing power on the resizing.
To check if your sequence settings match:
- Right-click on any piece of footage in your Project Browser and select Properties.
- Next, click on your sequence to highlight it and select Sequence > Sequence Settings.
- Change the Sequence settings to Match footage settings, and hit OK.
11. Use the Global FX Mute Button
The Global FX Mute is a handy little button that allows you to toggle your sequence effects on and off. Since using lots of effects is one of the leading causes of lagging issues, being able to switch them on and off can further ease the frustration of dropped frames.
To add the FX toggle button:
- Click on the + button in the Playback Window.
- Drag the small FX icon to your Playback Window button bar.
- You can now click on this to toggle all the sequence effects on and off.
This can be really useful if you have added animated titles and you want to see them play smoothly without the processing of footage effects.
12. Close Your Lumetri Scopes Panel
Lumetri Scopes are great for analyzing your footage color, but running the scopes themselves takes a fair bit of processing power. If you’re not using them, close the window. It’s a simple fix, but removing this one small element can free things up.
13. Render, Render, Render
We get it! You want to get on with your editing. Who’s got time to sit and render out the sequence?
Well, even if you’re not using a lot of effects or layers, rendering the sequence can help fix playback lag. So, keep an eye on your render line! If it’s red, your project needs to be rendered. Find out more about rendering from this tutorial we did.
14. Turn Off Any Overlays
Hopefully, by now you see a recurring theme with some of our lag fixes. Basically, the more you can reduce the visual elements that are being processed, the faster the processing will happen. This extends to all of the overlays for your Playback window.
If you’re not actively using your Safe Margins, Transparency Grid, and other overlays, turn them off.
15. Use Render and Replace
Dynamically Linked Compositions or clips that are effects heavy might be the cause of your playback lag. The reason is that your system is processing a lot of elements at the same time. Look at it this way: the more work you have to do to a clip, the more work it will take your system to play it back.
The Render and Replace Clips is a great function to save your machine the heavy lifting. Premiere Pro will render out the clip with all of its effects, and replace it with a simplified version — it essentially flattens all of the layers into one.
- Click on any clip you want to condense.
- Go to the Clip menu > Render and Replace.
Don’t worry, you can still change the effects on the clip later on, but it can help your system access it quickly and playback more efficiently.
If your video editing journey has only recently begun, you must consider the type of editing you want to be doing and the system requirements you need to do it. If you’ve been editing for a while, you’re probably well versed with the irritation of dropped frames.
We hope you’ve found our guide of ways to fix Premiere Pro playback lag helpful (and learned a few extra tricks)! Most importantly, we hope these tips will reduce the irritation of your frames dropping so you can get back to your project!