Over the past couple of years, dozens of AI image-generation tools come on the market, allowing users to create spectacular compositions from a few keywords. Adobe has been working on AI tools for their users for many years, including the much-loved Premiere Auto Transcription AI. Adobe is Beta testing its own AI Generative Fill, and we’re here to show you how to make the most of this exciting new tool.
- Find out how to use Adobe Photoshop AI Generative Fill.
- Discover the different uses of Adobes beta AI toolbox.
- Follow our top tips for creating stunning compositions with the Photoshop AI Art Generator.
Is Adobe Photoshop AI Generative Fill any good?
Before we jump into how to use the tool, it’s worth pointing out that Photoshop AI is still in beta testing, and the results can be hit-and-miss. If you’re looking to create artistic images from scratch, you might want to try Midjourney or Dalle2,
However, unlike other AI art generators, the Photoshop Generative Fill AI is a tool to use with everything Photoshop offers. The AI will learn over time, so the more people using the tool, the better it will become.
What can Photoshop AI be used for?
As with all Photoshop tools, the user’s creativity dictates what it is used for. Once you know how to use the tool, you’ll find endless possibilities to produce new and exciting compositions, edit photos, and combine images.
The AI Generative fill can be used very similarly to the Content-Aware Fill, except rather than duplicating parts of the existing Image, it creates a new one. For this reason, Photoshop AI is fantastic for background replacements and adding elements to your images.
The tool does struggle when it comes to creating images from scratch or adjusting elements that have too much detail, such as people or animals, but we’re going to show you some tricks to help improve your experience.
How to use Photoshop AI Generative Fill
Install/Update Adobe Photoshop Beta
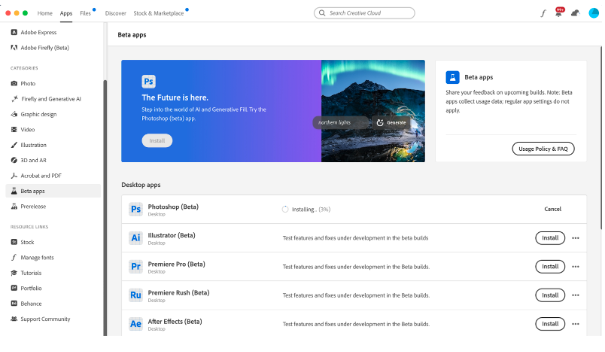
The first step is to install the Beta version of Adobe Photoshop – don’t worry; this won’t affect the standard version of Photoshop or any of your projects. It is a separate program that can be uninstalled easily if needed. If you already have Photoshop Beta installed, check to see if there are any updates.
- Go to the Creative Cloud app.
- In the left-hand column, look for Categories and select Beta Apps.
- Find Photoshop Beta in the list and click Install.
- When the software has been installed, click open next to the Photoshop Beta icon.
Replacing and Expanding Backgrounds
Replacing and Expanding the background in your Image is super easy – you can create realistic and fantastical background changes with just a click of a button. Start by creating a Canvas in Photoshop the size you want your finished composition to be, and import your base photo.
Expanding the Edges
You may need to expand the Image, especially if you want to use the end result in a video format. Traditionally, this would have been done using the Content-Aware fill, which duplicated parts of the Image to fill the space, but check out how well the AI Generative tool does at this simple task.
- Select the Mask tool and draw a box over the edge of one side of the Image.
- Hold Shift and draw a box over the other side of the Image.
- In the toolbar below the Image, hit Generative Fill.
- Next, click Generate – you don’t need to add any prompts for this task.
- Wait for Photoshop to generate your background fill – this can take a couple of minutes, depending on how complex the Image is.
- In the AI toolbar, click the side arrows to choose from the 3 options the software generates – if you don’t like any of them, hit Generate again to see more options.
Note: The AI will add any generated elements as a separate layer so your original image remains unchanged.
Replacing foreground elements
Photoshop AI is also pretty good at replacing foreground elements, such as adding roads, paths, and rivers to a shot. Using exactly the same masking technique, choose the area of your Image and tell the AI what to replace it with.
Top Tip: If you struggle to create a good blend between your original Image and the AI generation, try adjusting the feathering on the Mask.
Adding to an image
When trying to add elements to your Image, it is essential to consider the element’s overall shot composition and size. Photoshop AI has issues with working out the size of a generated element in relation to the rest of your Image.
- Using the Mask tool, select a portion of the Image that is a similar size to the area you wish the element to take up.
- Click Generate Image and type in some prompt words describing the visual you want to add.
- It is super helpful to the AI to add in environmental words that explain how the element will fit into the Image – For our example, we’re adding a Dinosaur, but by including the prompt ‘Running through tall grass,’ the AI has an easier time blending it with your original Image.
Adjusting elements within an image
As well as adding elements to an image, you can adjust parts of the composition, but this is where you need to get creative. If there is more detail in the adjustments you are trying to make, Photoshop will be able to create something realistic. Instead, focus on more minor changes one at a time.
For our example, we want to change the color of the boy’s shorts and give him a dinosaur egg to carry. As you can see from this video, trying to adjust all the elements simultaneously creates a strange and unrealistic-looking image.
Adjusting elements within an image 1
Instead, when we take the time to isolate and replace the elements individually, the AI does a much better job.
Adjusting elements within an image 2
Creating images from scratch
You can use Photoshop AI to create entire images from scratch, but it is essential to know that, unlike Midjourney and Dalle2, the tool wasn’t built for this purpose. Photoshop AI is an editing tool to help you fix, adjust, and augment your compositions, but that doesn’t mean we can’t have fun.
- Start a blank canvas in your chosen size.
- Hit Command/Control A to select everything.
- In the AI Generator box, type in the description of what you want to see.
- Hit Generate and wait.
Top Tips
Finding the best ways to use the Photoshop Beta AI art generation tool might take a while, but the more you play with it, the better the AI gets. Here are some top tips for getting the most out of this incredible tool.
Best images to use
It can take a bit of testing to figure out the best compositions to start with. Photoshop AI definitely has issues when it comes to people and animals and can often distort features through the editing process.
Use high-quality images for the best results, and keep your prompts simple and to the point. If you’re looking for ideas to play around with, Motion Array has some fantastic scenes you can use to test the software.
Prompting
As you use words to prompt the AI to build your images, finding the most concise and clear description of what you want can be tricky. Fortunately, the AI works very well with additional descriptive words.
Alongside the description of what is in the scene, help the AI by using some of the following;
Emotive words – use words like happy, scary, and tense to describe the scene’s feeling.
Genres – The AI will understand genre-based language such as Thriller, Fantasy, and Sci-Fi, which can help you define the style of the generated art.
Other Artist Styles – Photoshop AI can even mimic other artists’ styles; pop the artist’s name in with your prompt.
Adjustment Layers
While AI generates art, it is a fantastic and time-saving tool all photo editors can take advantage of. It is by no means a one-stop shop for all of your photo editing requirements. You can use many other techniques to help your generated artwork feel more cohesive and realistic.
Try adding adjustment layers to color grade your scenes and bring everything together. Motion Array has a vast library of LUT effects you can download for your projects.
AI can seem scary, but it’s vital to understand that the creative AI tools being developed are not here to take your place as a photographer or editor. These incredible functions should be looked at as another technique you can utilize in the vast toolbox Photoshop offers. If you want to learn more about photography and how to produce incredible images, check out the range of resources available at Motion Array.