It can be very frustrating to be working on a video project and to see that you’re running out of disk space. This can inhibit you from using the full capabilities of your computer and can even slow down your hard drive and workflow. To avoid these problems, it can be very effective to delete your Premiere Pro cache data every so often. Today, we’re going to show you how to do just that!
Summary
Pro Tip: We recommend using a fast dedicated SSD or NVME drive for your media cache. To do so just change the location of the folder you want using Browse.
Delete Premiere Media Cache Data on a Mac or PC
Thankfully, getting rid of cache data is a very simple process:
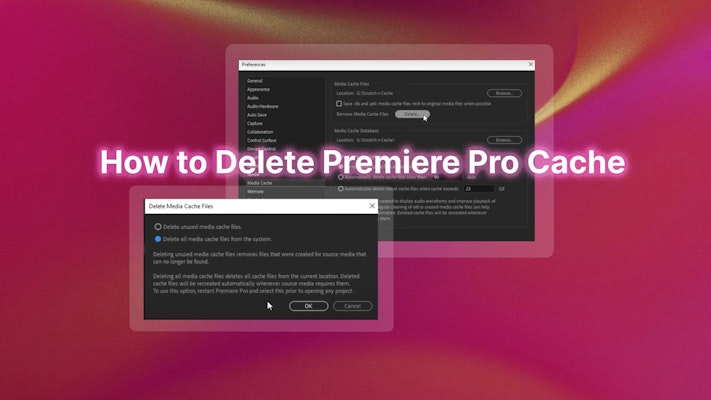
- If you’re on a Mac, simply open up Premiere Pro and go to Premiere > Preferences > Media Cache
- If you’re on a PC, simply go to Edit > Preferences > Media Cache
From here, click the Delete button, and choose one of the options: delete unused media cache data in the current project or delete all media files from the system. If you want more control over how to prevent cache data from building up in the first place, you have a few options for that as well.

Below the Media Cache Management section, you have 3 main options:
- You can set an automatic delete function that deletes cache files older than a certain age. Typically the default is set to delete any cache data older than 90 days, but you can customize it to your liking.
- You can set an automatic maximum data amount that you don’t want your computer to exceed. The default is 10% of the volume size or 95 GB, but you can adjust it to make sure your cache data never builds up past a certain amount of your choosing.
- Finally, you can also set it to never delete automatically and to simply do it yourself by using the Clean Unused button. It is important to note that this applies only to .pek, .cfa, and .ims files within the subdirectory folders.
Once you make your changes, they will take place after quitting and restarting Premiere Pro. Basically, on the next application launch, the system will determine whether the media cache files meet the criteria for deletion and it will begin the process to clear the files 10 minutes after launch.
While we don’t suggest diving into your computer’s file library to delete them manually, that is also an option that is available to you. To know where your cache data files are being stored, simply look at the directory under the top section of Media Cache Files and follow it to your file location. You will need to close Premiere Pro before proceeding. Also, once you have deleted files, don’t forget to also empty the trash in your computer as well.
Delete Media Cache in After Effects
This method is along the same lines in After Effects, but with some differences that are important to note here:
For general disk cache preferences, such as to enable, or disable disk caching (this is useful if disk cache is not enabled by default):
- Edit > Preferences > Media & Disk Cache (Windows)
- After Effects > Preferences > Media & Disk Cache (Mac OS)
Here you can change the location of where your cache data is stored by selecting Choose Folder (Windows) or Choose (Mac OS). Also, you can click on Clean Database & Cache to remove indexed footage files and their database entries from the cache, specifically for which the source file is no longer available.
To delete and clear all the media cache in After Effects, you need to go to Edit > Purge > All Memory & Disk Cache…
Delete Cache Files for Troubleshooting Errors in Premiere Pro
When troubleshooting errors, deleting your files manually with Premiere Pro closed will actually clear all the current media cache files, which will be helpful to resolve your issues. You might also notice a certain amount of delay once you open Premiere Pro again, which is normal as the project files need time to rebuild. Depending on the actual size of your project, you need to plan enough time as some might take all night!
One of the troubleshooting issues you might face in Premiere Pro is lag issues and deleting or clearing your cache files is going to be useful for you to consider. If you happen to also be experiencing playback lag in Premiere Pro, we have loads more tips for you to try out.
We hope you found this tutorial on how to delete or clear cache data in Premiere Pro helpful. If you’re running out of disk space or just want to stay better organized, consider automating this process by adjusting the cache settings. Time to get back to the creative aspects of video editing and eliminate your cache worries!