A glitchy VHS rewind effect is brilliant for highlighting elements of your composition. Rewind effects are often used in sporting content, as they offer an instant replay of vital moments. Still, the retro style can be used across various project types, from music videos and promos to reaction videos and vlogs. This short tutorial will show you how to create the rewind effect in Premiere Pro for your visuals and audio.
Summary
Part 1: Creating a Glitchy VHS Rewind Effect
To create a glitchy VHS look, you’ll need a few assets; the main clip you want to rewind, a VHS overlay, Rewind Sound Effects and music. Fortunately, all of these elements are available at Motion Array.
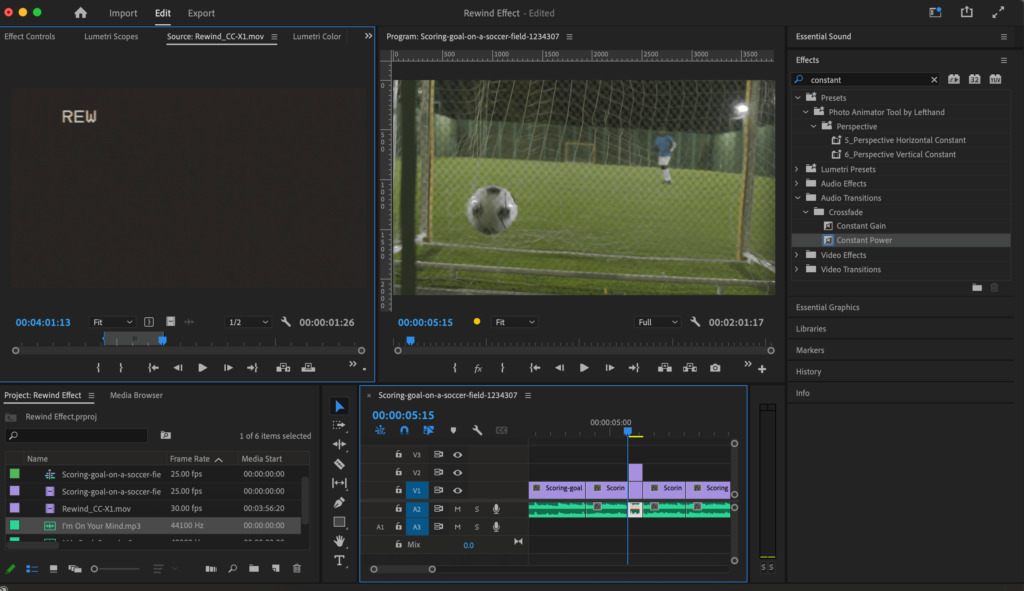
Step 1: Reversing the clip
You can create a reverse section as long or as short as you would like. The key to a high-quality rewind effect is choosing the best part of the clip; the best use of Rewind effects is to highlight action or movement in your story. For this example, we’re using a clip from the Goal Scoring Motion Array collection.
- Place your clip in the timeline and scroll to the section you want to reverse.
- Press C to access the Blade tool and create 2 cuts, separating the rewind section from the rest of the clip.
- Hit V on your keyboard to return to the Arrow tool.
- Grab the end of the clip and move it down the timeline, creating a space at least 3 times the length of your reverse section.
- Highlight the reverse section while holding Alt-drag and drop it along the timeline.
- Create a second duplicate of the rewind section using the same method. You should end up with 5 sections; the start of the clip, 3 reverse sections and the end of the clip.
- Select the middle reverse section and go to Clip > Speed/Duration.
- In the pop-up box, click the Reverse checkboxes and adjust the Speed to 300%; hit Ok to close the panel.
- On the timeline, select the spaces between your clips and hit Delete until your sequence is altogether.
Step 2: Adding the VHS Glitch Effect
So far, the effect looks pretty cool, and there are plenty of compositions you can use this effect in without adding to it. However, we will add a VHS Glitch overlay with the Rewind symbol to sell the effect.
- Import your motion graphic overlay and double-click it in the Project browser.
- In the Media Source Viewer, scroll through your VHS effect to find the section you want to use; hit I and O on your keyboard to set your in and out points.
- Drag the section to the timeline and place it over the rewind clip; trim the length to fit the section exactly.
- Select the clip you’re working with, then go to the Effect Controls panel.
- Find the Blend Mode drop-down and select a setting to suit your overlay and clip; we’re using the Screen Mode.
Part 2: Add Sound Effects for the Full Effect
Audio is vital in editing; even the slightest sound effect can help enhance the viewer’s experience. Adding a rewind audio cue can help sell the effect, creating synchronicity to your visuals and sound.
Using Stock Effects
Stock Effects are a fantastic option for creating a sound design for your videos, and Motion Array has plenty of suitable Rewind and Glitch effects available to download.
- Place your rewind sound effects below the visual effect and trim it to match.
- In the Effect Controls panel, search for Constant Power under Audio Transition.
- Drag the effect to the audio clip.
Rewind Audio Effect
If your composition uses a music track, you can add a cool rewind effect in Premiere Pro to the audio and the visuals. The best thing is you can use the same method; separate the section of music you want to rewind, duplicate it twice and add the Reverse and Speed Effects to match.

Part 3: 5 Rewind Transition Templates for Premiere Pro
1. Rewind VHS Opener
Download Now
The Rewind VHS Opener template is a fantastic intro sequence offering 8 media and 1 logo placeholder. The fun VHS design glitches through your footage with trendy rewind transitions and video recording HUD.
2. Rewind Intro
Download Now
The Rewind Intro template includes 17 media placeholders with 1 customizable title and logo element. The speedy movement offers plenty of room for your images and video clips, ideal for showreels and slideshows.
3. Rewind Opener
Download Now
The rewind opener is ideal for showreels, presentations, and promos, with 19 media, 13 titles, and 1 logo placeholder. The graphical flourishes offer a bright flash of color over the fun, glitching transitions and rewind effect.
4. Rewind Short Intro
Download Now
As you might have guessed, the Rewind Short Intro template is a shorter version of the Rewind Intro, featuring 9 fast-moving media placeholders. The dynamic animation and bold color palette will grab your viewer’s attention.
5. VHS Time Effects Transitions
Download Now
The VHS Time Effects Transitions Pack includes 8 presets for adding the retro style to your videos. Along with a stunning Rewind preset, the toolkit also consists of a simple pause effect and a fun fast-forward style.
Whether using rewind effects in traditional sports videos or adding a unique flourish to your story’s content, the retro feel is always fun and stylish. With these techniques, you can create various effects, including Fast Forward and Pause. Now that you know how to create rewind effects in Premiere Pro, give this incredible Glitch Loop effect a try.