


Final Cut Pro audio editing isn’t difficult–all the tools you need are already built into the program. Right out of the box, you can adjust levels, add effects, remove noise, enhance voiceovers, and much more! There’s also a whole world of 3rd party plugins you can download and easily use from right inside Final Cut.
Below, we’ll cover all the basic audio controls and where they’re located in Final Cut Pro. Then we’ll walk you through the most common audio editing tasks so that you can learn the workflow.
Summary
Part 1: Basics Audio Editing Controls in Final Cut Pro
Before diving into all the most common audio editing tasks, you might want to first familiarize yourself with the layout of Final Cut, as well as the fundamental roles that audio plays in a video composition. Once you learn these, the walkthroughs in part 2 will be a breeze.
Audio Controls
If you’re just getting started editing in Final Cut Pro, you may be wondering where to find the audio controls. Truth is they’re not all in one place, so it’s worth taking some time to learn about the different locations you can modify the sound in your project.
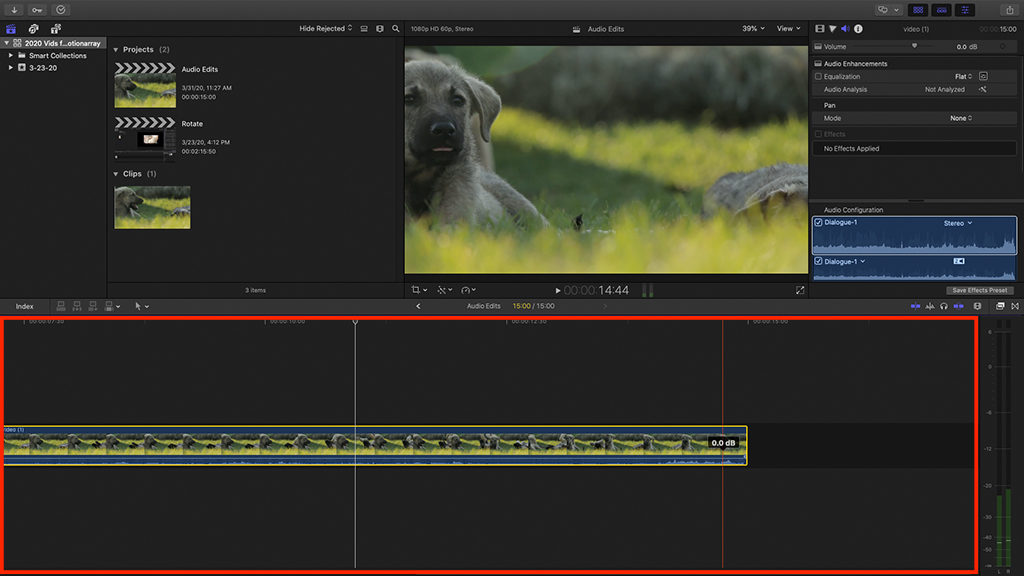
The Timeline is the large area toward the bottom of the screen, which is where all your clips are arranged in your project. Below each clip, you should see an audio waveform for the clip’s sound. Above that audio waveform is a line you can drag up and down to adjust the volume. At either edge of every clip, you can find Fade Handles which allow you to audio fade at the beginning or end of any clip.
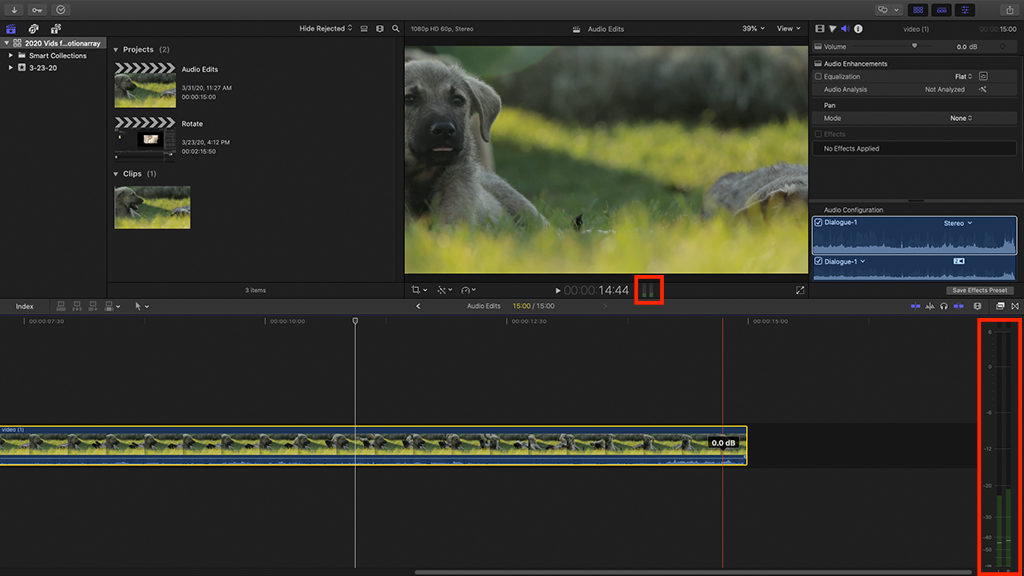
Above the Timeline and just below the Viewer, you can see a small Audio Meter, which is used to keep track of your audio levels throughout the project. If you click on this small Audio Meter, a larger one will open to the right of your Timeline–much easier to see. Always try to keep your levels below 0 dB or your audio will be distorted when you export. The Audio Meter is color-coded, so if you ever see it become red, you know that the levels need to be brought down.
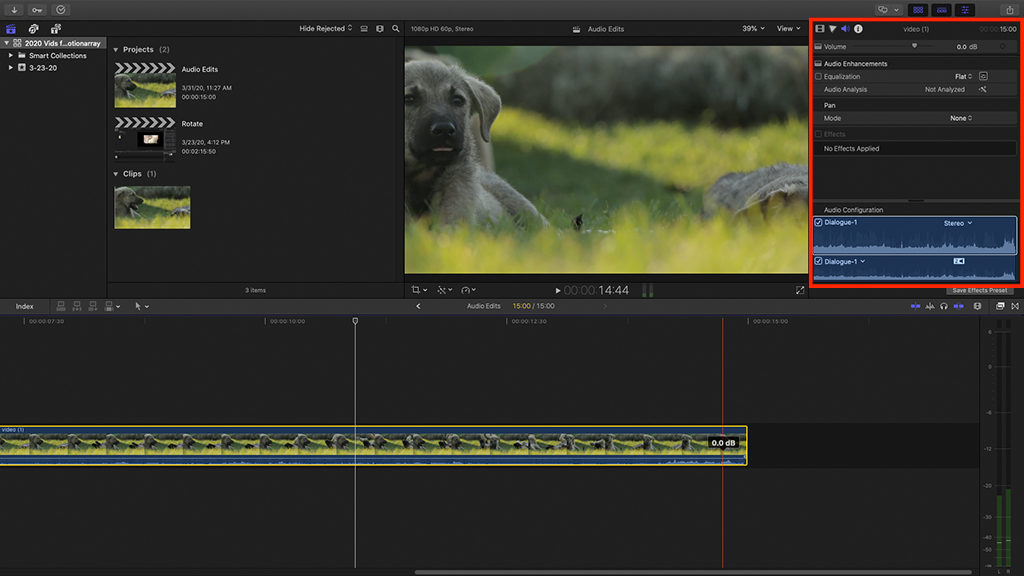
If you select a clip in the Timeline, you can then open the Audio Inspector by clicking the speaker icon towards the top right above the Inspector panel. Here, you can adjust the clip’s volume, equalization, and modify any Audio Effects you’ve added to the clip.
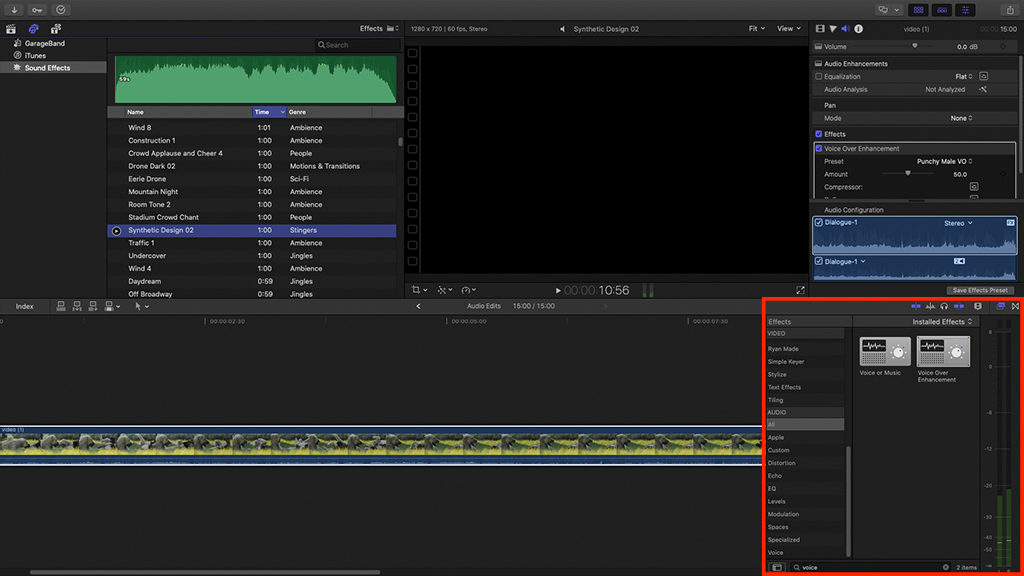
By opening the Effects Panel and scrolling down to the audio section, you can find dozens of built-in audio effects that can be dragged onto clips in the Timeline. These audio effects cover a wide variety of different sounds you may wish to achieve. Everything from simulating the reverb of a large hall, to making someone’s voice sound like a robot!
Audio Roles
Generally, there are 3 types of sound you will use in your productions: voice, music, and sound effects. Understanding how to combine these together to create an engrossing aural experience for your audience is the mark of a pro video editor.
- Dialogue or Voiceover is the main focal point of your video’s soundscape, so it should be markedly louder than any competing sounds. The Voice Over Enhancement effect is a great way to make your voiceover pop.
- Music is a great way to liven up any video, especially compositions without important voiceover or dialogue. If you’d like to add background music under dialogue, make sure to turn down the volume: like 20% as loud as your voice track.
- Sound effects double the impact of actions in your video by hitting viewers with 2 senses instead of just 1. You can find a huge selection of searchable sound effects in the Photos and Audio Sidebar in the Sound Effects category.
Part 2: Basic Audio Editing Workflow
Now that you’ve familiarized yourself with all the basic audio controls and the roles that sound should play in your videos, it’s time to put those tools to work! Below are short tutorials for the most common audio editing tasks you’ll need to do in Final Cut.
How to Adjust Volume
There are 2 ways to adjust volume, and we’ll cover them both below. You’ll also be adding 2 keyframes in order to smoothly increase volume across a video clip. Once you learn how to use keyframes, they can be used for just about any audio property you’d like to change.
- If you haven’t already, create a Project and add your clips to the Timeline.
- Below each clip, you should see an audio waveform. If you don’t, click the Clip Appearance button above your timeline to the right. Then choose a clip appearance with a white bar on the bottom, to add the waveform to your clips in the Timeline.
- Above the waveform, you should see a horizontal line. Drag it up to increase the volume of your clips, and down to decrease it.
- Open the Audio Inspector by clicking the speaker icon above the inspector, to the top right of your screen.
- Create a keyframe in the Volume control by clicking the dark diamond to the right.
- Now move the Playhead forward in the Timeline, and create another volume keyframe.
- Increase the volume in the Audio Inspector. Final Cut Pro will automatically interpolate between your first and 2nd keyframes, creating a smooth increase in volume between them.
How to use the FCPX Music and Sound Browser
Final Cut Pro comes with an extensive library of royalty-free sound effects and jingles for your videos. These effects include everything from car ignition, door closing, and ambient forest noise.
- Towards the top left of the screen, open the Photos and Audio Sidebar by clicking the camera & music icon.
- On the left side, choose Sound Effects.
- Scroll through the list or type in what you’re looking for in the search bar above. If you’re looking for music, type in Jingles.
- You can preview any sound by clicking the play button to the left of its name.
- When you find what you’re looking for, drag it down to the Timeline to add it to your project.
How to Apply Fades to your Sound Clips
Fades are a common way to begin and end a video, or scene–especially if there is a lot of ambient noise. They create a nice smooth transition for the viewer’s ear as they adjust to the audio profile of the new scene.
- Select your clip by clicking it in the Timeline.
- Go to the top menu bar and select Modify.
- Find Adjust Volume on the menu. You can select Apply Fades to apply both fade-in and fade-out to your selected clip.
- You can manually adjust fades by dragging the Fade Handles at the beginning or end of any clips in the Timeline.
One extra cool tip for fades: they happen automatically if you use Transitions! So if you’re planning on adding some visual transitions to your video, don’t worry about the audio.
How to do Basic EQ in Final Cut
Too much bass from the wind? Or maybe there’s a shrill noise from nearby machinery. Equalization is how you fix the audio profile of your sound, by adding filters at different frequencies, and there are a lot of great presets already built into Final Cut.
- Select your clip in the Timeline, and open the Audio Inspector.
- Under Audio Enhancements find Equalization, and click the drop-down menu to the right.
- You can choose from a variety of profiles like Music Enhance, Bass Enhance, Hum Reduction. Once you select one, it will be applied to your clip.
- If you’d like to customize the EQ yourself, click the mixer icon to the right to open the Graphic Equalizer, where you can adjust the volume of each frequency individually.
Using the Audio Analysis Tool to Automatically Improve Audio
Final Cut Pro comes with a fantastic one-touch Audio Analysis tool that automatically fixes loudness, noise, and hum. It’s simple to use, very powerful, and unique to Final Cut–so it’s definitely worth learning!
- Select your clip in the Timeline and open the Audio Inspector.
- Under Audio Enhancements click the magic wand to the right of Audio Analysis.
- It may take Final Cut a few seconds to process your audio enhancements. After it’s done click Show to view the different enhancement controls.
- You can adjust the sliders under Loudness, Noise Removal, and Hum Removal if you want, although Final Cut Pro has already set these properties automatically.
Adding Audio Effects to your Clips
You’re probably familiar with the Effects Browser which is loaded with tons of cool filters for your videos. But you might not be aware that the Effects Browser is also home to a host of audio effects that can dynamically change the sound profile of your videos. Here’s how to use them.
- Open the Effects Browser by clicking the icon on the right side.
- Scroll down the left panel until you find the audio section, and select All.
- Search through the audio effects until you find one you’d like to use, then drag it to your clip on the Timeline to add it. Some useful effects are Adaptive Limiter, Compressor, Denoiser, Limiter, and Noise Gate.
- If you’d like to modify the settings, open the Audio Inspector and scroll down to find the effect’s controls.
Audio effects open up an entire world of possibilities for your audio tracks in Final Cut Pro. One cool trick you might want to try is layering them on top of each other by adding multiple audio effects to the same clip. You can also rearrange their order in the Audio Inspector to achieve different effects.
Using 3rd Party Plugins
Once you’ve learned how to use audio effects in Final Cut Pro, you’ve already got all the skills you need to use 3rd party plugins. Once you download them, plugins will appear inside the effects browser right next to your built-in audio effects, and they work the same way!
Now that you’ve learned all the fundamentals for editing audio in Final Cut Pro, you’re ready to take any project from source footage to fully mastered composition. You’ve learned the basic controls and essential roles that audio plays. You’ve also learned workflows for all the most common audio editing tasks in Final Cut Pro, so you should be set!
Grow your audio editing skills further with our other tutorial on how to fade audio in Final Cut Pro.


