


When you’re working with multiple cameras and multiple audio outputs, the amount of data you find yourself working within post-production can often seem overwhelming. But with the right multicam editing tools currently available in the new Davinci Resolve 17 update, this seemingly complicated workflow can now be significantly reduced.
Here are some useful tips and tricks to help you make the most of the multicam tools available in Multicam Editing Davinci Resolve. Following this, we’ll show you the two best ways to use and sync Multicam using the Edit and Cut tabs. By the end, we guarantee that you’ll be able to work with a multitude of cameras and audio outputs!
Summary
Part 1: General Tips & Tricks for Multicam Editing
- Make sure all your cameras have the same frame rate while shooting.
- Make sure each camera’s audio is adjusted to a good audio level; use a lav mic as needed.
- To sync up your audio while shooting, use an audio/visual cue such as a clapper board or an on-camera clap to spike the audio on all your recording devices. This will make it easier to sync your audio with your footage in post.
- If the audio files do not line up, right-click on your multicam footage and select Open in Timeline and then find the spot you can align the audio and video files accordingly.
- You can also utilize Audio Sync, a built-in tool available in Davinci Resolve, which we will run through in steps below.
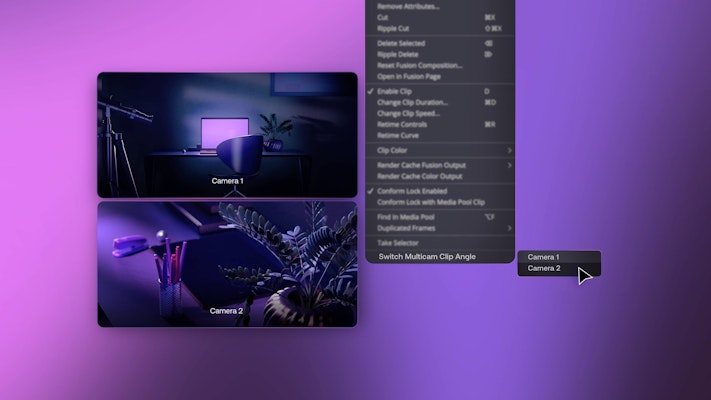
- If you need to change the angle you chose, right-click on the clip you want to change, select Switch Multicam Angle Clip > select one of the other camera angles.
Part 2: 2 Different Ways to Use Multicam Editing in DaVinci Resolve
Step 1: Multicam Editing Using the Cut Tab
- Sync files using Audio. You can choose to sync using Timecodes (which you would have had to set up in-camera while shooting), Audio, or by using common In and Out points. Save Sync when done.
- In the Media Pool, you will see the files, select a section of your main clip and click on Append to move it to the timeline.
- Go through your footage to where you want to add another angle – maybe of your character looking in another direction while talking.
- Go to the Sync Bin, select the new angle you want to use.
- Select the Place on Top tab just above the timeline on the left, and this will drop your alternative angle in the right spot in the timeline.
- Replay everything back to see it has synced correctly and don’t forget to Unmute the clip with the unwanted audio, so you have only your main audio source.
Step 2: Multicam Editing Using the Edit Tab
- Highlight your files and Right-click to Create a new Multicam Clip using selected clips
- Select Angle Sync > Sound in the pop-up. This will enable all your clips to be synced up with their accompanying audio outputs.
- Angle Name > Metadata (Camera is what we would recommend)
- Drag the new file into the timeline.
- Make sure you change the right side view to Dual (by the Inspector) and the left side view to Multicam.
- Right-click your file in the timeline and hit Switch Multicam Clip Angle > choose the clip you want to match the main audio (you can also use this option for audio if you have more than one recording).
- Make sure you have the Film Strip view set if you only need to edit the video and not the audio.
- In the Multicam window, you can now click on every angle you want to use while playing back your footage simultaneously. Make sure to play everything back and ensure the audio is still matching.
Now you will be able to explore the many useful elements to sync up your multiple angles and audio in post-production. We hoped you enjoyed this Davinci Resolve Multicam tutorial. If you are interested in learning more – make sure to check out all our other tutorials available for Davinci Resolve, Premiere Pro, After Effects, and many more!


